Onboarding a Printer
Add a new 3D printer to FilaOps — from physical installation through your first tracked production order.
This workflow walks you through every step, in order. By the end, the printer exists in FilaOps, belongs to a work center, and appears in production scheduling.
Concepts: two registries, one printer
FilaOps keeps two separate records for each physical machine:
| Record | Where it lives | What it does |
|---|---|---|
| Printer | Printers page | Network identity, status polling, maintenance history |
| Resource | Work Centers & Routings page | Scheduling capacity — how many hours/day this machine contributes to a work center |
You must create both and link them for the printer to receive scheduled production orders. The Printer record is the "hardware identity"; the Resource record is the "scheduling slot."
What is a work center?
A work center is a logical group of machines that share a capacity budget, hourly rate, and scheduling priority — for example, "FDM Printer Pool." Production routing operations are assigned to work centers, not individual printers. Machines inside the work center receive the actual jobs.
The flow
graph TD
    A[Physical setup] --> B[Create / confirm work center]
    B --> C[Register printer — Printers page]
    C --> D[Add as resource — Work Centers & Routings page]
    D --> E[Test connection]
    E --> F[First production order]
Step 1: Physical setup
Before touching FilaOps, verify the hardware is ready:
- Assemble and level the printer per the manufacturer's instructions.
- Run the manufacturer's test print to confirm the hardware is working.
- Connect the printer to your facility network (Ethernet or Wi-Fi) and note the IP address.
Use a static IP address
Assign a static IP — either on the printer itself or via a DHCP reservation in your router. FilaOps identifies printers by IP address, so a changing address will break status polling after a power cycle.
Step 2: Create (or confirm) a work center
Every printer must be placed inside a work center before it can receive scheduled work. If a suitable work center already exists, skip to Step 3.
Where: Work Centers & Routings in the sidebar.
- Click + New Work Center.
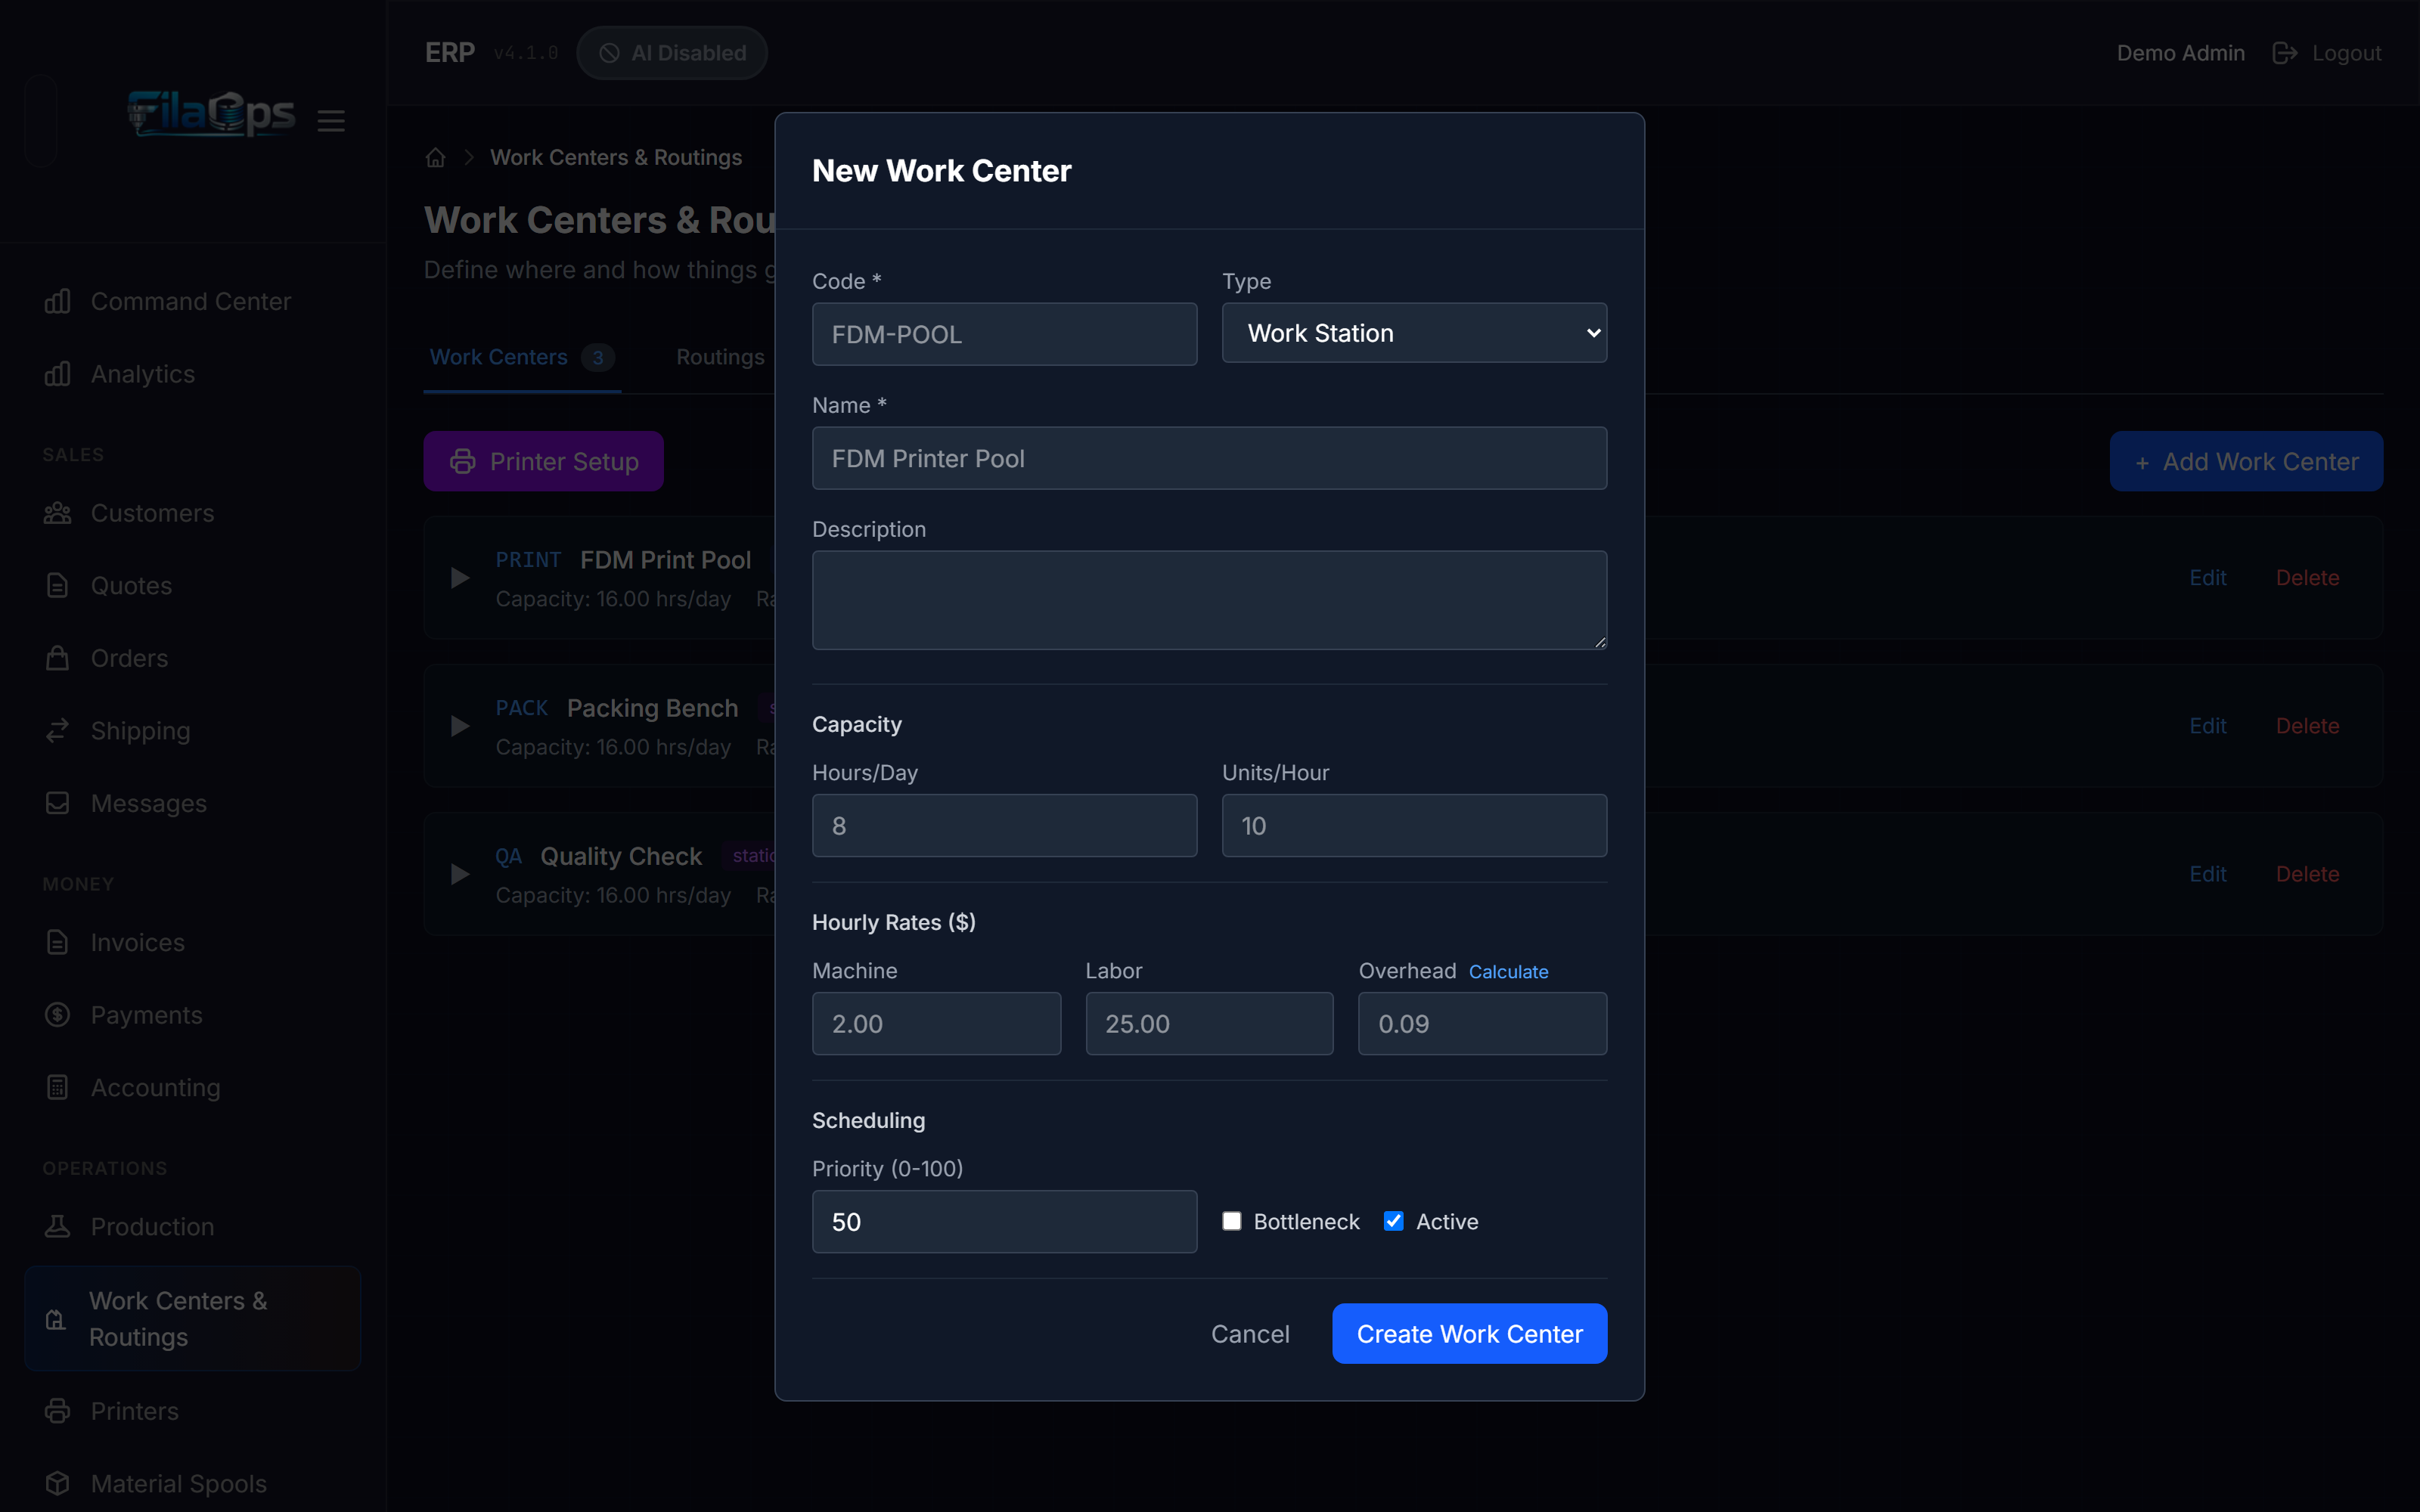
- Fill in the form:
| Field | Notes |
|---|---|
| Code | Short all-caps identifier — e.g., FDM-POOL |
| Name | Human-readable — e.g., "FDM Printer Pool" |
| Type | Select Machine Pool for a group of printers |
| Hours/Day | Total capacity (can exceed 24 for multiple machines — e.g., 5 printers × 20 hrs = 100) |
| Machine rate/hr | Optional: depreciation cost per hour |
| Labor rate/hr | Optional: operator cost per hour |
| Overhead rate/hr | Optional: use Calculate to derive from printer cost, lifespan, electricity, and maintenance |
- Click Create Work Center.
Overhead calculator
The Calculate link next to the Overhead field opens a built-in calculator. Enter printer cost, expected lifespan in years, hours/day, electricity rate ($/kWh), wattage, and annual maintenance cost — FilaOps computes the overhead rate and pre-fills the field.
Step 3: Register the printer
Where: Printers in the sidebar, then click Add Printer.
- Click Add Printer (top-right of the page).
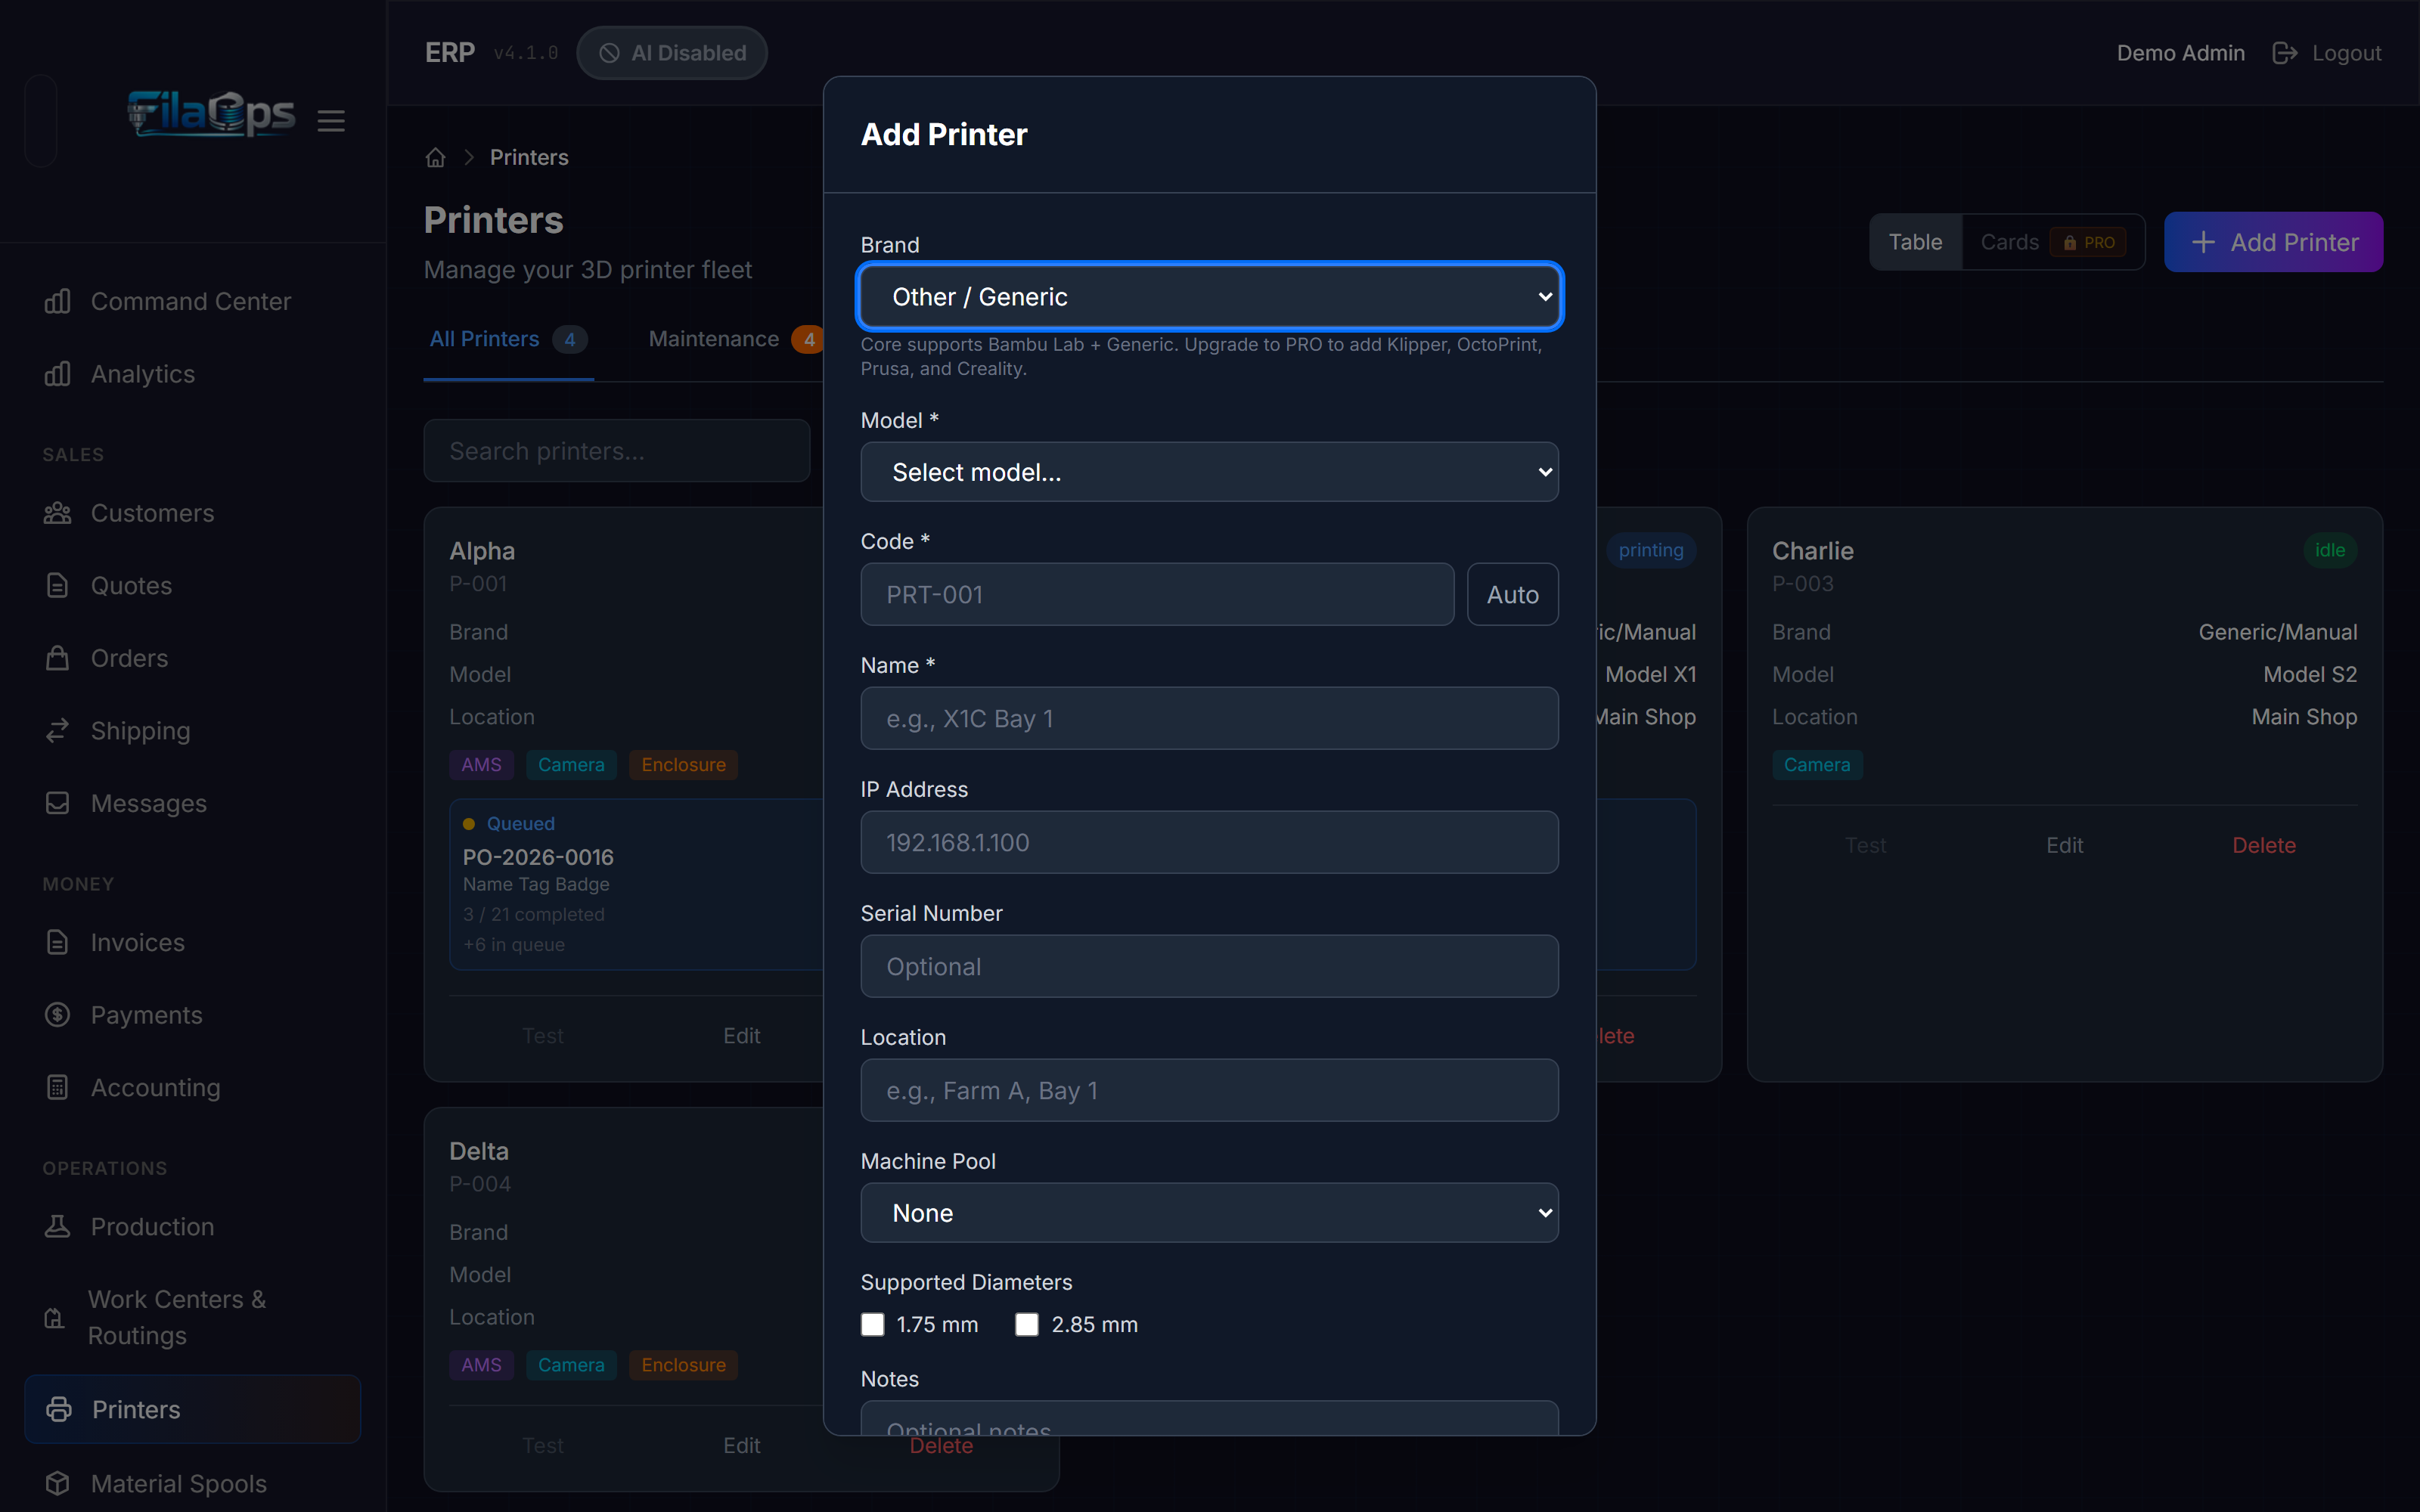
- Fill in the form:
| Field | Required | Notes |
|---|---|---|
| Brand | Yes | BambuLab or Generic/Manual on Core tier. (Klipper, OctoPrint, Prusa, Creality require PRO.) |
| Model | Yes | Select from the dropdown (BambuLab) or type a model name (Generic) |
| Code | Yes | Unique identifier — e.g., PRT-001. Click Auto to generate the next sequential code. |
| Name | Yes | Human-readable label — e.g., "X1C Bay 1" |
| IP Address | Recommended | Required for connection testing and status polling |
| LAN Access Code | BambuLab only | 8-digit code from the printer's network settings |
| Serial Number | No | Helps deduplicate during network discovery |
| Location | No | Physical description — e.g., "Farm A, Bay 3" |
| Machine Pool | No | Assign to a work center now, or do it later from Work Centers & Routings |
| Supported Diameters | No | Check 1.75 mm and/or 2.85 mm as applicable |
| Notes | No | Firmware version, quirks, or other notes |
- Click Add Printer.
Use this when you know the IP address but do not want to type all details manually.
Where: Printers > Network Discovery tab > Find Printer by IP section.
- Enter the printer's IP address and click Probe.
- FilaOps checks common ports (8883 for BambuLab MQTT, 7125 for Klipper/Moonraker, 5000 for OctoPrint, 80/443 for HTTP) and reports what it detects.
- If a printer is detected and not yet registered, the discovered details are passed to the Add Printer dialog, pre-filling the brand, suggested name, and IP address.
- Adjust any fields as needed and click Add Printer.
Network scan vs. IP probe
The Try Network Scan button (also on the Network Discovery tab) uses SSDP/mDNS broadcast discovery. It does not work reliably when FilaOps is running inside Docker. Use Find Printer by IP instead — it works from any deployment.
For commissioning a large fleet at once, use the CSV Import tab.
Where: Printers > CSV Import tab.
Prepare a CSV with the following columns (header row required):
Example rows:
PRT-001,X1C-Bay1,X1 Carbon,bambulab,ABC123,192.168.1.100,Farm A,Bay 1
PRT-002,P1S-Bay2,P1S,bambulab,DEF456,192.168.1.101,Farm A,Bay 2
PRT-003,Ender-01,Ender 3 V2,generic,,192.168.1.150,Farm B,
Paste the CSV into the text area, then click Import Printers. Results show imported count, skipped duplicates, and per-row errors.
Brand values in CSV
Use bambulab or generic in the brand column on Core. Unknown values fall back to generic. Rows with a code that already exists are skipped automatically.
Community tier printer limit
The Community tier supports up to 4 active printers when licensing is enabled. Licensing is off by default on self-hosted installs, giving unlimited printers. If you hit the limit, FilaOps shows an upgrade prompt.
Step 4: Add the printer as a resource in the work center
Registering the printer on the Printers page creates its hardware identity. To make it schedulable, you must also add it as a Resource inside the work center.
Where: Work Centers & Routings in the sidebar > click the work center card > Add Resource.
- Open your work center (e.g., "FDM Printer Pool").
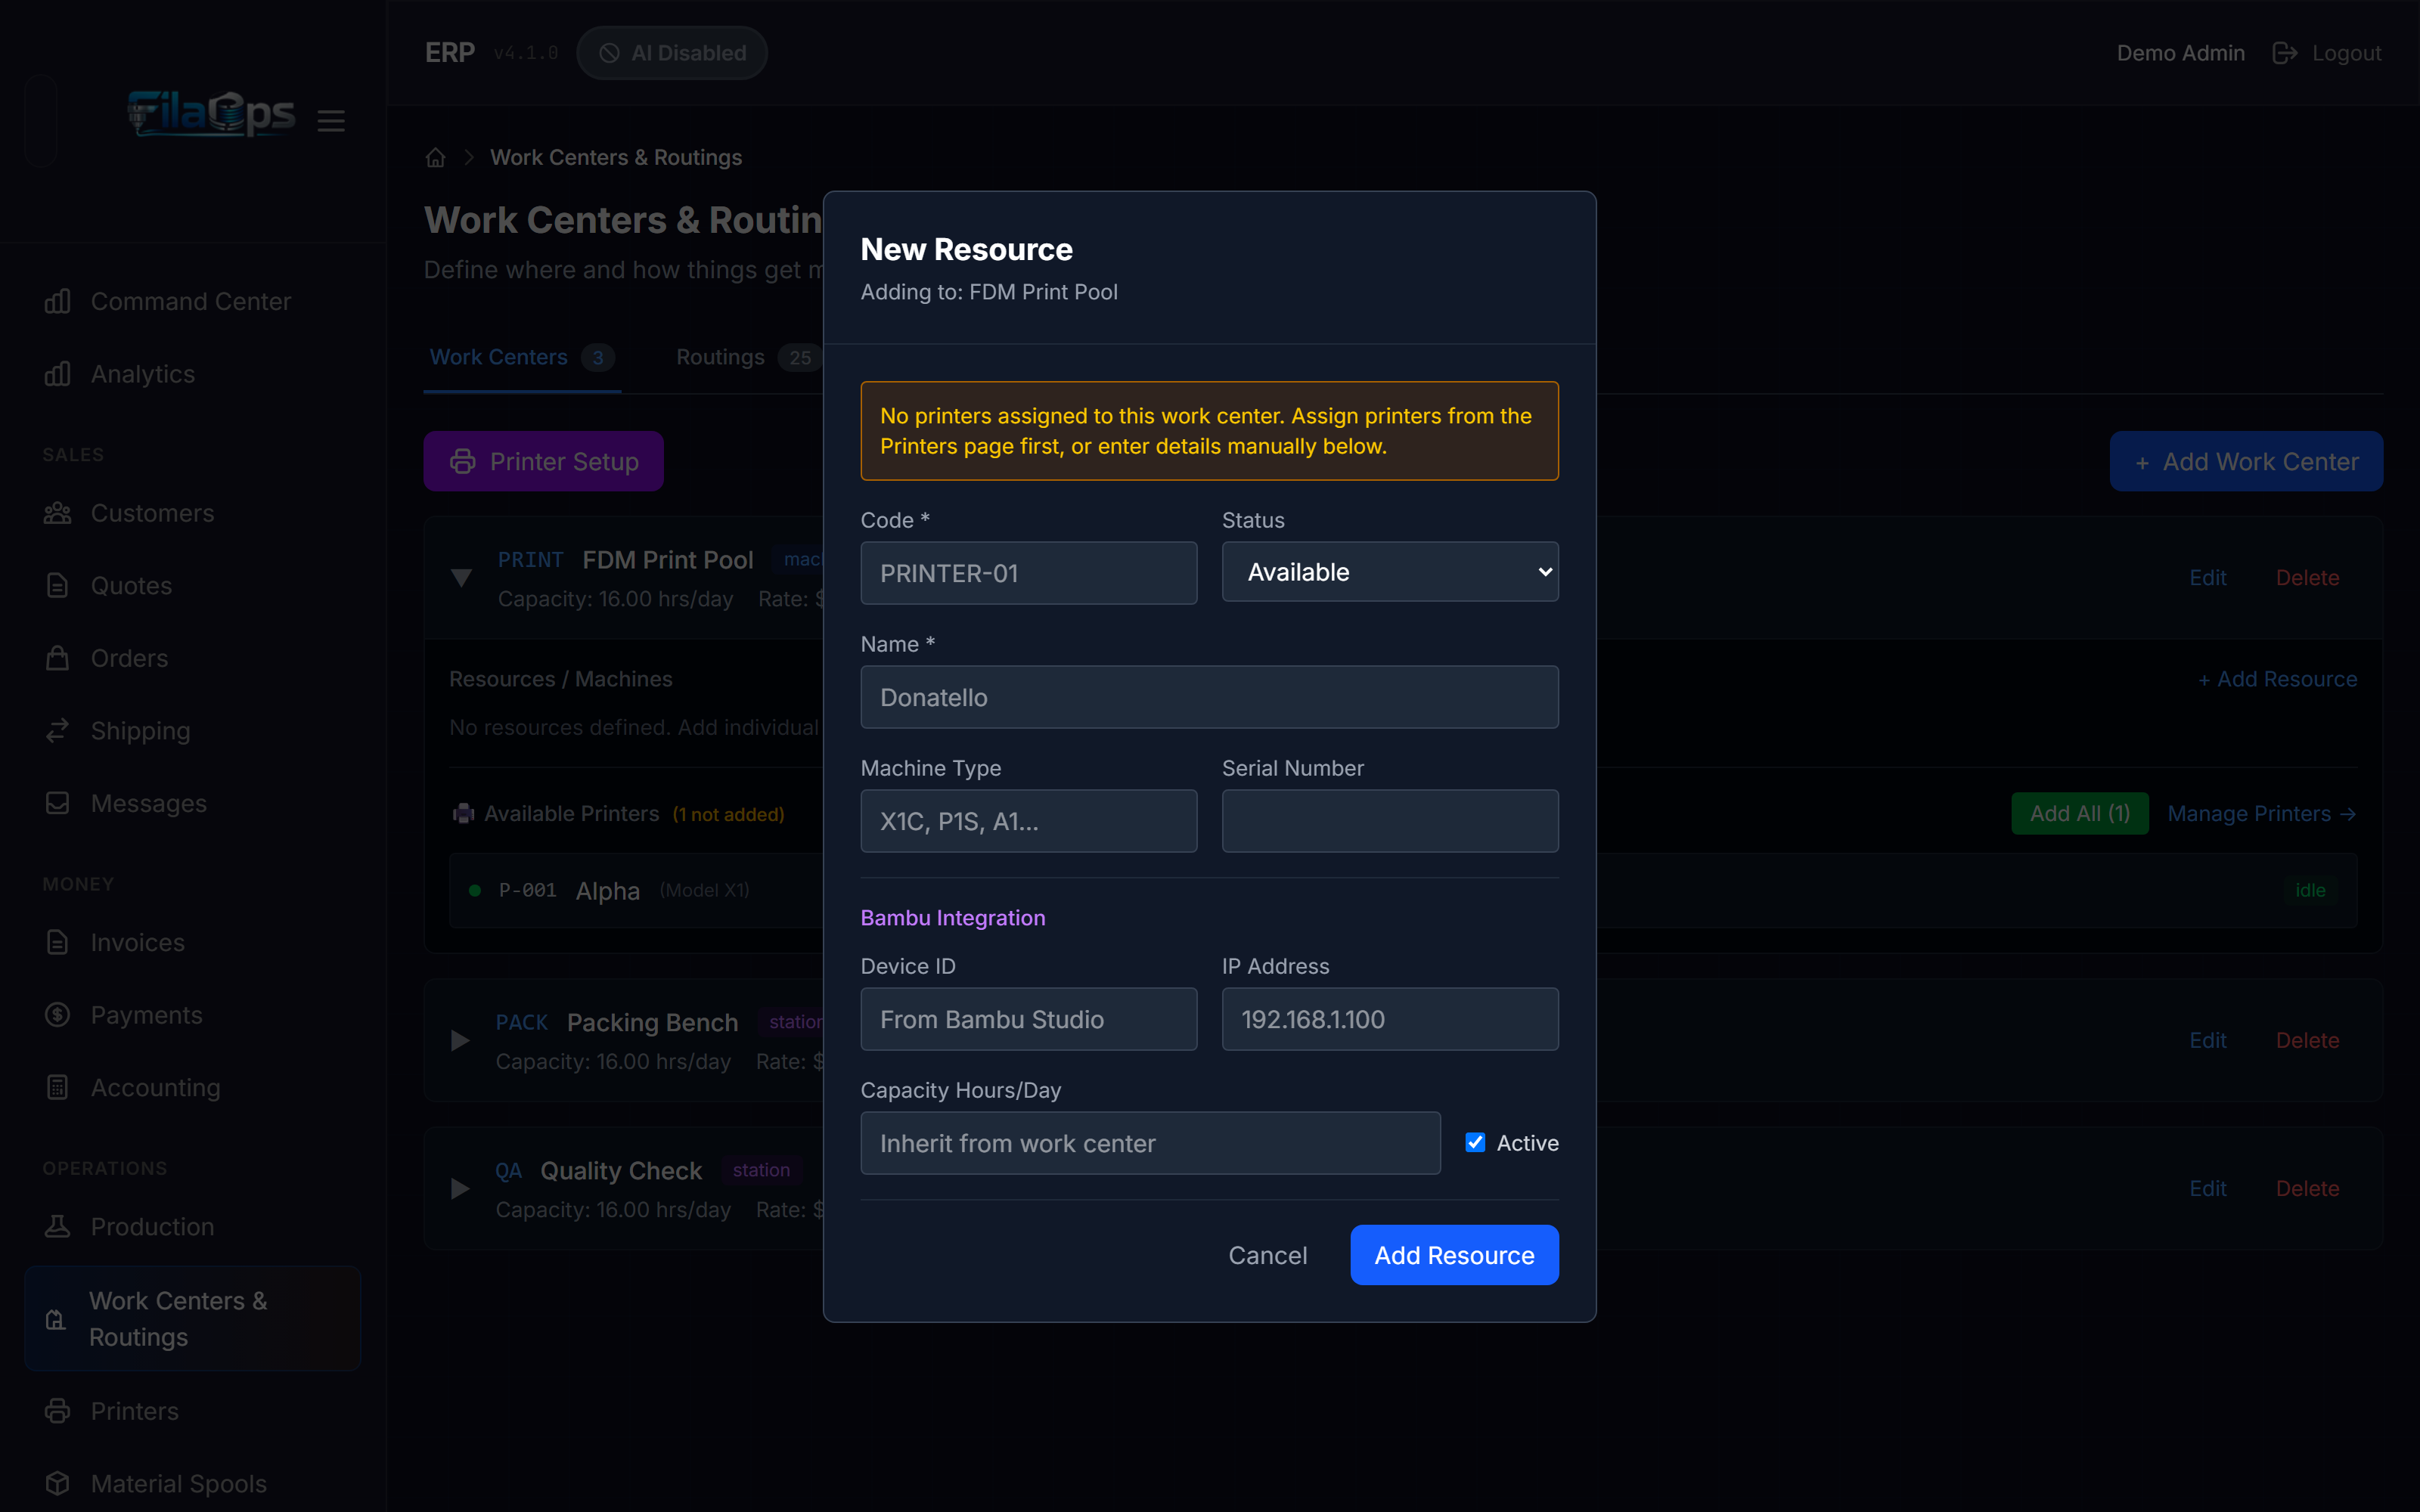
- Click Add Resource.
- If the printer you registered in Step 3 has its Machine Pool field set to this work center, a Quick Add from Assigned Printer dropdown appears at the top of the form. Select the printer to auto-fill all fields.
- Otherwise fill in manually:
| Field | Notes |
|---|---|
| Code | Unique within the work center — e.g., PRINTER-01 |
| Name | Display name for this resource — e.g., "Donatello" |
| Machine Type | Model shorthand — e.g., X1C, P1S, A1 |
| Serial Number | Optional; cross-references the hardware record |
| Status | Start at Available |
| Capacity Hours/Day | Leave blank to inherit from the work center, or set a per-machine override |
- Click Add Resource.
Linking shortcut
You can link a printer to a work center from the Add Printer / Edit Printer form by setting the Machine Pool dropdown. Once linked, the resource Quick Add dropdown in the work center will offer it automatically.
Step 5: Test the connection
Verifying connectivity confirms FilaOps can reach the printer for status polling.
Where: Printers > All Printers tab.
- Find the printer card. Click Test at the bottom of the card. — or — Click Test All (top-right of the page) to ping every printer that has an IP address at once.
- A successful test shows a toast such as
X1C Bay 1: Connected! (42ms)and updates the printer's status toidle. - If the test fails, use this table to diagnose:
| Symptom | Likely cause |
|---|---|
| No response / timeout | Printer powered off, wrong IP address, or firewall blocking access |
Connection refused | Correct IP but wrong port, or printer API not enabled |
| BambuLab fails despite correct IP | LAN-only mode not enabled on the printer, or LAN Access Code incorrect |
The printer's status remains offline until a successful test or until the printer itself sends a status update.
Step 6: Run the first production order
The printer is now registered, placed in a work center, and confirmed reachable. It is ready to receive scheduled work.
- Create a production order for a product whose routing includes at least one operation assigned to this work center. (Production > + New Order)
- Release the order. FilaOps generates the operation queue for the work center.
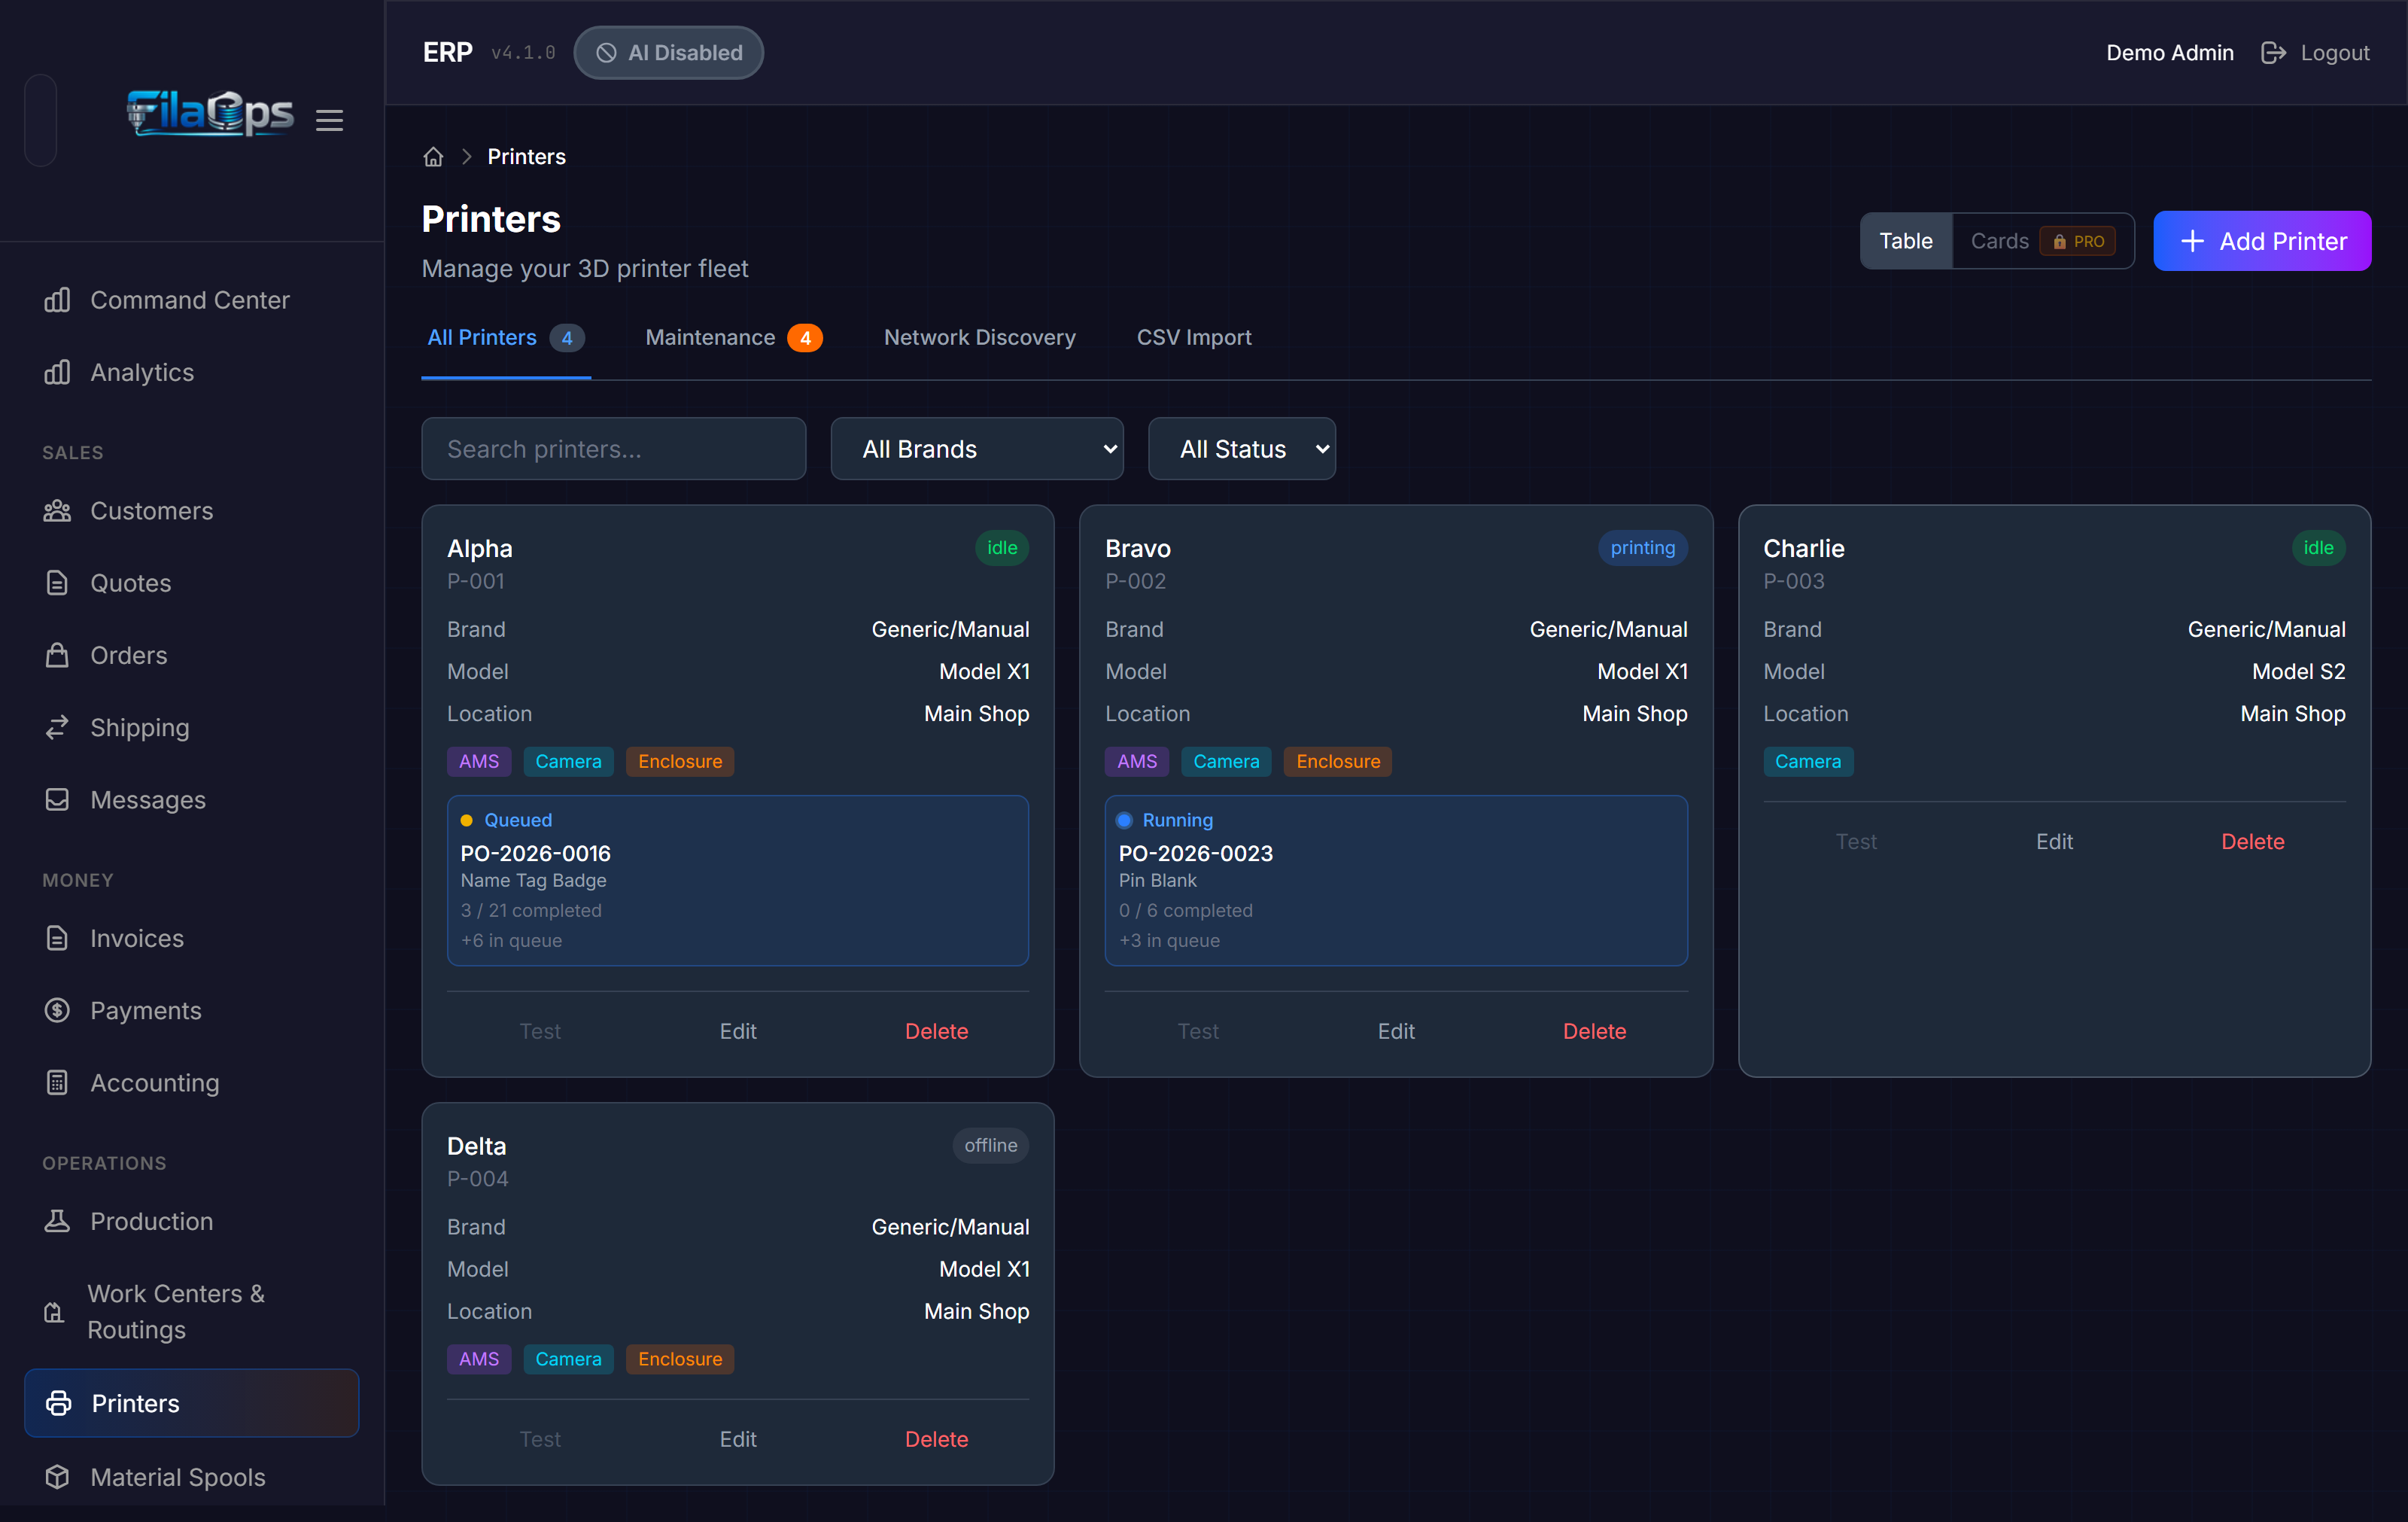
- On the Printers page, the printer card shows the queued operation in an Active Work block at the bottom of the card:
- Production order code and product name
- Operation status: Queued (solid yellow dot) or Running (pulsing blue dot)
- Completed / ordered quantity
- Count of additional jobs waiting in queue
- When the physical print finishes, mark the operation complete from the production order detail page (Production > click the order > complete the operation).
Scheduling-based tracking, not live telemetry
The Active Work block reflects what is scheduled on the work center, polled every 30 seconds. It shows assigned jobs, not a live feed from the printer hardware. Manual operation completion is always accurate. MQTT-based live telemetry requires additional hardware integration beyond Core.
Initial maintenance log
Log the installation as a maintenance event immediately. This establishes a baseline so future service intervals are calculated correctly.
Where: Printers > Maintenance tab > Log Maintenance.
- Maintenance Type:
routine - Description: "Initial install"
- Date: today
Future scheduled outages (e.g., a planned nozzle swap) can be booked with Schedule Window on the same tab.
Onboarding checklist
- [ ] Printer assembled; manufacturer test print completed
- [ ] Static IP assigned; IP noted and recorded
- [ ] Work center exists with type Machine Pool
- [ ] Printer registered on the Printers page (Brand, Model, Code, Name, IP Address)
- [ ] For BambuLab: LAN Access Code entered
- [ ] Printer linked to the correct Machine Pool (in the Printer form)
- [ ] Resource added inside the work center (Work Centers & Routings > Add Resource)
- [ ] Connection test passed — printer shows
idlestatus - [ ] Installation logged on the Maintenance tab
- [ ] First production order created and visible in Active Work on the printer card
What's next?
- Monitoring Your Printers — day-to-day status monitoring, maintenance tracking, and fleet-wide connection testing
- Running Production — create production orders and advance them through the operation queue
- MRP Planning — plan material needs across your scheduled production orders