New Product Launch
Everything you need to set up a new product in FilaOps Core — from item creation through the first production run.
The Flow
graph TD
A[Design Complete] --> B[Create Item<br/>Inventory > Items]
B --> C[Add Raw Materials<br/>if not in catalog]
C --> D[Define BOM<br/>Inventory > Bill of Materials]
D --> E[Set Up Work Centers<br/>if needed]
E --> F[Create Routing<br/>Operations > Work Centers & Routings]
F --> G[Review Cost & Set Price<br/>Inventory > Items]
G --> H[Test Production Run<br/>Operations > Production]
H --> I{Quality OK?}
I -->|Yes| J[Product Ready for Orders]
I -->|No| K[Adjust BOM / Routing]
K --> H
J --> L[Check Buy List<br/>Purchasing > Buy List]One-time vs. per-product setup
Work Centers (printers, assembly stations, etc.) are set up once per shop. If your shop is already configured, skip to Step 3.
Step 1: Create the Item
Add the finished product to your item catalog.
Where: Inventory > Items, then click + New Item
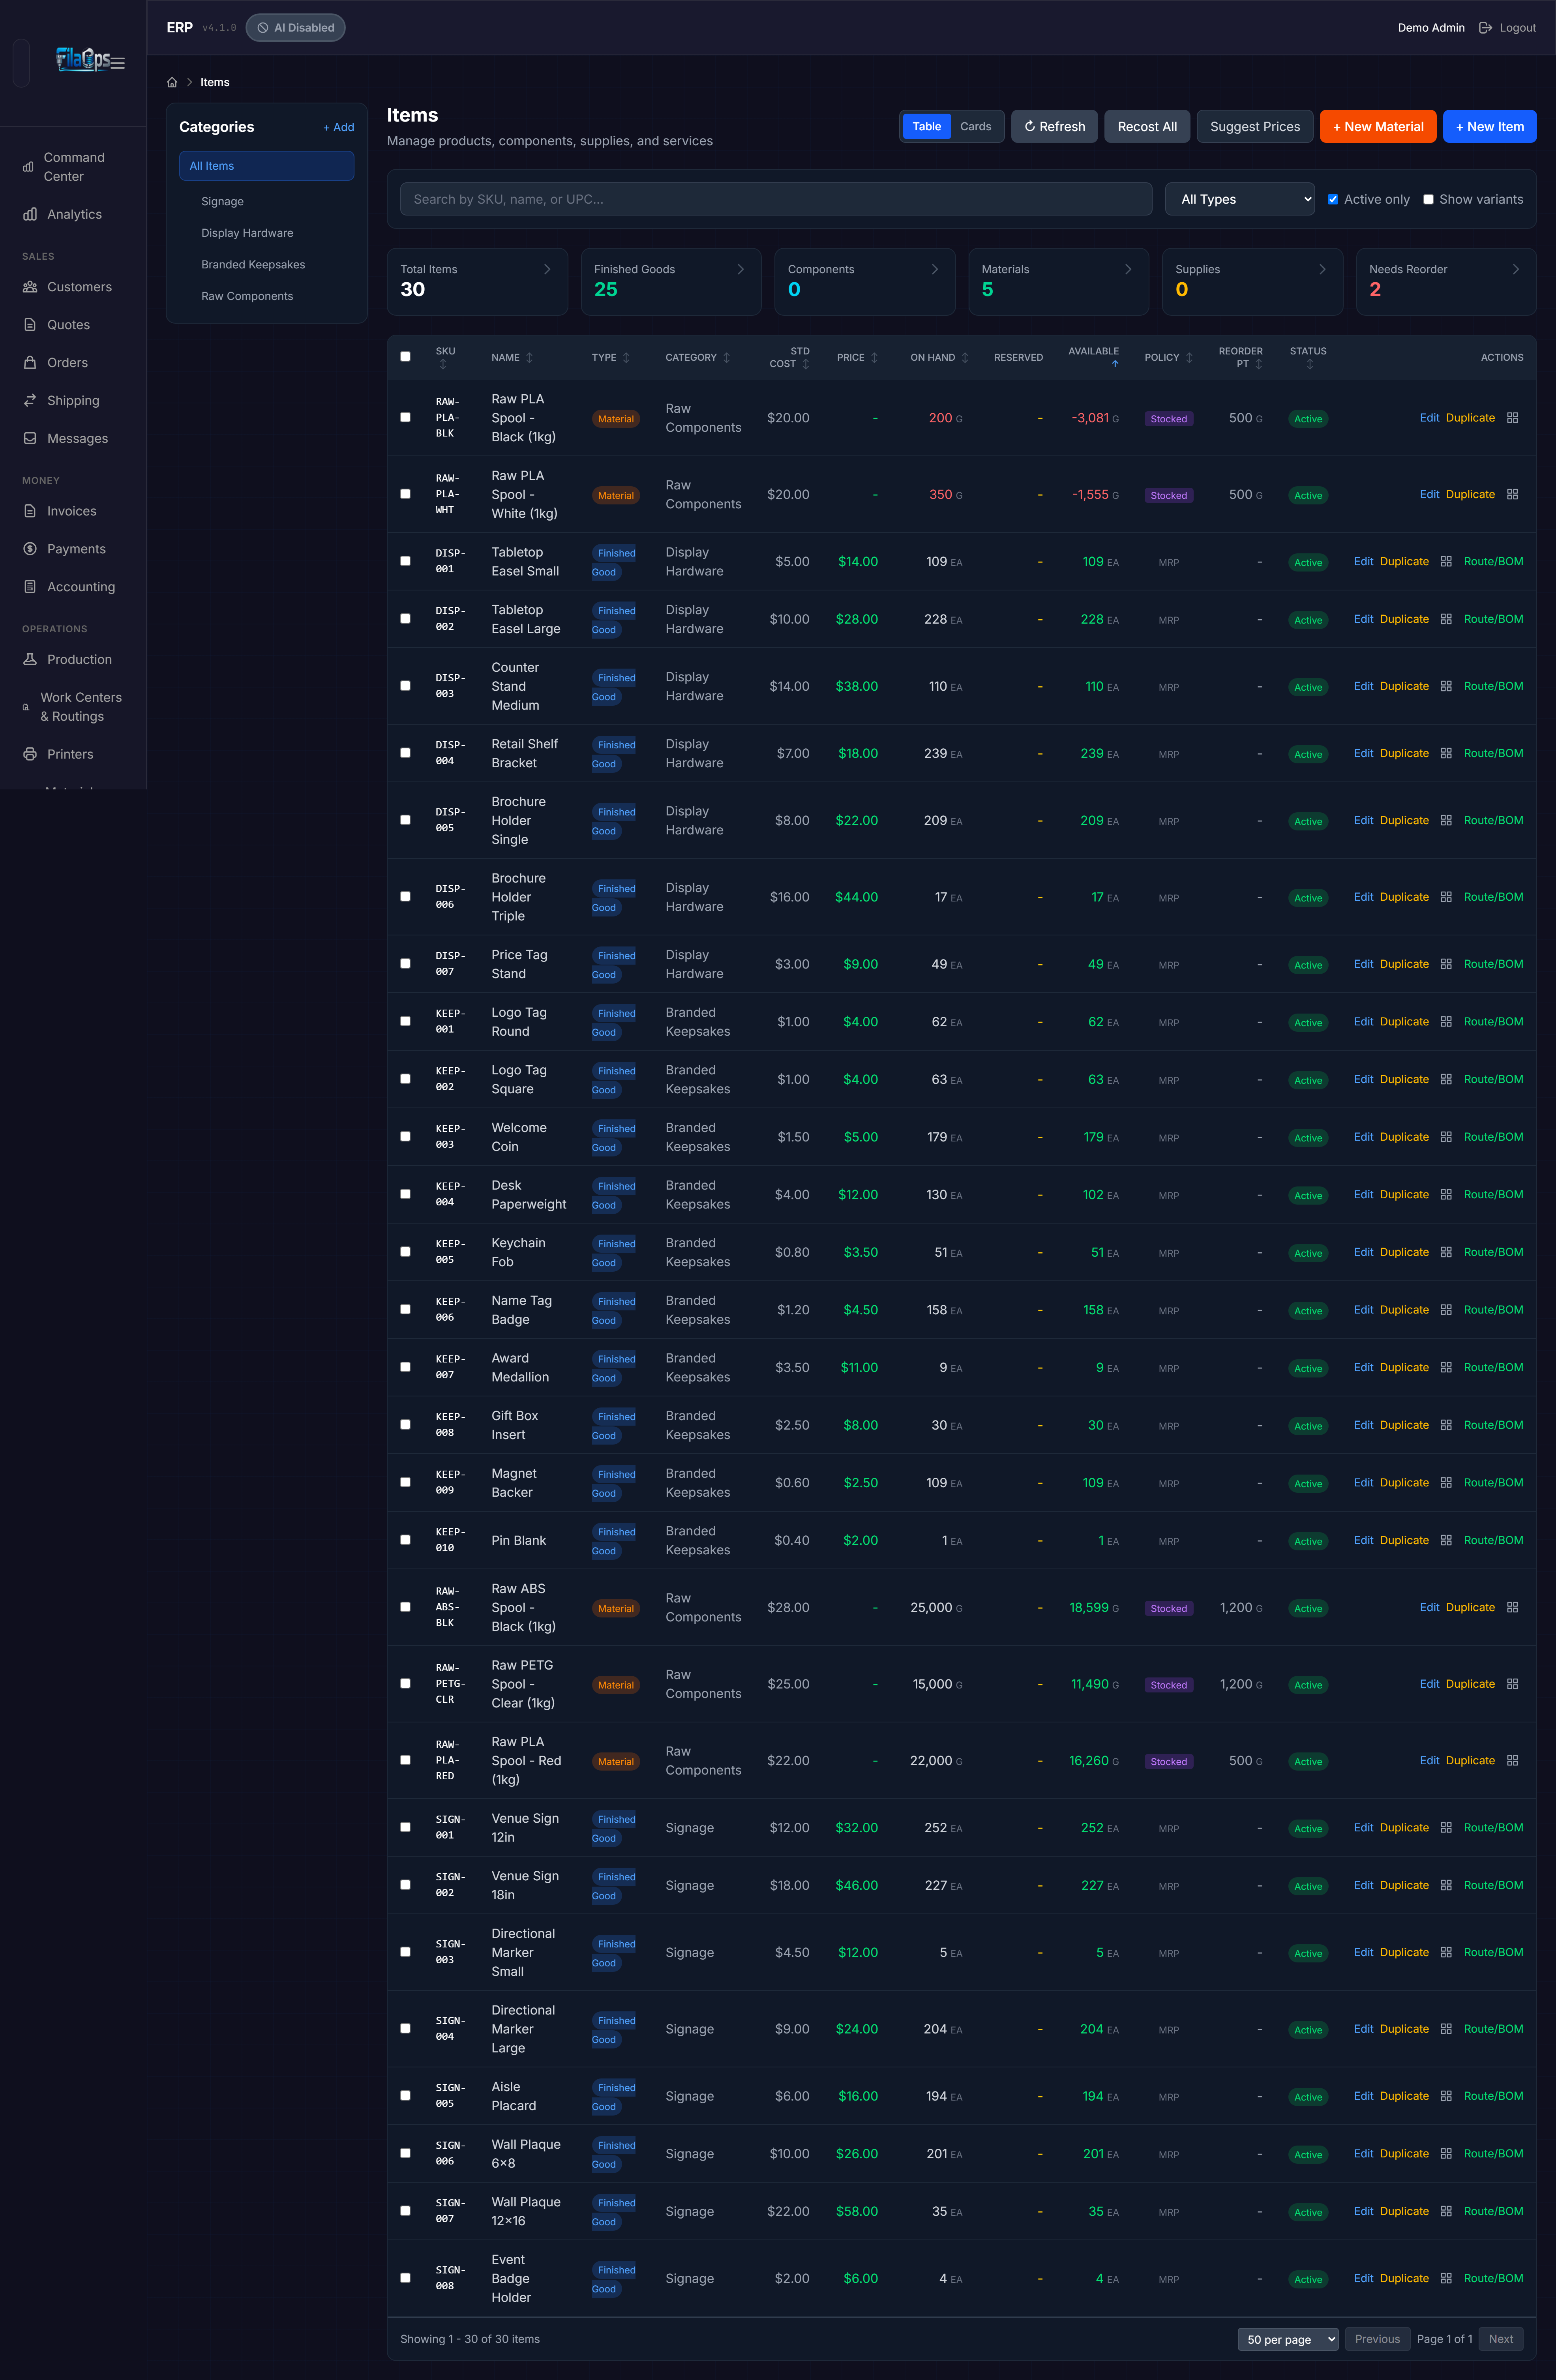
- Enter a Name (required). Leave SKU blank to let FilaOps auto-generate one, or type your own.
- Set Item Type to Finished Good.
- Set Procurement Type to Make (Manufactured) — this tells MRP that this item is produced in-house.
- Choose a Unit of Measure (e.g.,
EAfor each,Gfor grams). - Optionally enter a Category, Selling Price, and Standard Cost.
- Click Save.
Stocking policy
Under Stocking Policy, choose On-Demand (MRP-driven) if you only build to order, or Stocked (Reorder Point) if you keep finished inventory on the shelf. You can change this later.
Add materials to the catalog first
If any raw material your product uses does not yet exist in Items, add it now (Item Type = Material, Procurement Type = Buy). The BOM form will not let you add a line for an item that does not exist. Use + New Material on the Items page for a faster material-only shortcut form.
Step 2: Confirm Work Centers Exist
Routings reference work centers. If your shop's work centers are already defined you can skip this step.
Where: Operations > Work Centers & Routings, then the Work Centers tab
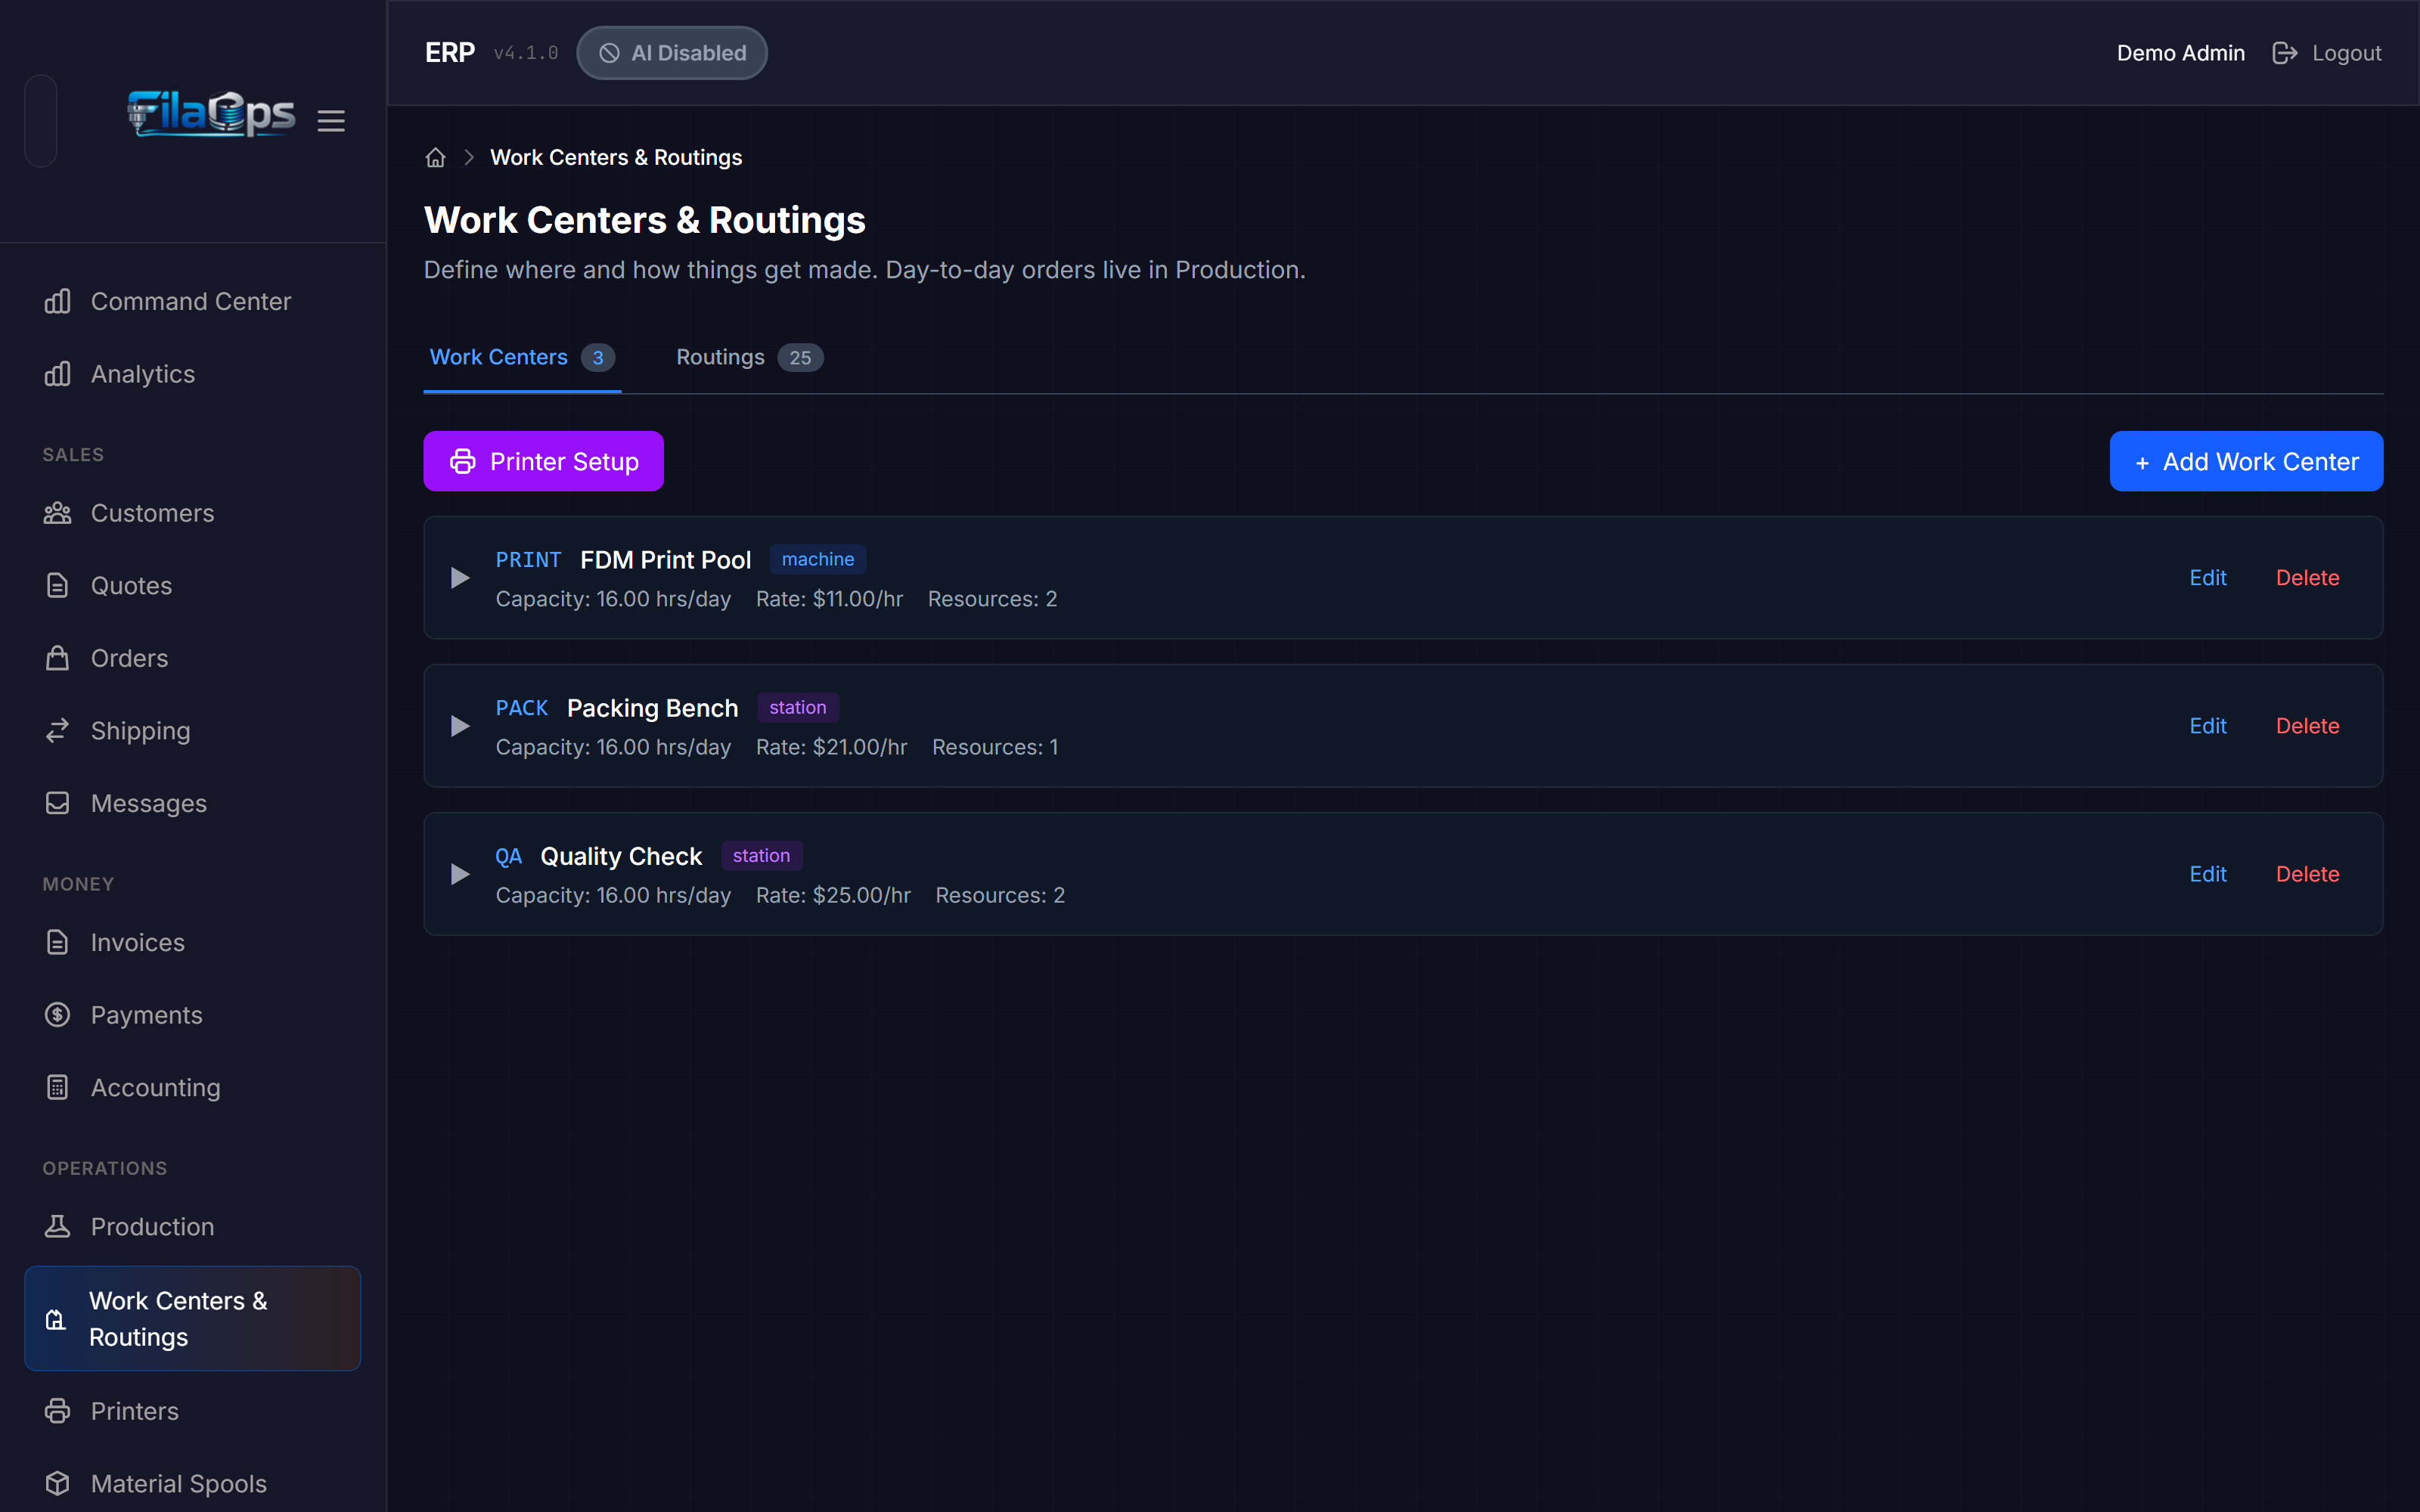
- Click + Add Work Center.
- Enter a Code (e.g.,
FDM-POOL) and Name (e.g.,FDM Printer Pool). - Set Type (
machine,station, orlabor), Capacity Hours/Day, and rate fields (Machine Rate/Hr, Labor Rate/Hr, Overhead Rate/Hr). These rates drive automatic cost calculation on routing operations. - Save. Optionally add individual Resources (specific printers or machines) under the work center card using + Add Resource.
Printer setup shortcut
On the Work Centers tab, use the Printer Setup button to register Bambu Lab printers by serial number and IP address. FilaOps automatically adds them as resources in the FDM-POOL work center.
Step 3: Define the Bill of Materials
The BOM lists every component and material consumed to produce one unit of the finished good. It drives cost roll-up and purchasing.
Where: Inventory > Bill of Materials, then click + New BOM
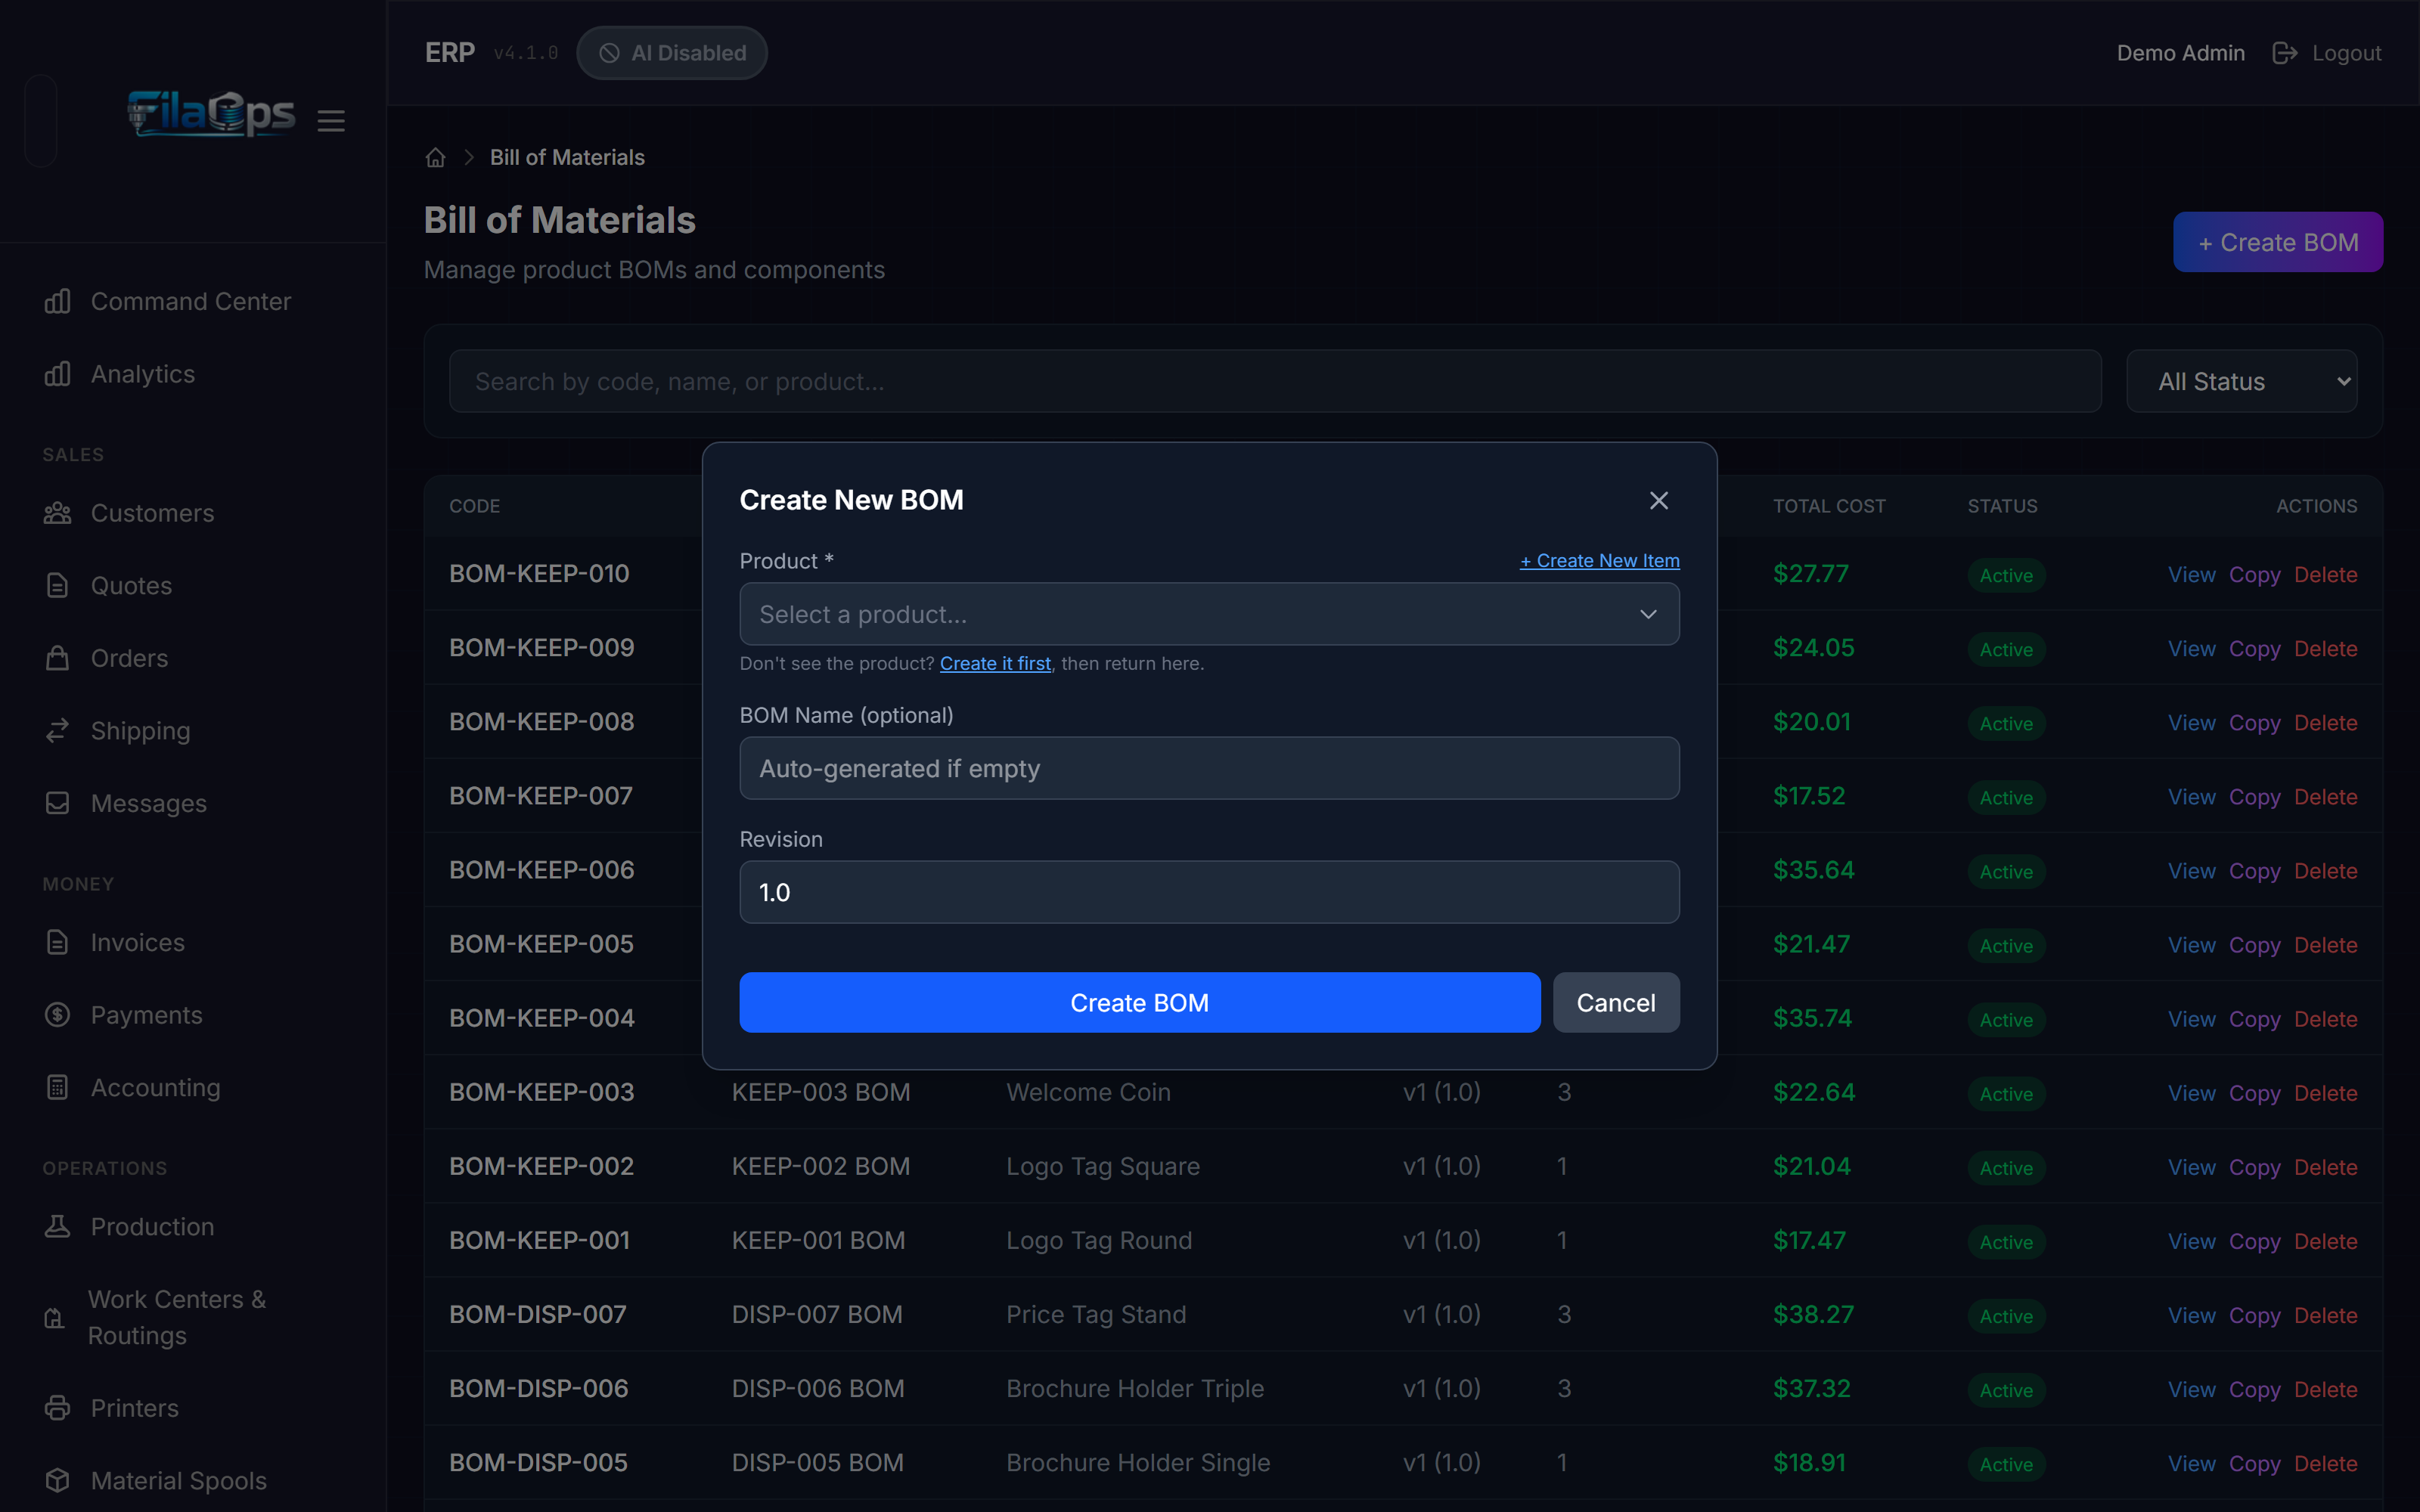
- In the Create BOM dialog, select your new product from the Product dropdown.
- Optionally enter a Name and Revision (defaults to
1.0). - Click Create. FilaOps opens the BOM detail view.
- Click Add Component, search for and select the first material or sub-component.
- Enter the Quantity needed per unit of finished product.
- Repeat for each component.
Sub-assemblies
If a component is itself a manufactured item with its own BOM, FilaOps rolls up its cost automatically. Use Explode in the BOM detail toolbar to inspect the full multi-level tree.
Recalculate cost after component price changes
The BOM detail page shows the rolled-up Material Cost. If you update a component's standard cost later, click Recalculate on the BOM to refresh the total.
Copying an existing BOM
If your new product is similar to an existing one, use the Copy BOM action in the BOM detail to clone it to the new product, then adjust line quantities.
Step 4: Create a Routing
A routing defines the production steps (operations) and the work center that performs each one. Operation times and work center rates combine to produce a labor cost that rolls into the product's standard cost.
Where: Operations > Work Centers & Routings, then the Routings tab, then click + Create Routing
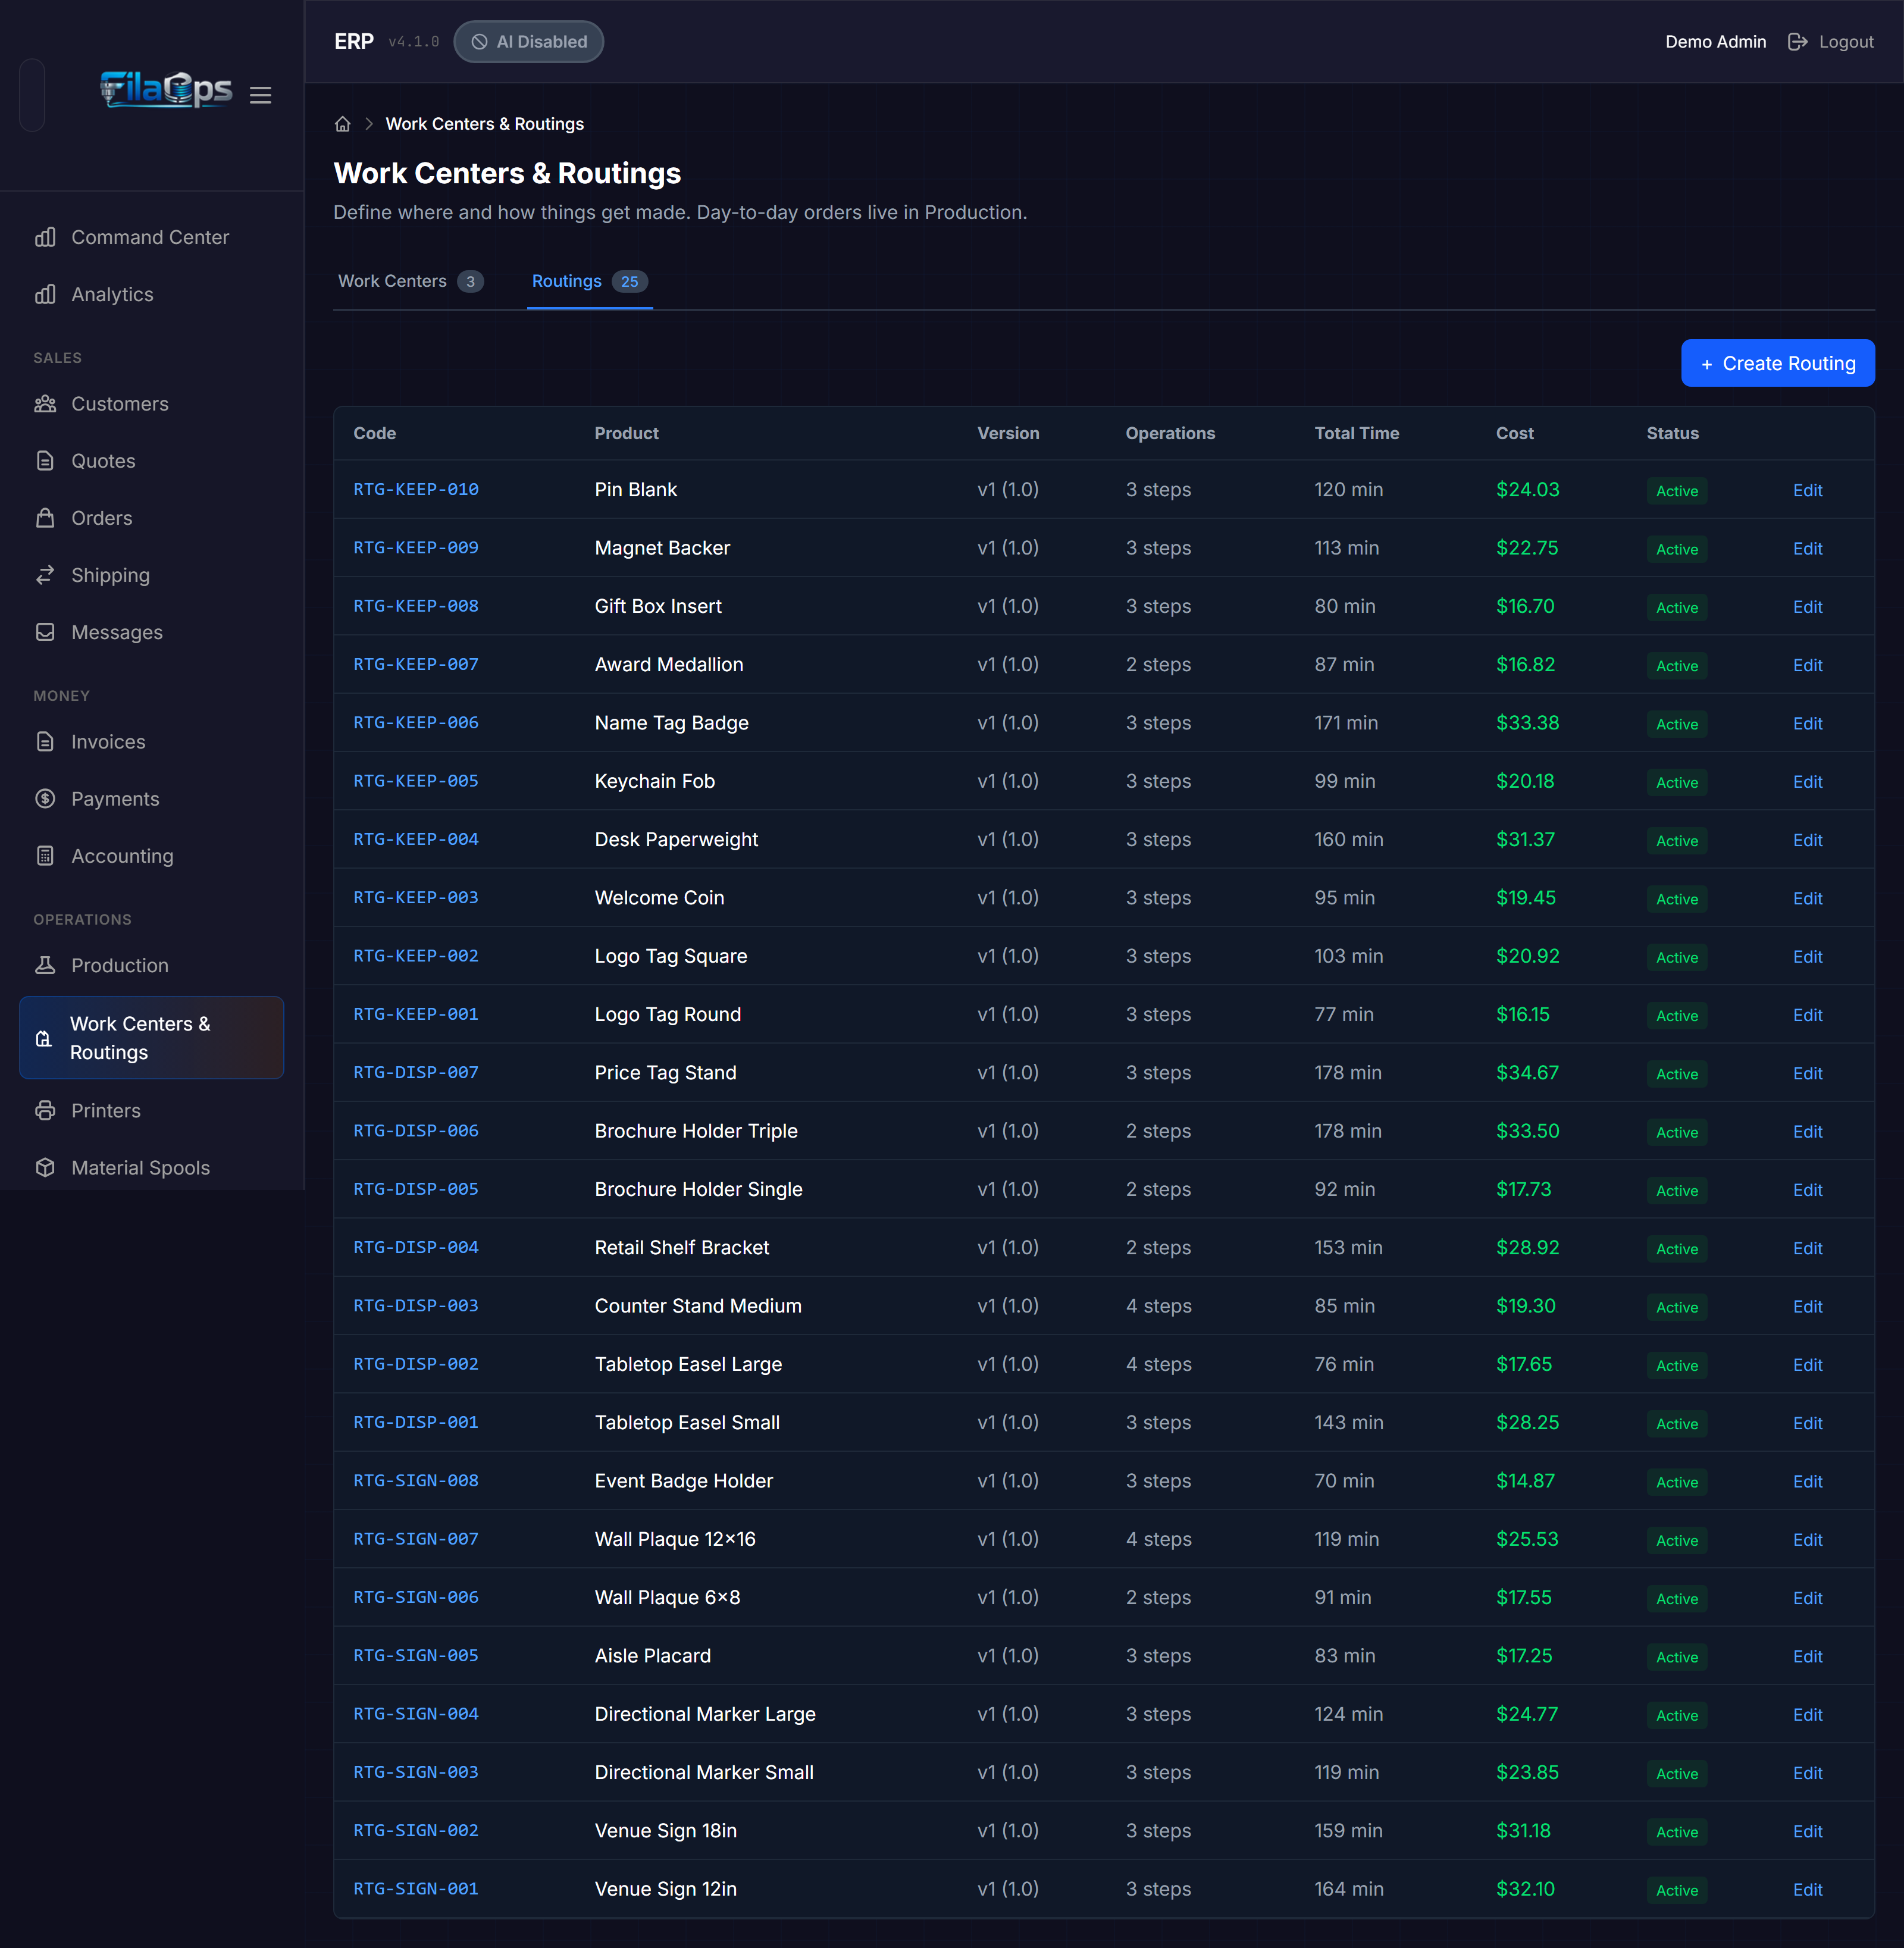
Alternatively, the BOM detail view contains an embedded Routing section. Click Edit Routing there to open the same editor without leaving the BOM page.
Using a Template (Recommended)
FilaOps ships two built-in routing templates:
- Standard Flow — Print → QC → Pack → Ship
- Assembly Flow — Print → QC → Assemble → Pack → Ship
In the Routing Editor, pick a template from the Apply Template dropdown and select your product. FilaOps copies the template operations onto a product-specific routing. Adjust times on each copied operation to match your estimates.
Building a Custom Routing
- Select the Product for this routing.
- Click + Add Operation for each production step.
- For each operation, fill in:
- Operation Code and Operation Name (e.g.,
PRINT/FDM Print) - Work Center — links the operation to the work center's cost rates
- Sequence — controls execution order
- Setup Time (min) and Run Time (min) per unit
- Optionally: Wait Time, Move Time, Units per Cycle, Scrap Rate %
- Save the routing.
Runtime source
For print operations, you can set Runtime Source to slicer and enter the slicer-estimated print time in Run Time (min). This keeps estimates accurate and makes it easy to update them when the slicer file changes.
Operation materials
Each operation can list its own consumables (e.g., support resin used during post-processing). Click Add Material on an operation row to attach them. These appear as Op Materials cost in the BOM detail view and count toward the total standard cost.
Step 5: Review Cost and Set the Selling Price
After BOM and routing are saved, FilaOps can compute the product's full standard cost.
Where: Inventory > Items, toolbar button Recost All; then edit the item for Selling Price
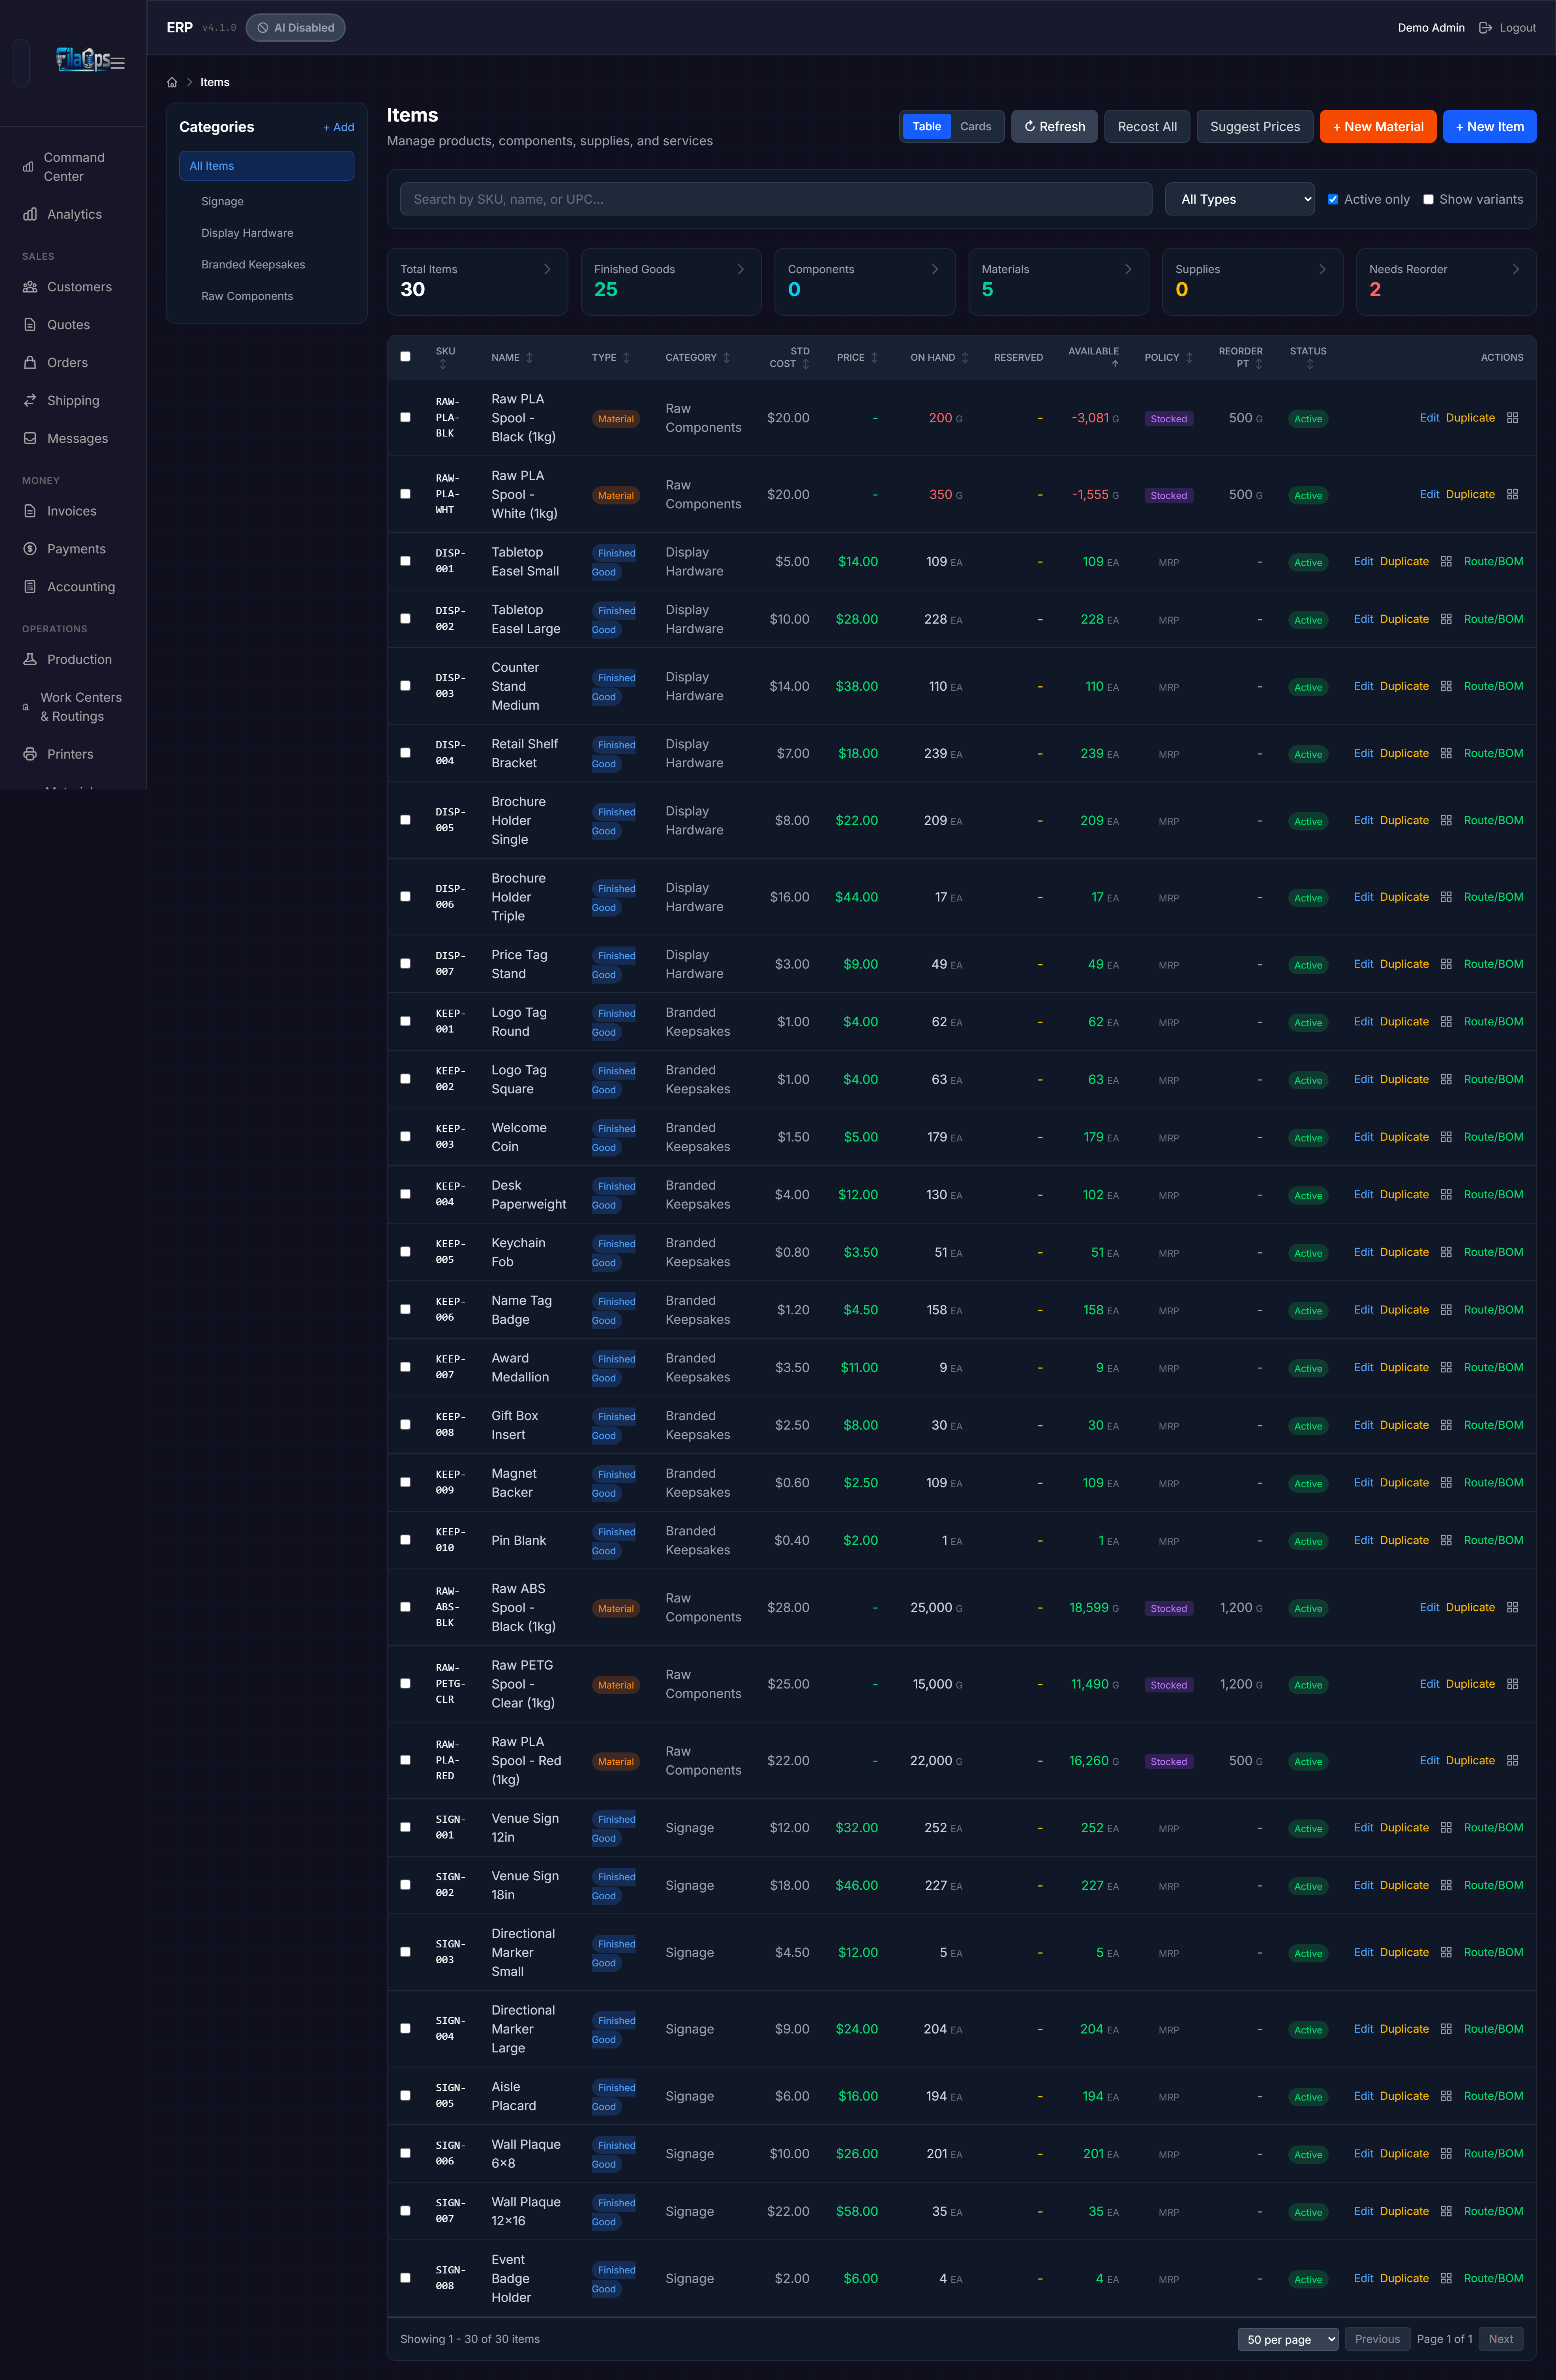
- On the Items page, click Recost All (top-right toolbar). FilaOps walks every manufactured item and rolls up BOM material cost + routing labor cost + operation material cost into Standard Cost.
- Open your new product. The BOM detail (Inventory > Bill of Materials) also shows the cost breakdown:
- Material Cost — sum of BOM component costs
- Labor — routing operations × work center rates
- Op Materials — operation-level consumables (if any)
- Edit the item and set Selling Price to your target price. Verify the margin is acceptable.
Suggest Prices
After recosting, click Suggest Prices on the Items toolbar to generate margin-based price suggestions across your catalog. Review and apply the ones that make sense.
Step 6: Test Production Run
Before accepting customer orders, run a small test batch to validate BOM quantities and routing times.
Where: Operations > Production, then click + New Production Order
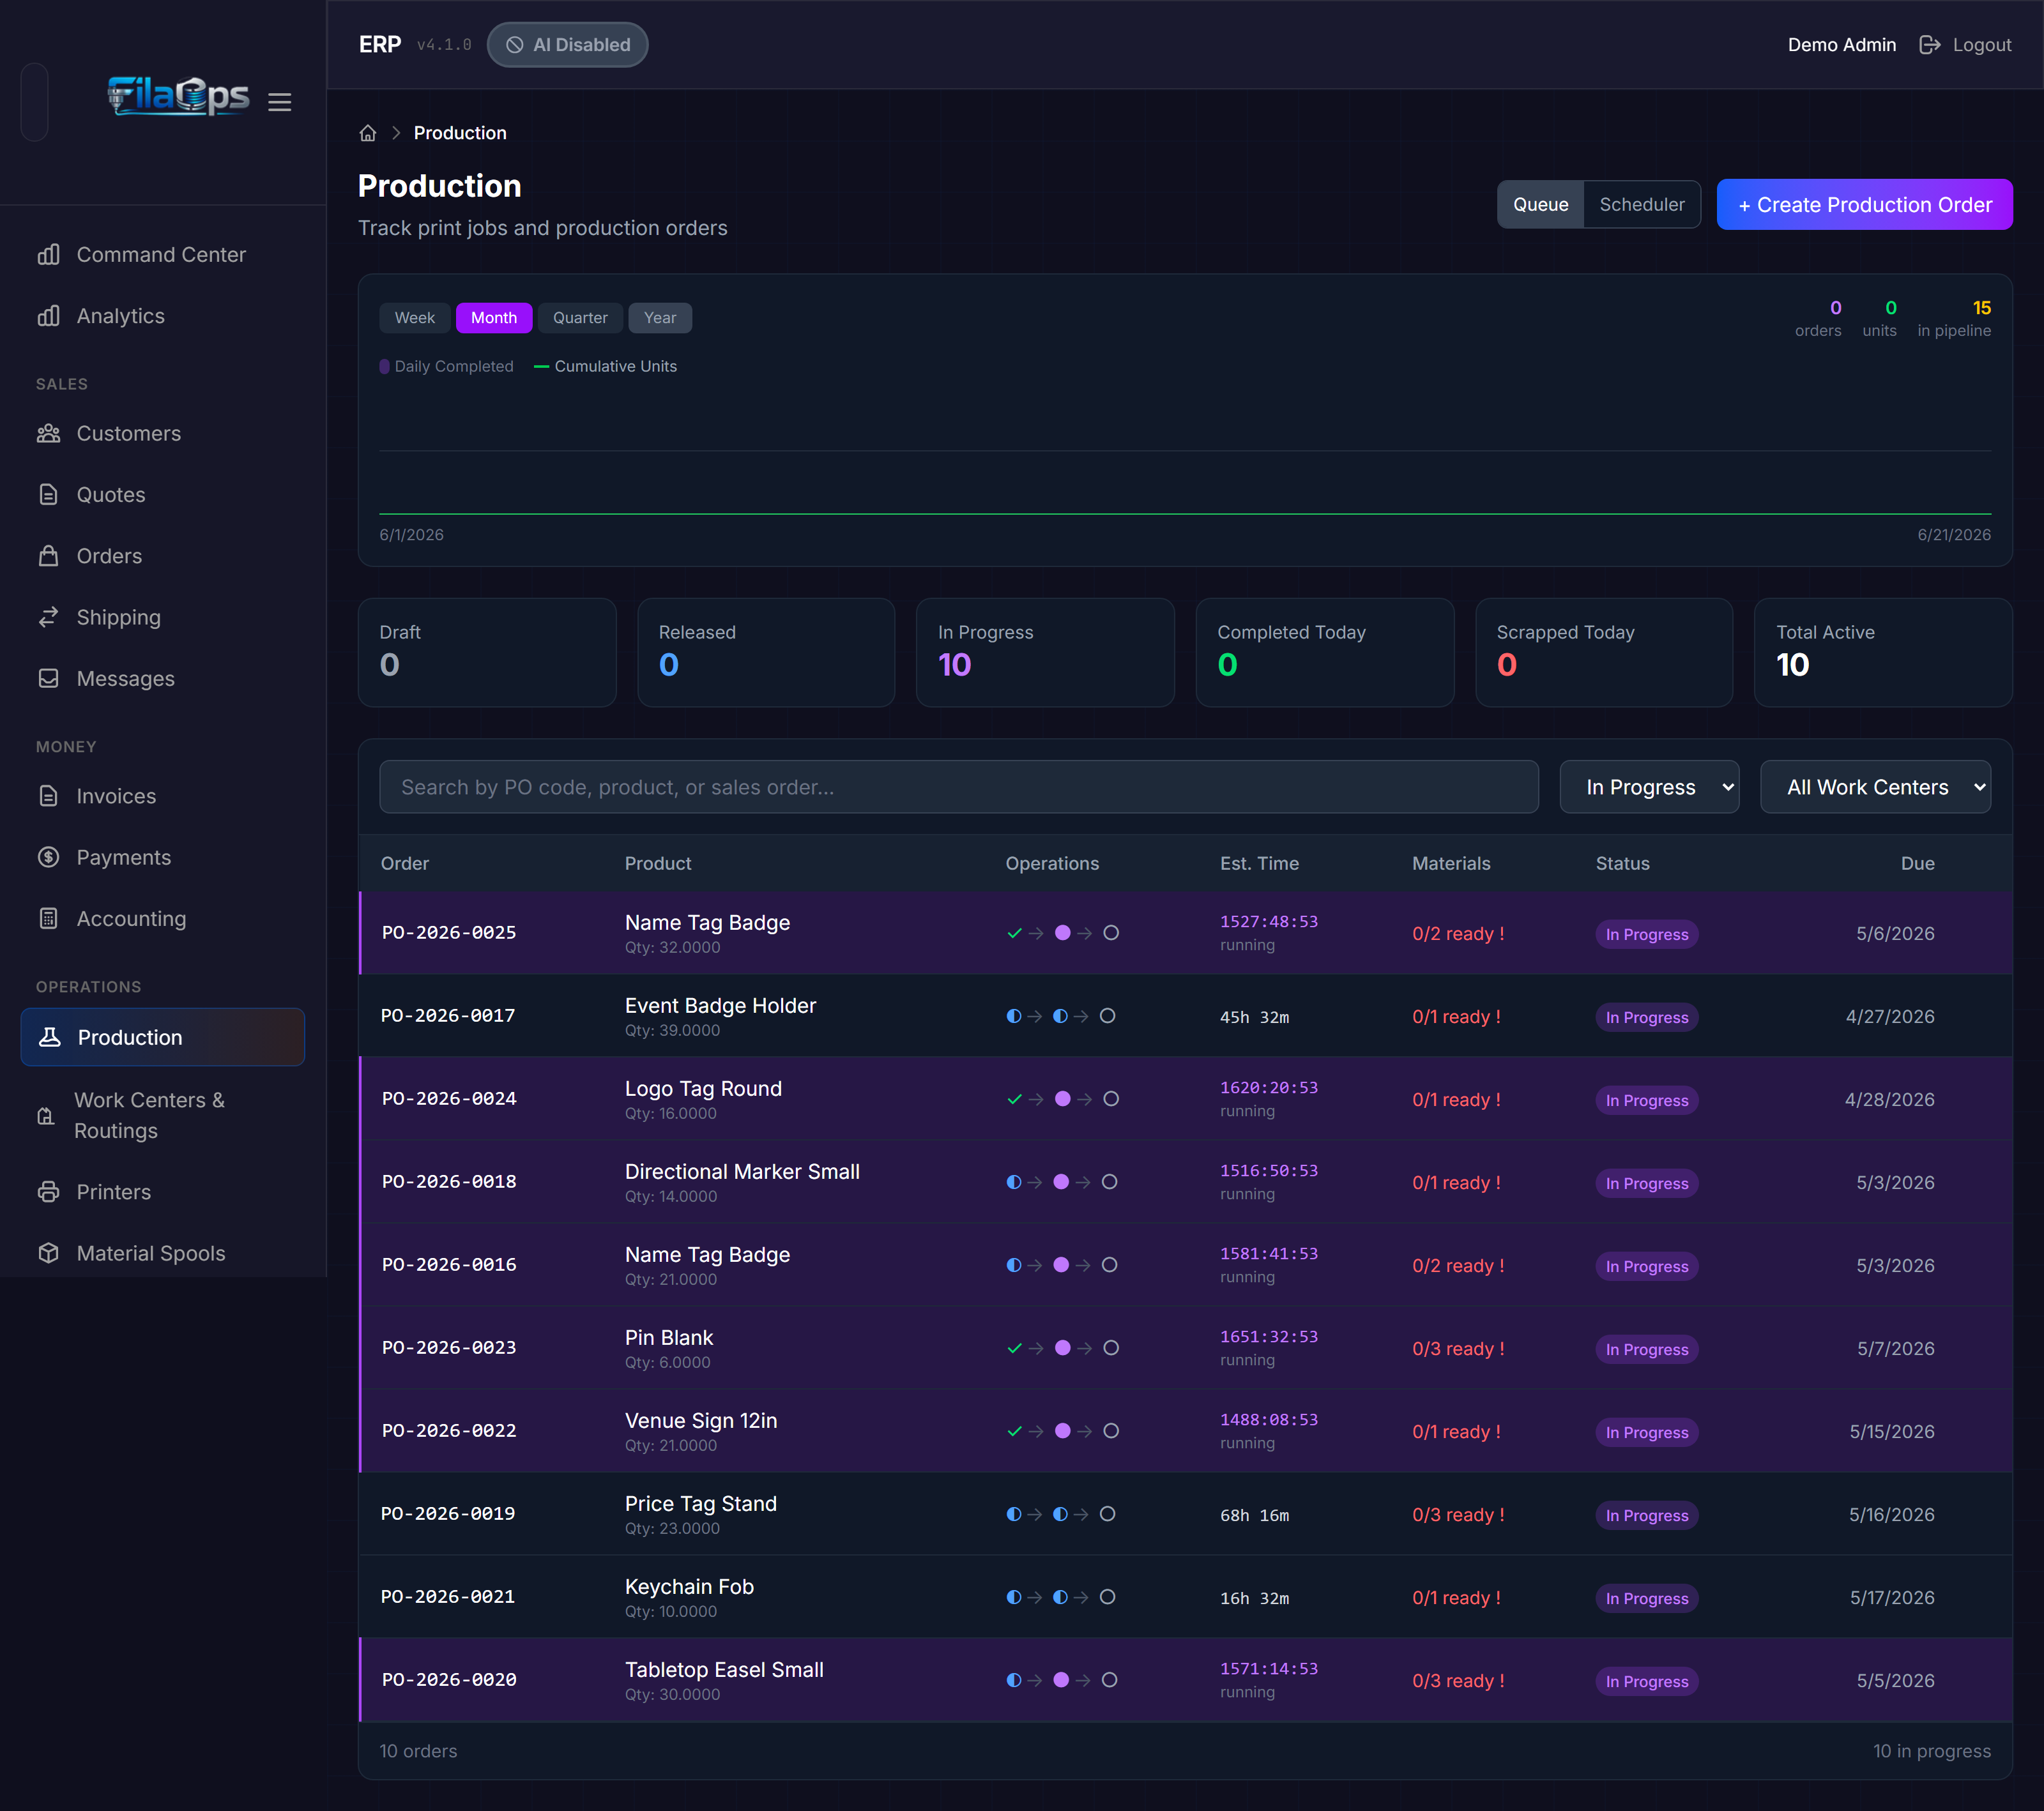
- Select your new product and enter a small Quantity (1–3 units).
- Set a Due Date and click Create.
- Open the order. FilaOps shows operations in sequence. For each operation:
- Click Start when work begins.
- Note actual material usage compared to BOM quantities.
- Click Complete when finished (or follow the QC inspection flow if you have a QC step).
- Complete the production order once all operations are done.
Scheduling
From the Production page you can switch to the Scheduler (Gantt board) to assign operations to specific resources and time slots. For a quick test run you can skip formal scheduling and execute operations manually in the queue.
Step 7: Adjust Based on Test Results
Compare actuals from the test run to your BOM and routing estimates:
| What to check | Where to adjust |
|---|---|
| Material quantities (used more or less than BOM) | Inventory > Bill of Materials — edit BOM line quantities |
| Operation times (took longer or shorter) | Operations > Work Centers & Routings > Routings — edit operation Run Time or Setup Time |
| Scrap higher than expected | Routing operation Scrap Rate % field |
| Selling price needs revision | Inventory > Items — edit Selling Price; run Recost All first |
After any BOM or routing change, run Recost All again to keep standard cost current.
Step 8: Check the Buy List
With a new product ready for orders, confirm you have enough raw materials on hand to fulfill upcoming demand.
Where: Purchasing > Buy List
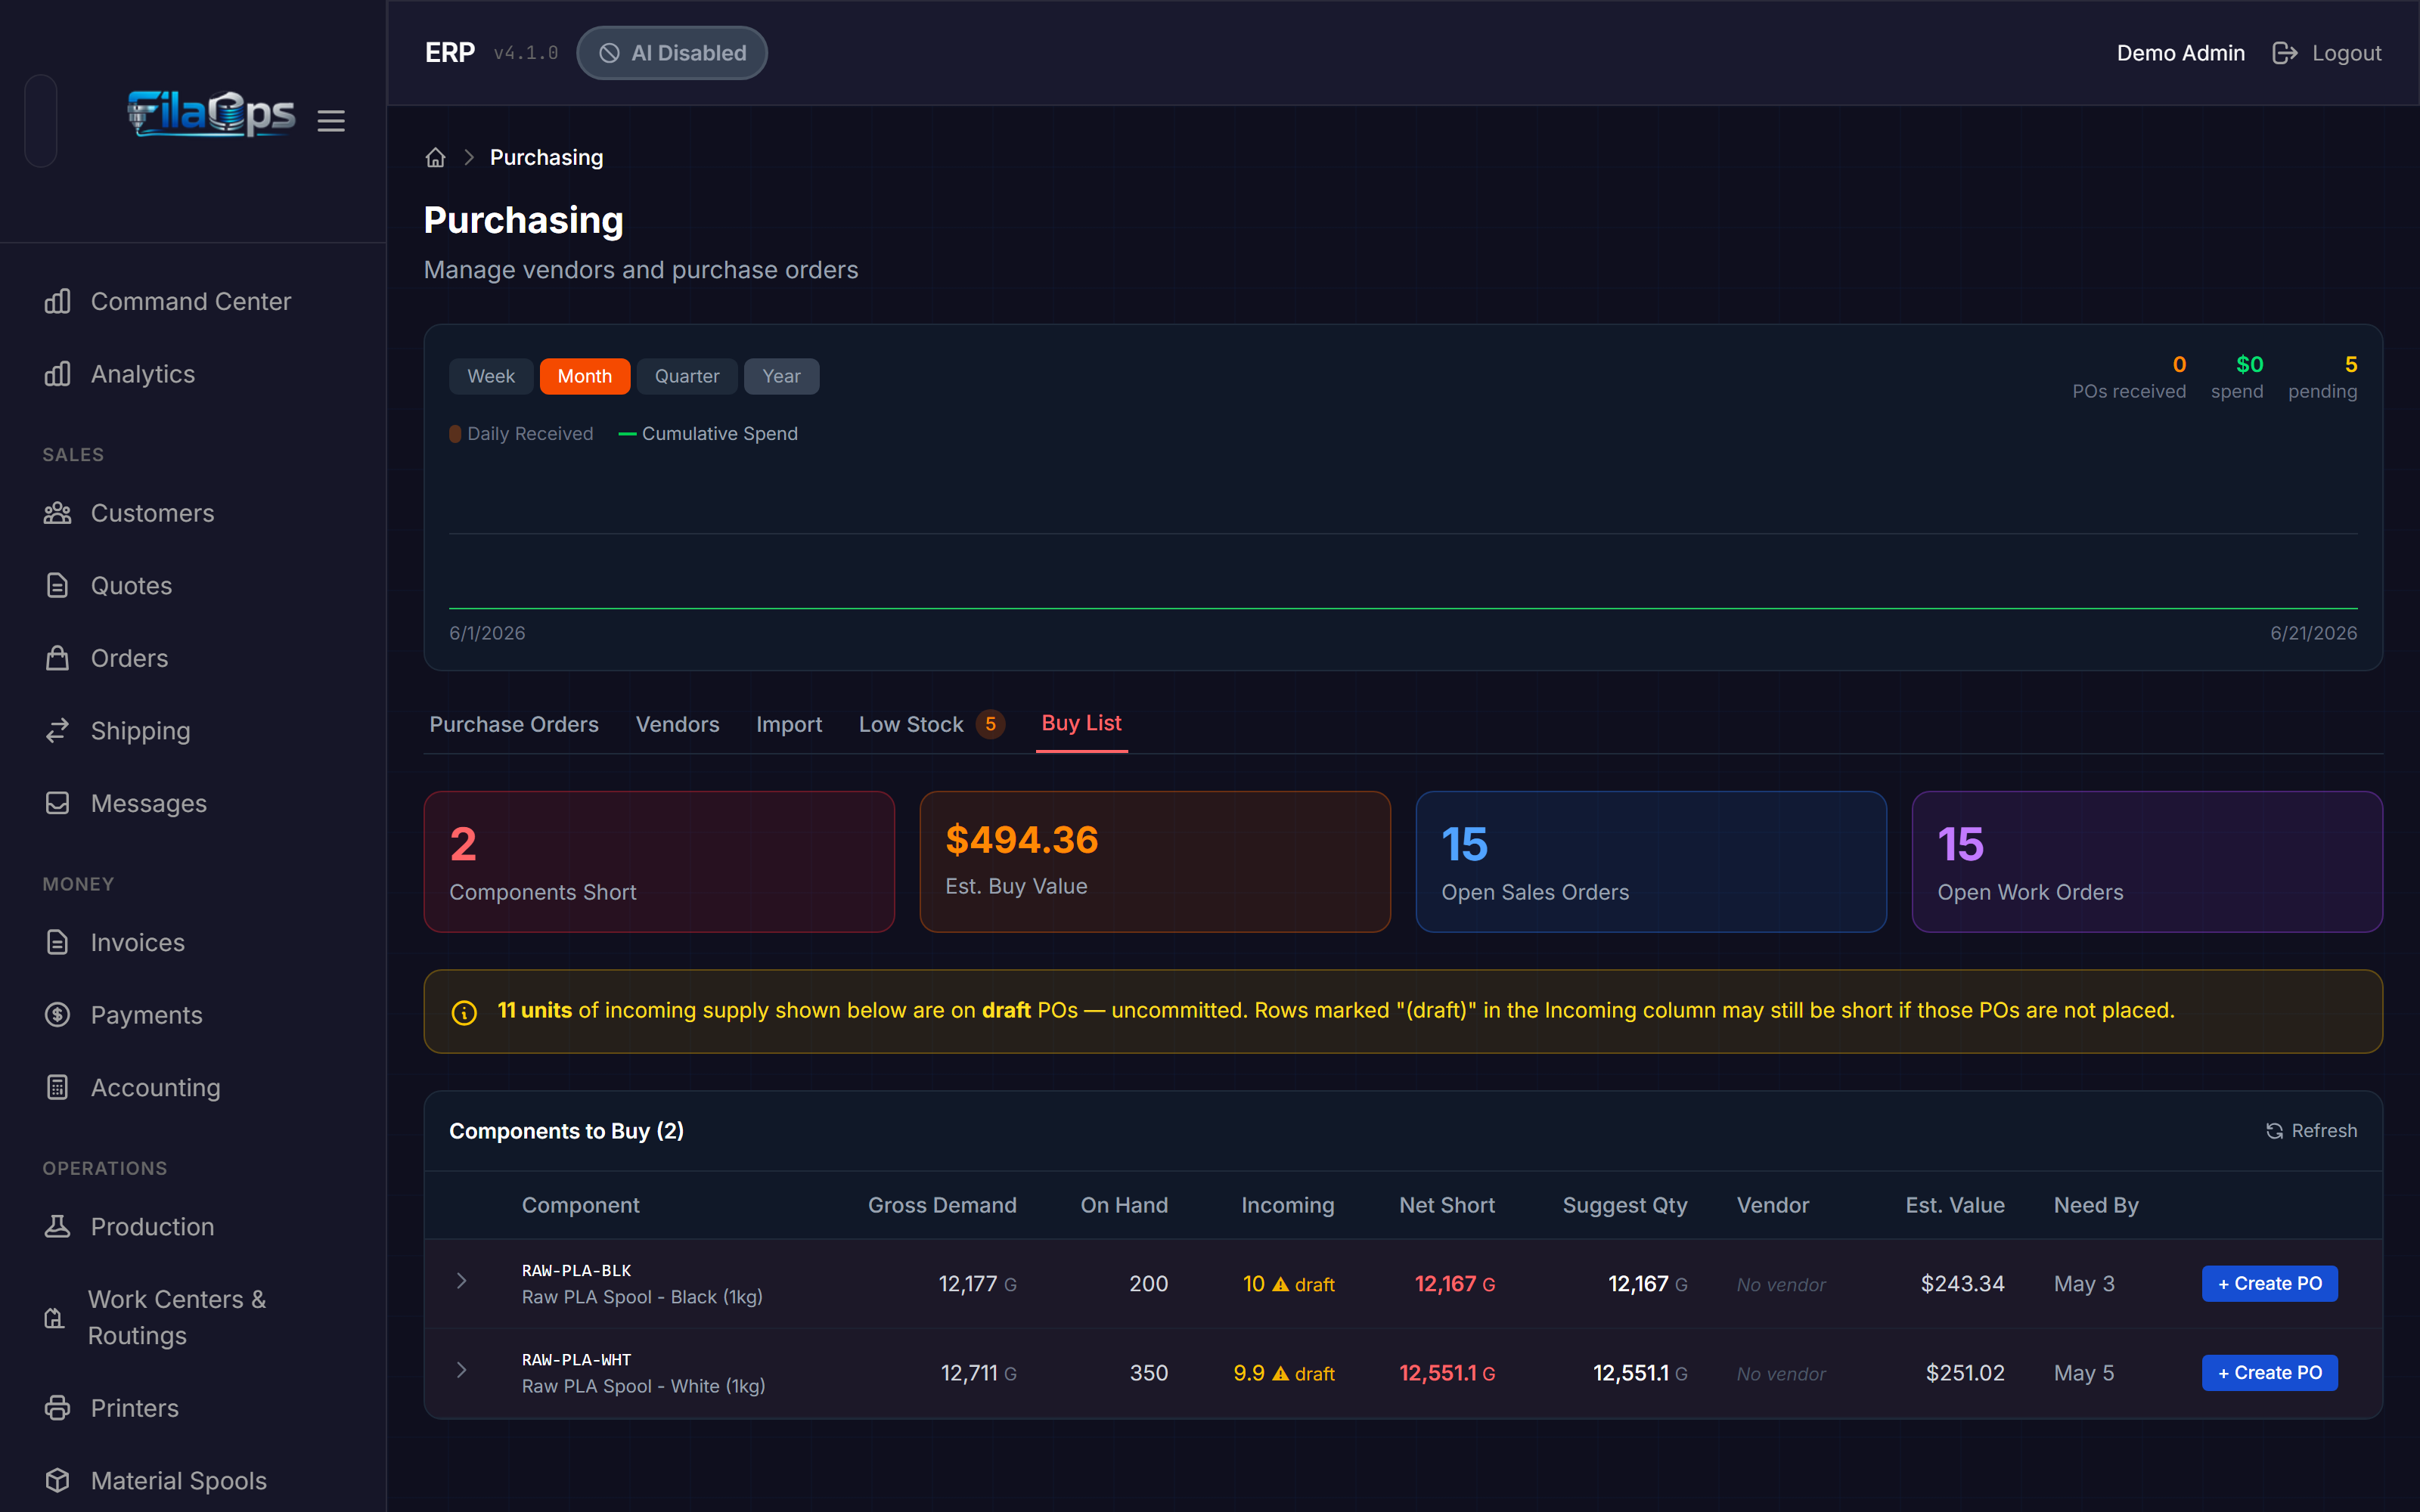
The Buy List nets all open demand (production orders and sales orders) against available inventory and tells you exactly what to buy, in what quantity, and by when. Any shortage row includes a Create PO button that opens the Purchase Order form pre-filled with the item and suggested quantity.
Low Stock tab
The Purchasing > Low Stock tab separately surfaces items below their reorder point (independent of open orders). Check it too if any of your new product's materials use the Stocked reorder policy.
Quick Checklist
- [ ] Finished good item created (Type = Finished Good, Procurement = Make (Manufactured))
- [ ] All raw materials exist in the item catalog
- [ ] BOM created with accurate per-unit quantities
- [ ] Work centers configured with correct rate fields
- [ ] Routing created with operations, work center assignments, and time estimates
- [ ] Recost All run — standard cost reflects BOM + routing
- [ ] Selling price set and margin verified
- [ ] Test production order completed
- [ ] BOM and routing adjusted based on actual test results
- [ ] Recost All run again after adjustments
- [ ] Buy List checked — no unexpected material shortages
- [ ] Product ready for sales orders