Production & Scheduling
Turn sales orders into finished goods — plan, schedule, execute, and track production runs across your print farm.
What You'll Learn
- How to configure work centers and routings for your shop floor
- How to create and manage production orders through their full lifecycle
- How to use the Scheduler (Gantt) board to plan and dispatch operations
- How to handle scrap, splits, quality inspections, and partial completions
- How to read the production dashboard and trend chart
Prerequisites
- Admin access to FilaOps
- At least one product with a Bill of Materials (see Managing Your Product Catalog)
- At least one work center and resource configured (printers or stations)
Setting Up Manufacturing
Before running production, tell FilaOps about your equipment and processes. Navigate to Manufacturing in the sidebar, then open the Setup tab.
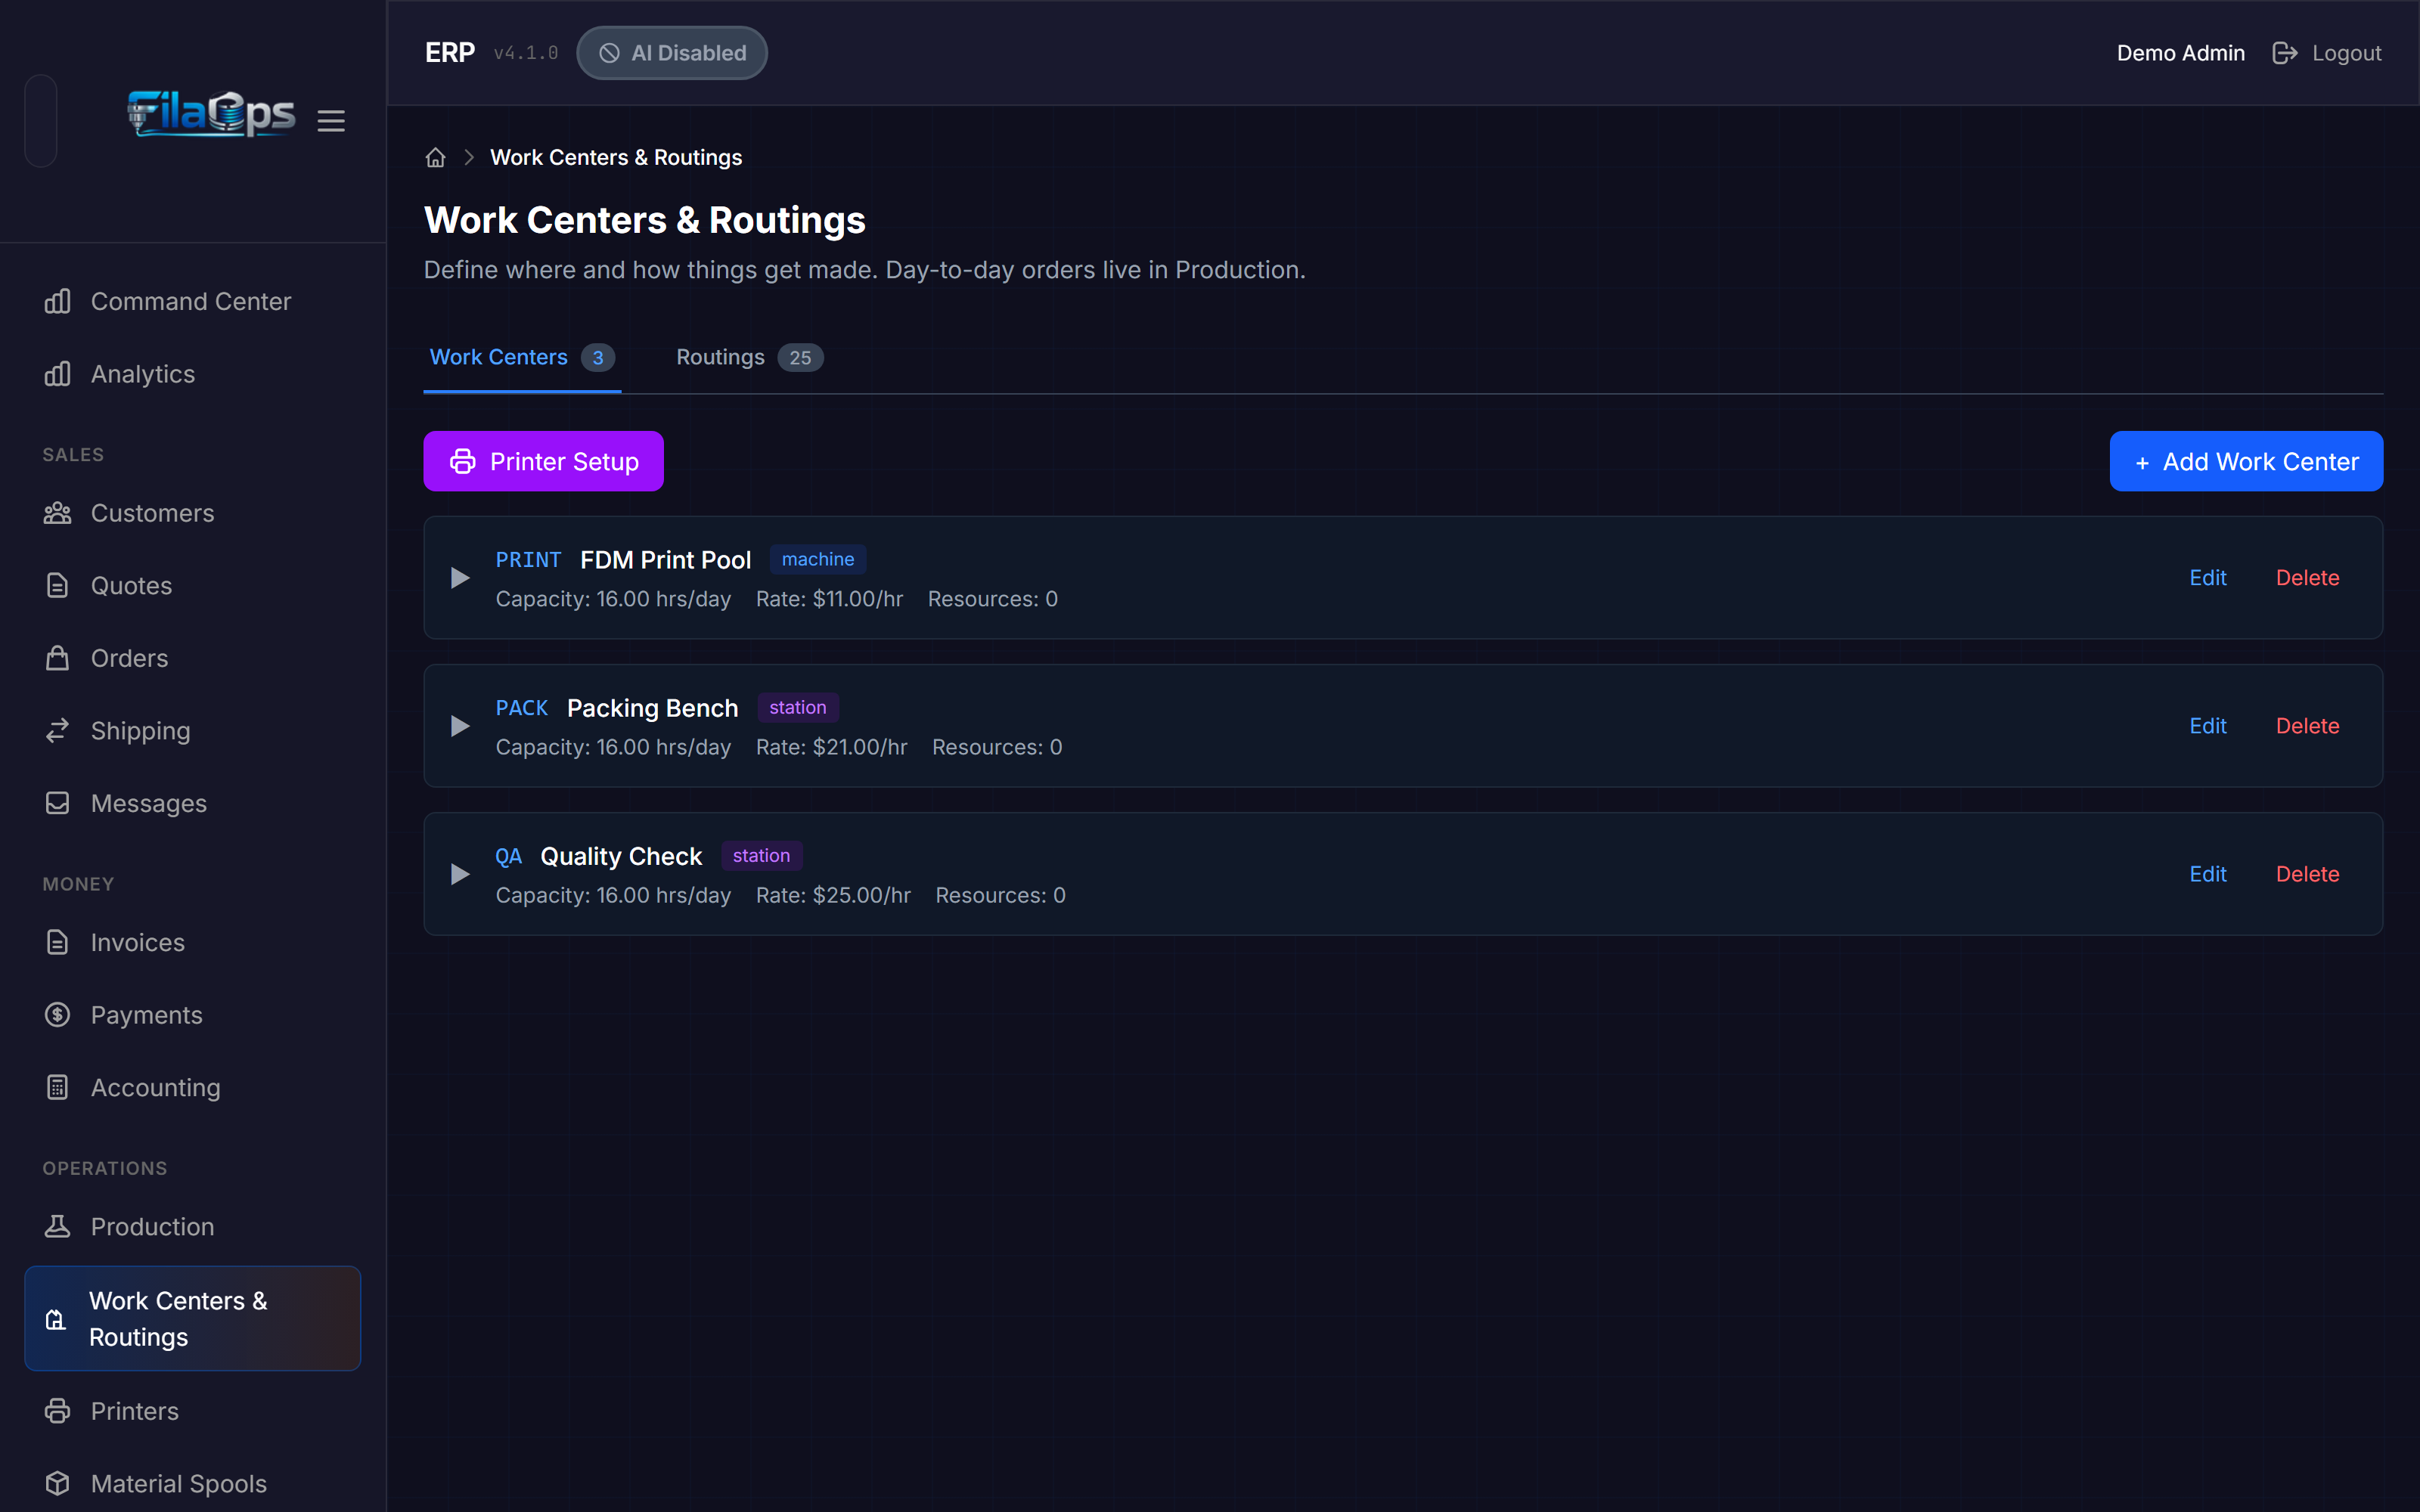
Work Centers
A work center is a logical area of your shop — for example, "FDM Print Farm," "Resin Station," or "Post-Processing Bench." Operations in routings are assigned to work centers, and then dispatched to specific resources within them.
Creating a Work Center
- Click + Add Work Center.
-
Fill in the details:
Field Description Code Short identifier used throughout the system (e.g., FDM-POOL)Name Human-readable label (e.g., "FDM Print Farm") Description What this work center handles Type Machine Pool (has individual resources), Work Station (single workstation), or Labor Pool (generic) Capacity (hours/day) Hours available per day for capacity planning Machine Rate / Labor Rate / Overhead Rate Per-hour cost rates used to calculate job costing -
Click Save.
Adding Resources to a Work Center
Resources are the individual machines within a work center — each printer, curing station, and so on. Operations are scheduled to work centers and then dispatched to a specific resource within that center.
- Open a work center card and click Add Resource.
-
Fill in:
Field Description Code Short identifier (e.g., P1S-01)Name Machine name (e.g., "Bambu P1S #1") Machine Type Model identifier such as X1C,P1S, orA1Printer Class open(open-frame, e.g., A1 Mini) orenclosed(e.g., P1S, X1C) — used for material compatibility checkingStatus available,busy,maintenance, oroffline -
Click Save.
Quick printer setup
Use the Printer Setup button at the top of the Work Centers tab to launch a guided wizard. It creates a work center and adds your first printer resource in one flow — faster than the manual steps above.
Editing and Removing Resources
- Click Edit on any resource card to update its details or status.
- Click Delete to permanently remove a resource. Resources with active scheduled operations must have those operations rescheduled or completed first.
Resource status vs. maintenance windows
Setting a resource status to offline or maintenance manually blocks new scheduling on that resource. For planned downtime that should appear visibly on the Gantt board, use Maintenance Windows instead — those render as amber diagonal-stripe blocks on the scheduler and are factored into the next-available-slot calculation.
Routings
A routing defines the step-by-step manufacturing process for a product — which operations to perform, in what order, on which work center, and how long each takes. When a production order is created, the active routing for that product is automatically copied onto the order as a snapshot.
Navigate to the Routings tab on the Manufacturing Setup page.
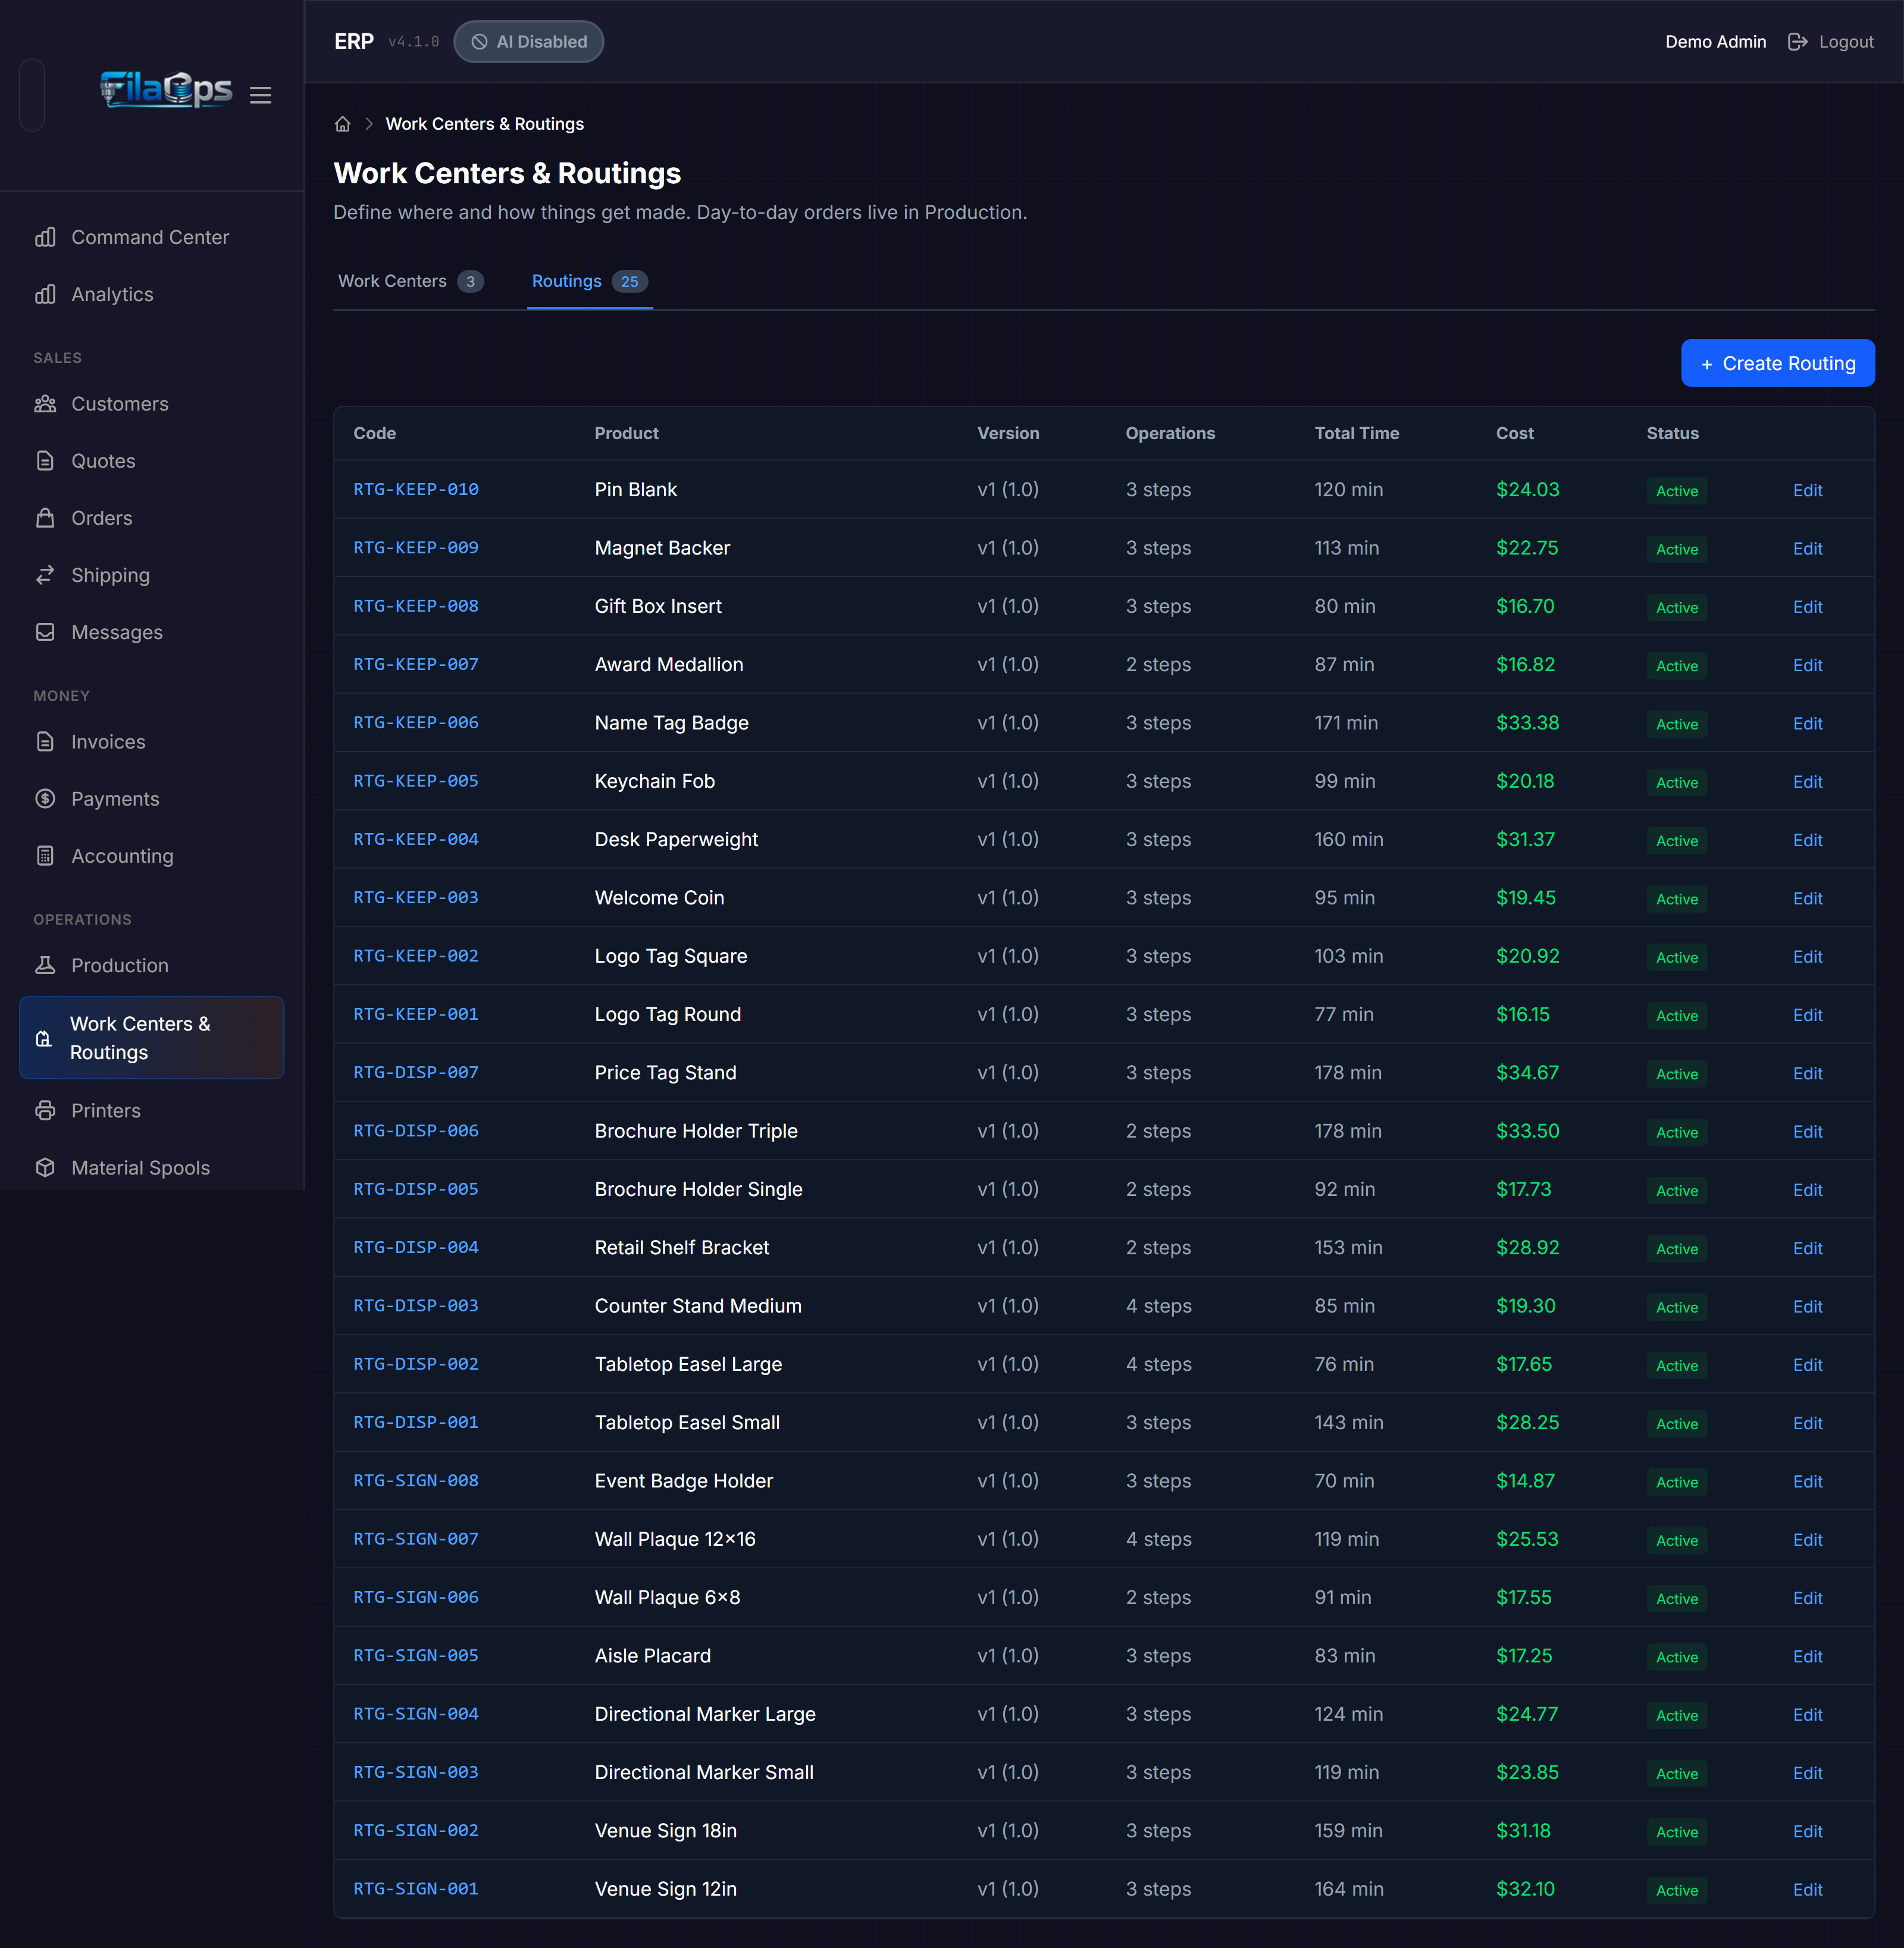
The Routings Table
| Column | What It Shows |
|---|---|
| Code | Routing identifier. Template routings display a "Template" badge. |
| Product | Which product this routing manufactures |
| Version | Version number and revision string (e.g., v2 / 1.0) |
| Operations | Number of steps in the routing |
| Total Time | Combined setup + run + wait + move time across all operations (minutes) |
| Cost | Calculated manufacturing cost (labor + materials) |
| Status | Active or Inactive |
Creating a Routing
- Click + New Routing to open the Routing Editor.
-
Fill in the routing header:
Field Description Code Unique identifier for this routing Product Which product this routing manufactures (leave blank for templates) Version / Revision Numeric version and revision string for change tracking Is Template Check to create a reusable starting point with no product assignment -
Add operations in sequence. Each operation specifies:
Field Description Operation Code Short code such as PRINT,QC,PACKOperation Name Readable label (e.g., "Print Base Layer") Work Center Which work center handles this step Setup Time (min) Time to prepare the machine before running Run Time (min) Time per unit produced Wait / Move Time (min) Cure time, transport, or dwell — counted in total duration but not billed as labor run time Can Overlap Allow this operation to start before its predecessor finishes -
Optionally add materials to each operation — the components consumed at that step (e.g., PLA filament for a print operation, boxes for a pack operation). Materials defined here are automatically copied to the production order when it is created, with quantities scaled to the order quantity.
-
Click Save.
Routing Templates
Set Is Template to create a routing with no product assignment. Templates appear with a "Template" badge in the list. When creating a new routing, you can base it on a template — useful for standard process patterns shared across many products (e.g., "FDM Print → Support Removal → QC → Pack").
Which routing is used when creating an order?
When you create a production order, FilaOps automatically attaches the most recently created active, non-template routing for that product. If the routing changes after the order is created, use Refresh Routing on the order (see below).
The Production Page
Navigate to Manufacturing > Production in the sidebar. The page has two views you can toggle between at the top right: Queue and Scheduler.
Queue View
The Queue view is the day-to-day workspace for managing orders. It shows the trend chart, stat cards, and the full order list.
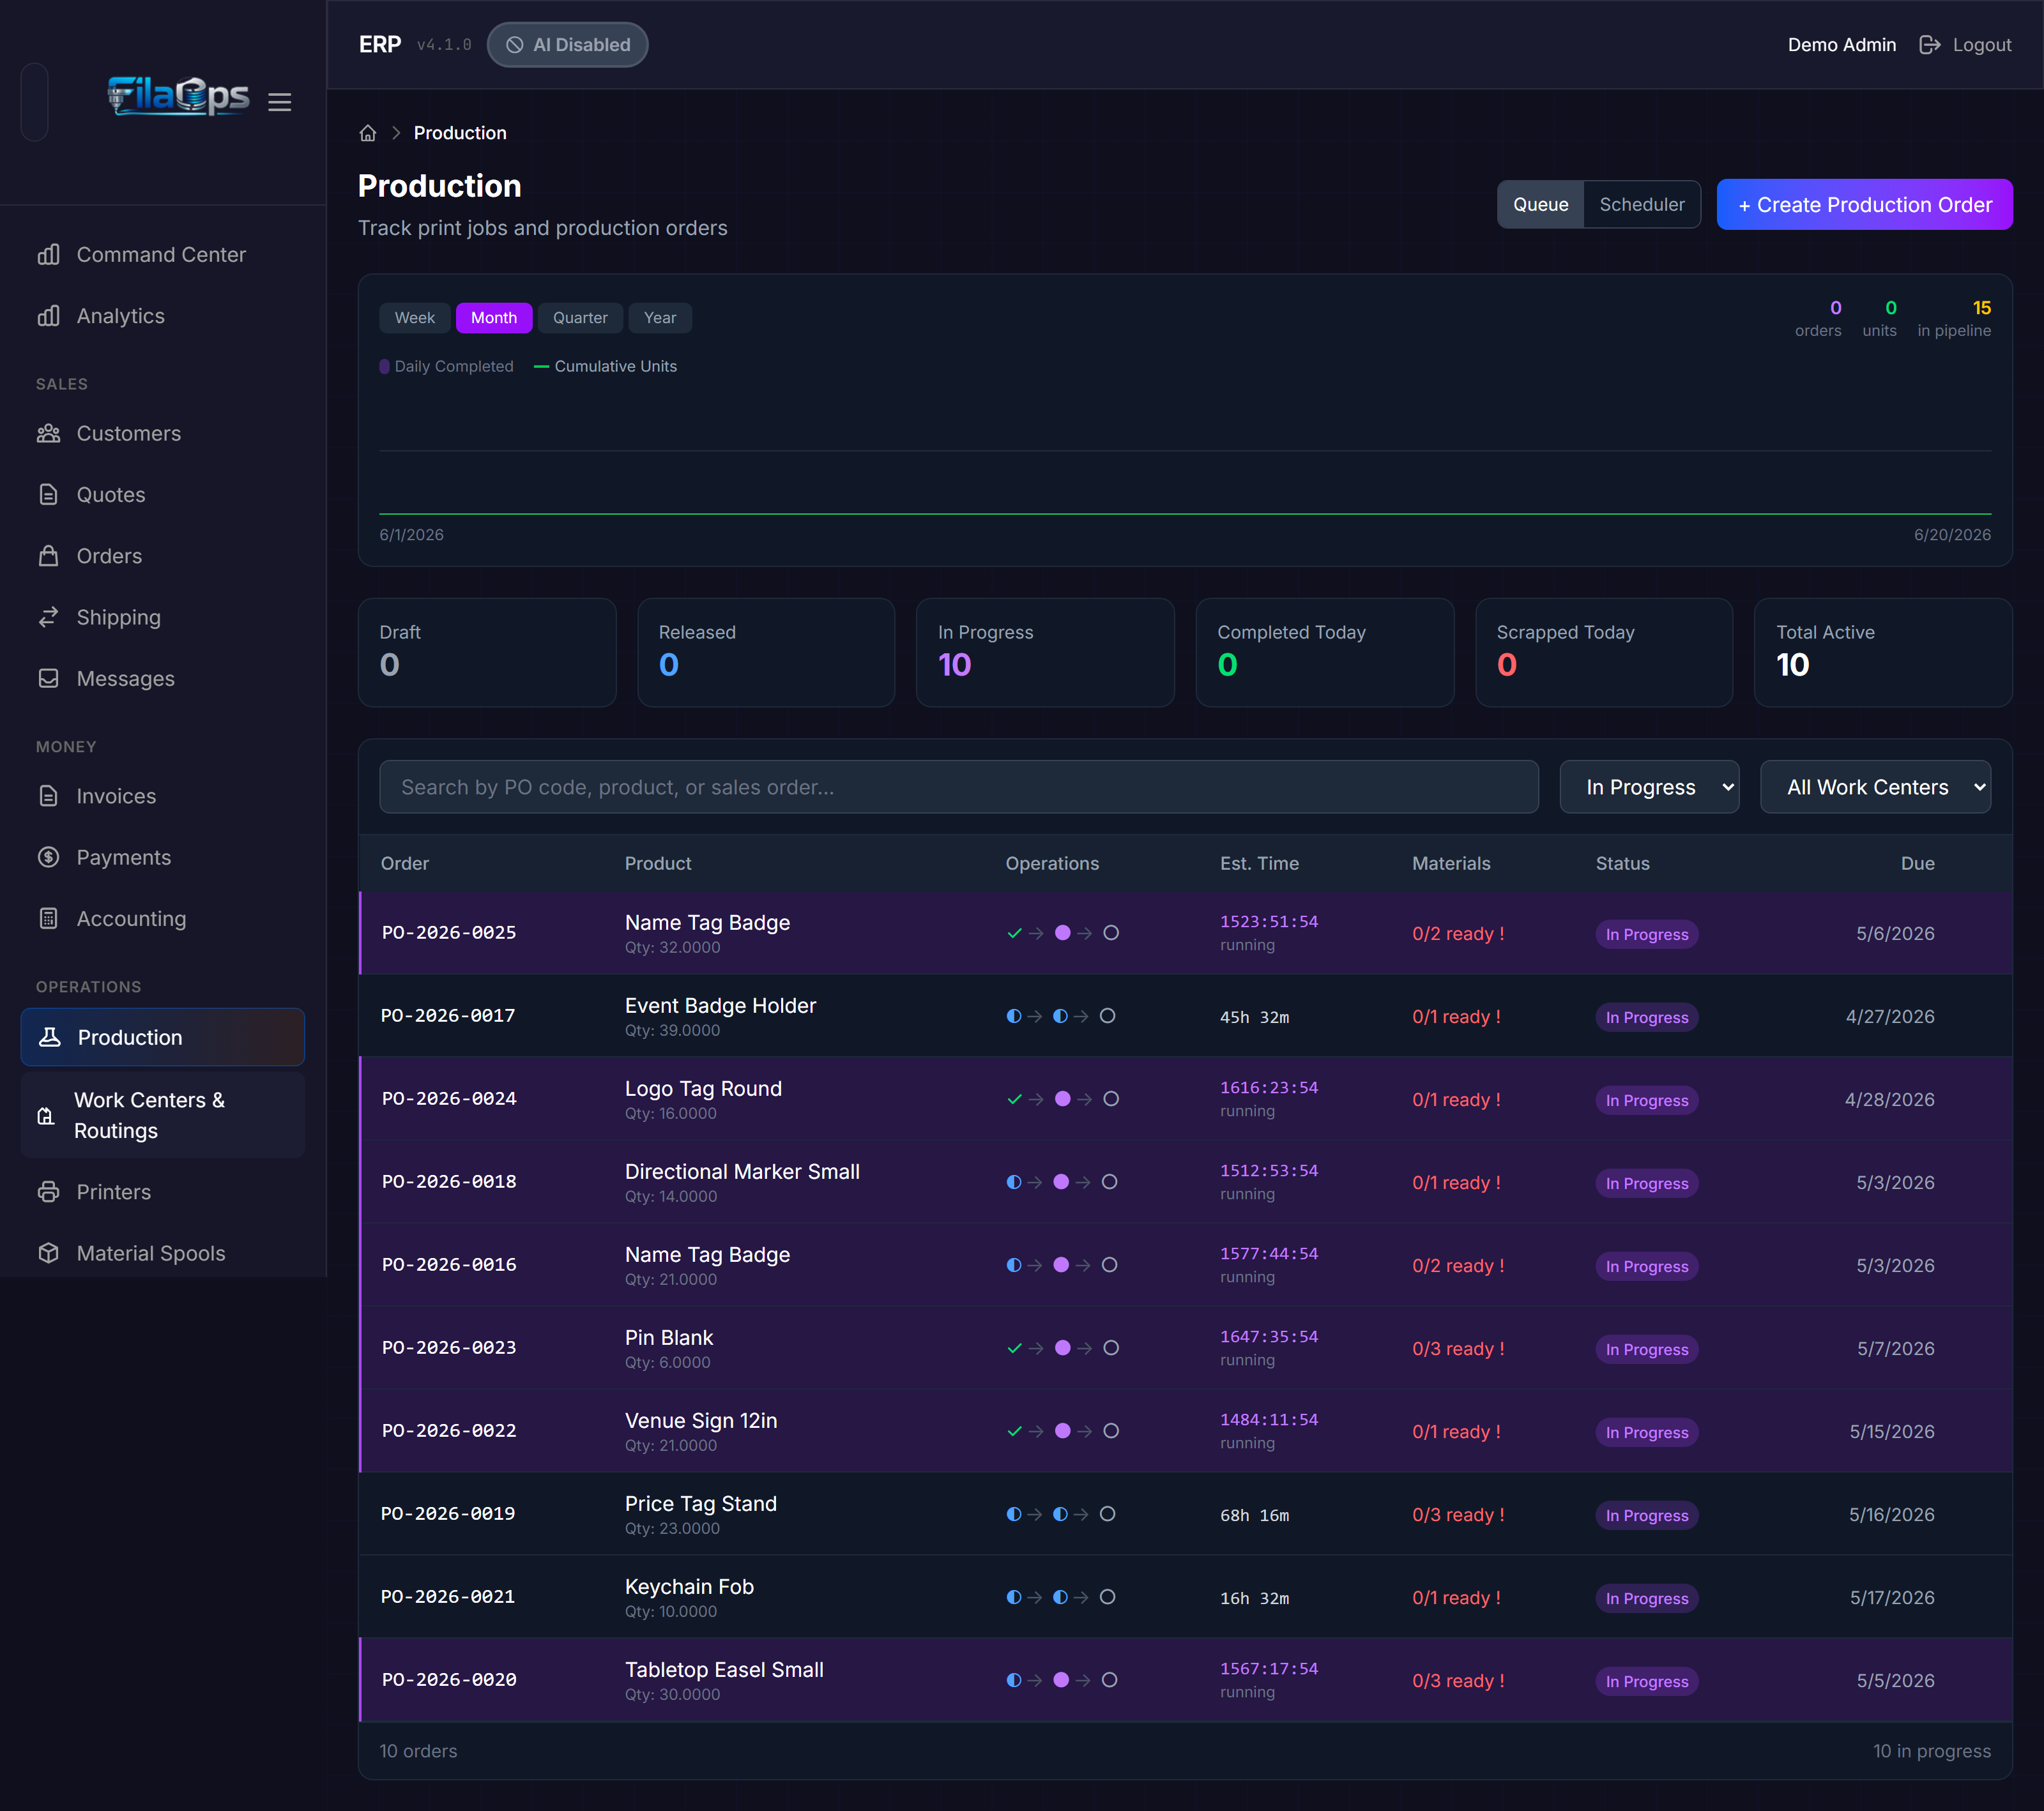
Production Trend Chart
At the top, a chart shows production throughput over time. Toggle between periods:
| Button | Period |
|---|---|
| Week | Week to date |
| Month | Month to date |
| Quarter | Quarter to date |
| Year | Year to date |
The chart shows:
- Purple bars — Orders completed each day
- Green line — Cumulative units produced over the period
- In pipeline count (top right of chart) — Orders currently released + in progress
Hover over any day to see a tooltip with that day's completed orders, units produced, and running cumulative totals.
Stats Cards
Six stat cards show the current state of production (counts reflect the loaded data, not the active filter):
| Card | Color | What It Shows |
|---|---|---|
| Draft | Gray | Orders created but not yet released |
| Released | Blue | Orders approved and ready to start |
| In Progress | Purple | Orders currently being worked on |
| Completed Today | Green | Orders finished today |
| Scrapped Today | Red | Orders scrapped today |
| Total Active | White | Released + In Progress combined |
Filtering and Searching
Above the order table:
- Search — Filter by production order code (e.g.,
PO-2026-0042), product name, product SKU, or linked sales order code - Status filter — Show only orders in a specific status (defaults to In Progress)
Make-to-Order vs. Make-to-Stock Badges
Each order shows a badge next to its code:
| Badge | Color | Meaning |
|---|---|---|
| SO-XXXX | Blue | Make-to-order — linked to a specific sales order |
| STOCK | Purple | Make-to-stock — building inventory, not tied to a sales order |
Operations Chain
The order table shows a compact operations chain for each row — a series of status icons connected by arrows, one icon per routing operation. Hover an icon to see the operation name and any assigned resource.
| Icon | Color | Status |
|---|---|---|
| ○ | Gray | Pending — not yet scheduled or started |
| ◐ | Blue | Queued — scheduled on a resource, waiting to run |
| ● (pulsing) | Purple | Running |
| ✓ | Green | Complete |
| ⊘ | Yellow | Skipped |
Scheduler View
Click Scheduler in the top-right toggle to open the Gantt board. This view shows your machine lanes on a time axis, making it easy to see what is scheduled where, spot capacity gaps, and dispatch unscheduled orders.
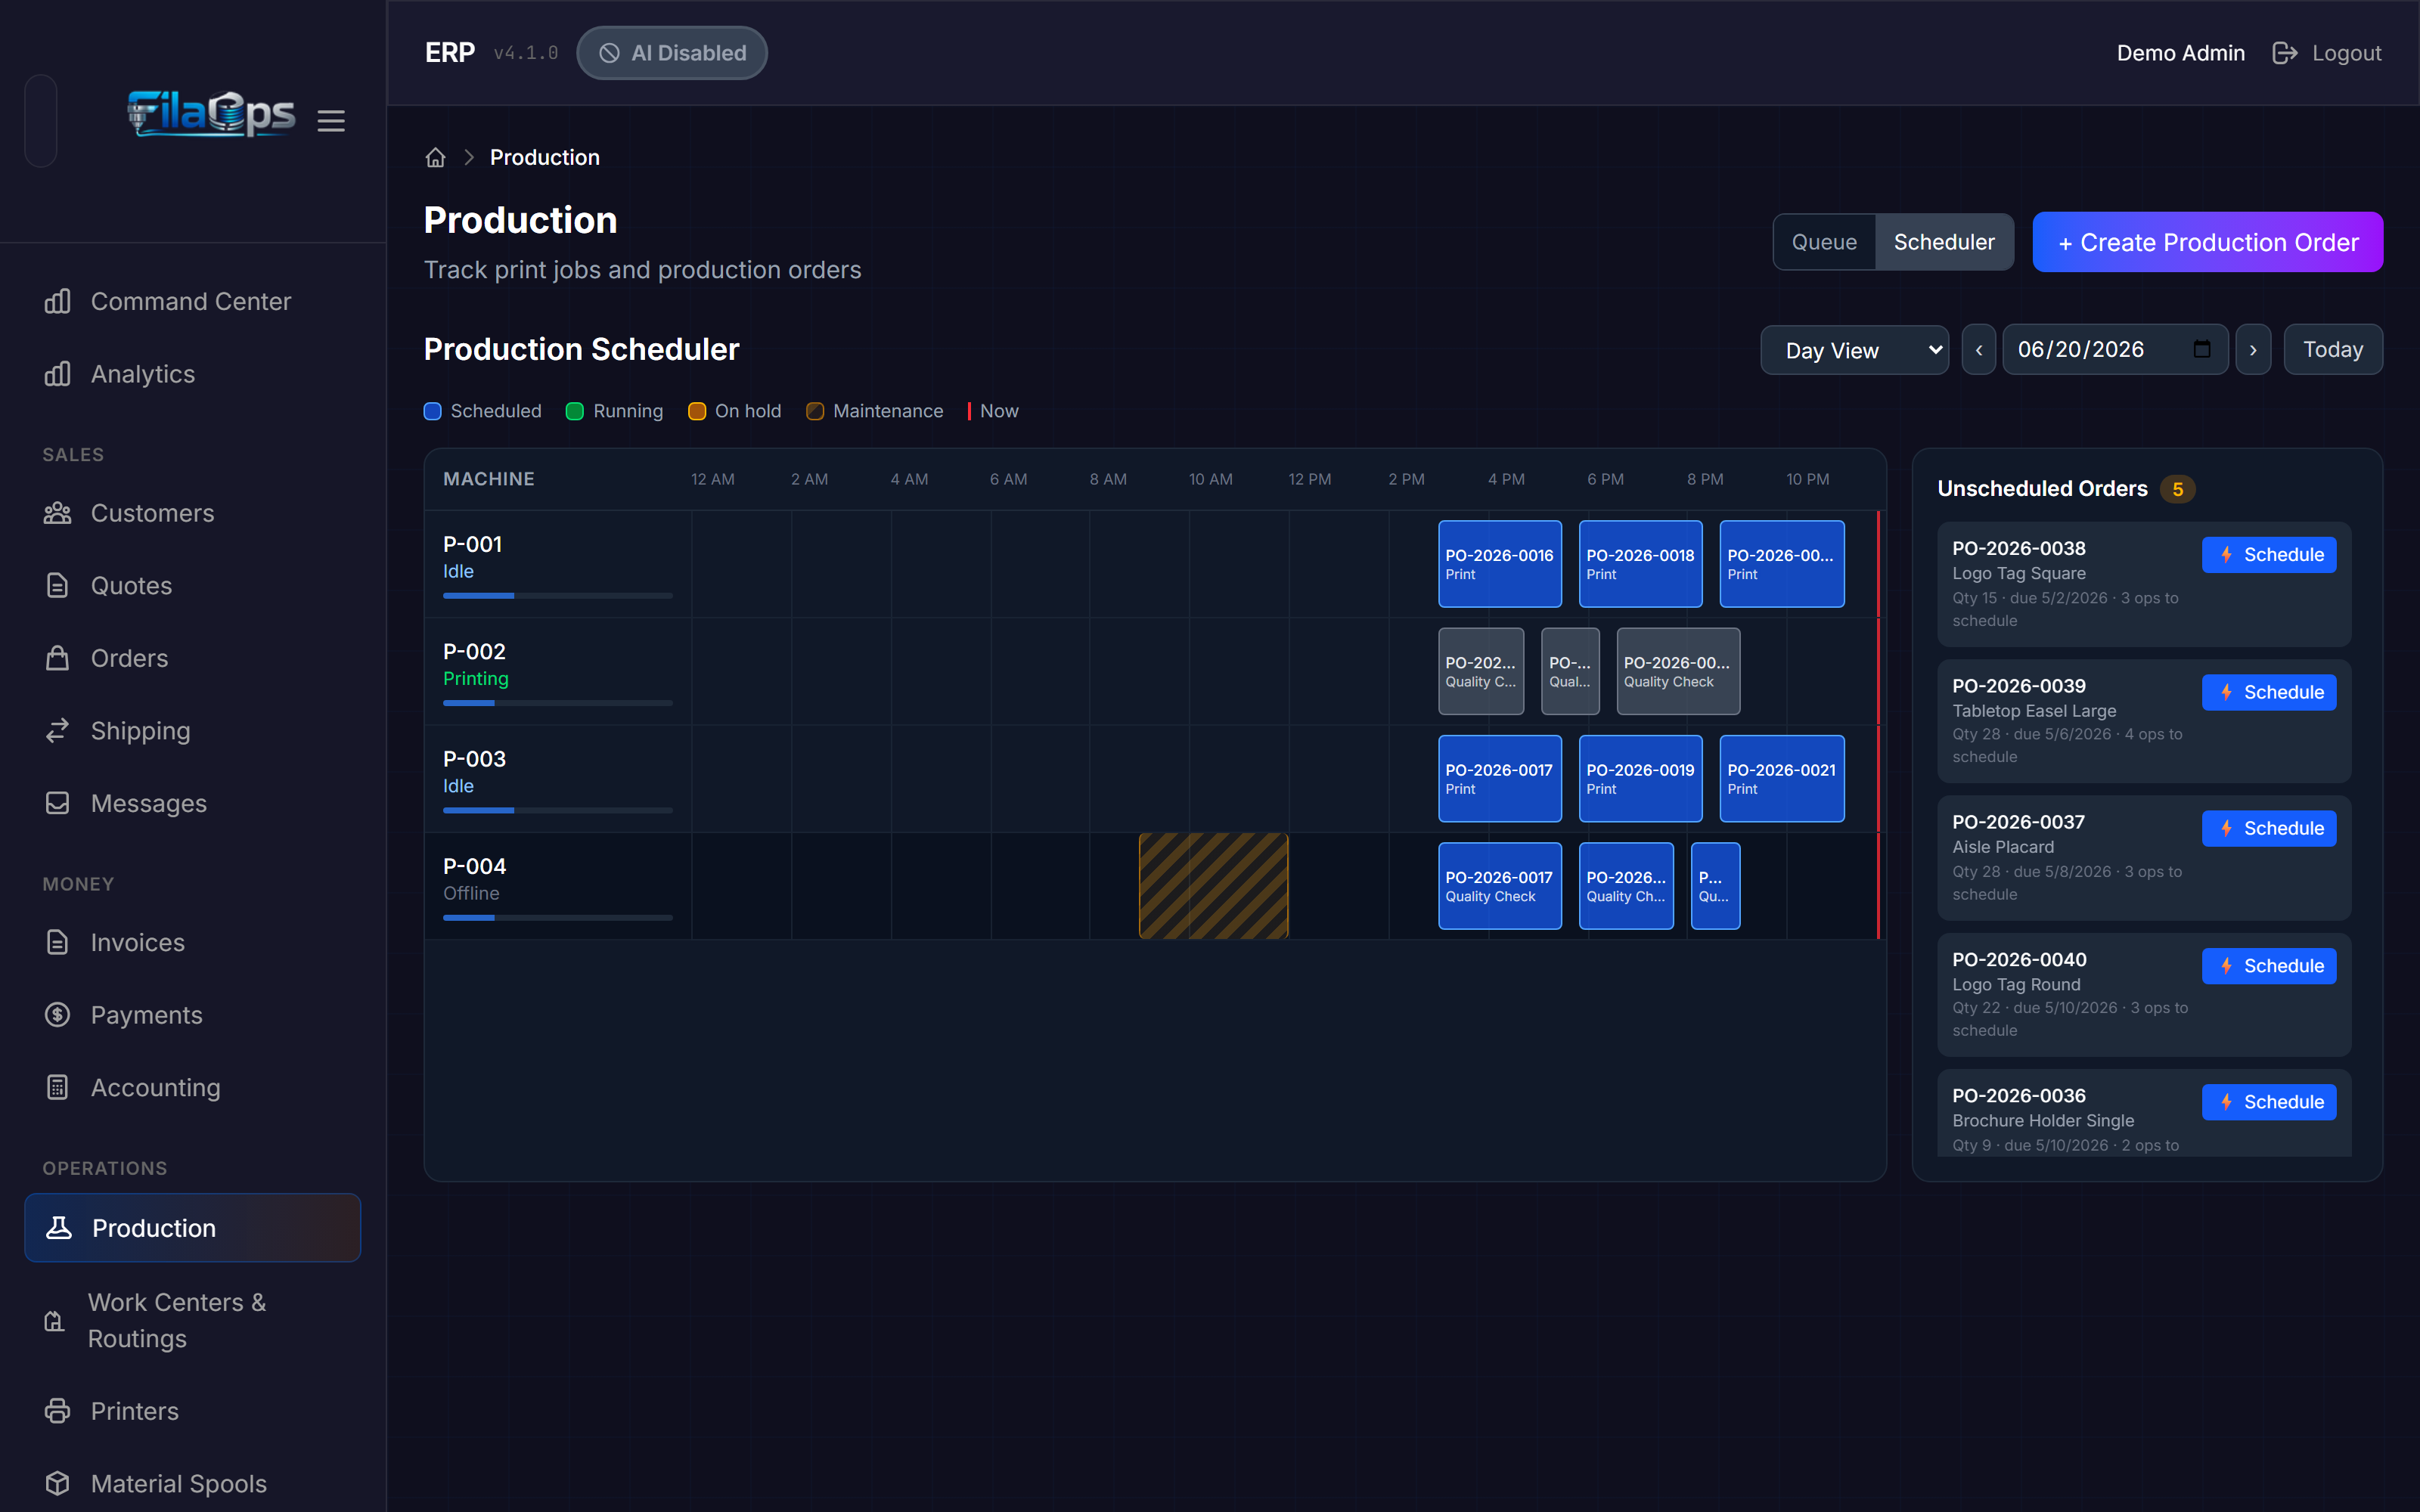
Gantt Controls
| Control | Purpose |
|---|---|
| Day / Week / Month dropdown | Change the time window |
| Date picker | Jump to a specific date |
| ‹ / › arrows | Navigate backward or forward one window |
| Today button | Return to the current date window |
Reading the Gantt
Each row is a machine lane corresponding to a resource or printer. Blocks represent scheduled operations:
| Block Style | Meaning |
|---|---|
| Blue | Scheduled / queued |
| Green | Currently running |
| Amber | On hold |
| Amber diagonal stripes | Maintenance window — blocks scheduling on this lane |
| Red vertical line | Current time ("now" line) |
Below each machine name, a thin utilization bar shows the percentage of the window that is booked:
- Blue — below 60% utilized
- Amber — 60–85% utilized
- Red — over 85% utilized (approaching capacity)
Click any operation block to open the Schedule Operation (or Edit Schedule) modal for that operation.
Unscheduled Orders Panel
The right-hand panel lists released orders that have at least one unscheduled operation. Each card shows:
- Order code and product name
- Quantity and due date
- Number of operations still needing a time slot
Click ⚡ Schedule on any card to open the scheduler modal for the first pending operation on that order.
Dispatch from Queue view without switching tabs
In the Queue view, released orders show a Dispatch button at the right end of their row. Clicking it opens the same scheduler modal for that order's first pending operation.
Production Order Lifecycle
Production orders move through the following statuses:
graph LR
    A[draft] --> B[released]
    B --> C[scheduled]
    C --> D[in_progress]
    B --> D
    D --> E[complete]
    D --> F[short]
    F --> E
    D --> G[scrapped]
    B --> H[on_hold]
    H --> B
    A --> I[cancelled]
B --> I| Status | Description |
|---|---|
| draft | Created but not ready for the floor. Planning stage — editable. |
| released | Approved, materials reserved, ready to schedule or start. |
| scheduled | At least one operation has been assigned a time slot and resource. |
| in_progress | Work has started — at least one operation is running. |
| complete | All units produced (or accepted short). Inventory has been updated. |
| short | All operations finished but quantity_completed is less than quantity_ordered. Awaiting Accept Short action to update inventory. |
| on_hold | Production paused. Can be resumed (returns to released). |
| scrapped | Order abandoned. |
| cancelled | Order terminated before completion. Material reservations are released. |
Individual operation statuses follow: pending → queued → running → complete (or skipped).
QC hold
If QC inspection is enabled for a product, completing the order transitions qc_status to pending before inventory is updated. QC status values: not_required, pending, in_progress, passed, failed, waived.
Creating a Production Order
Manually from the Production Page
- Click + Create Production Order.
-
Fill in the form:
Field Required Description Product Yes Select from active products (shows SKU — name) Quantity Yes Units to produce (minimum 1) Priority — Urgency; defaults to 3 Normal Due Date — Target completion date (optional) Notes — Instructions for the production team Priority levels:
Value Label 1 Urgent 2 High 3 Normal (default) 4 Low 5 Lowest -
Click Create Order.
FilaOps automatically: - Generates an order code in PO-YYYY-NNNN format - Attaches the active BOM and routing for the product - Copies routing operations onto the order (including their materials, scaled to the order quantity) - Reserves materials from inventory - Estimates costs from BOM materials and work center rates
The new order opens immediately in the detail view.
From a Sales Order
- Open a sales order in Sales > Orders.
- Click Generate Production Order.
- FilaOps creates production orders for each manufactured line item, pre-filled with the product, quantity, and a link back to the sales order line.
This is the recommended flow for make-to-order production. The linked sales order code appears as a blue badge on each production order.
Working with a Production Order
Click any order in the production list to open its detail view.
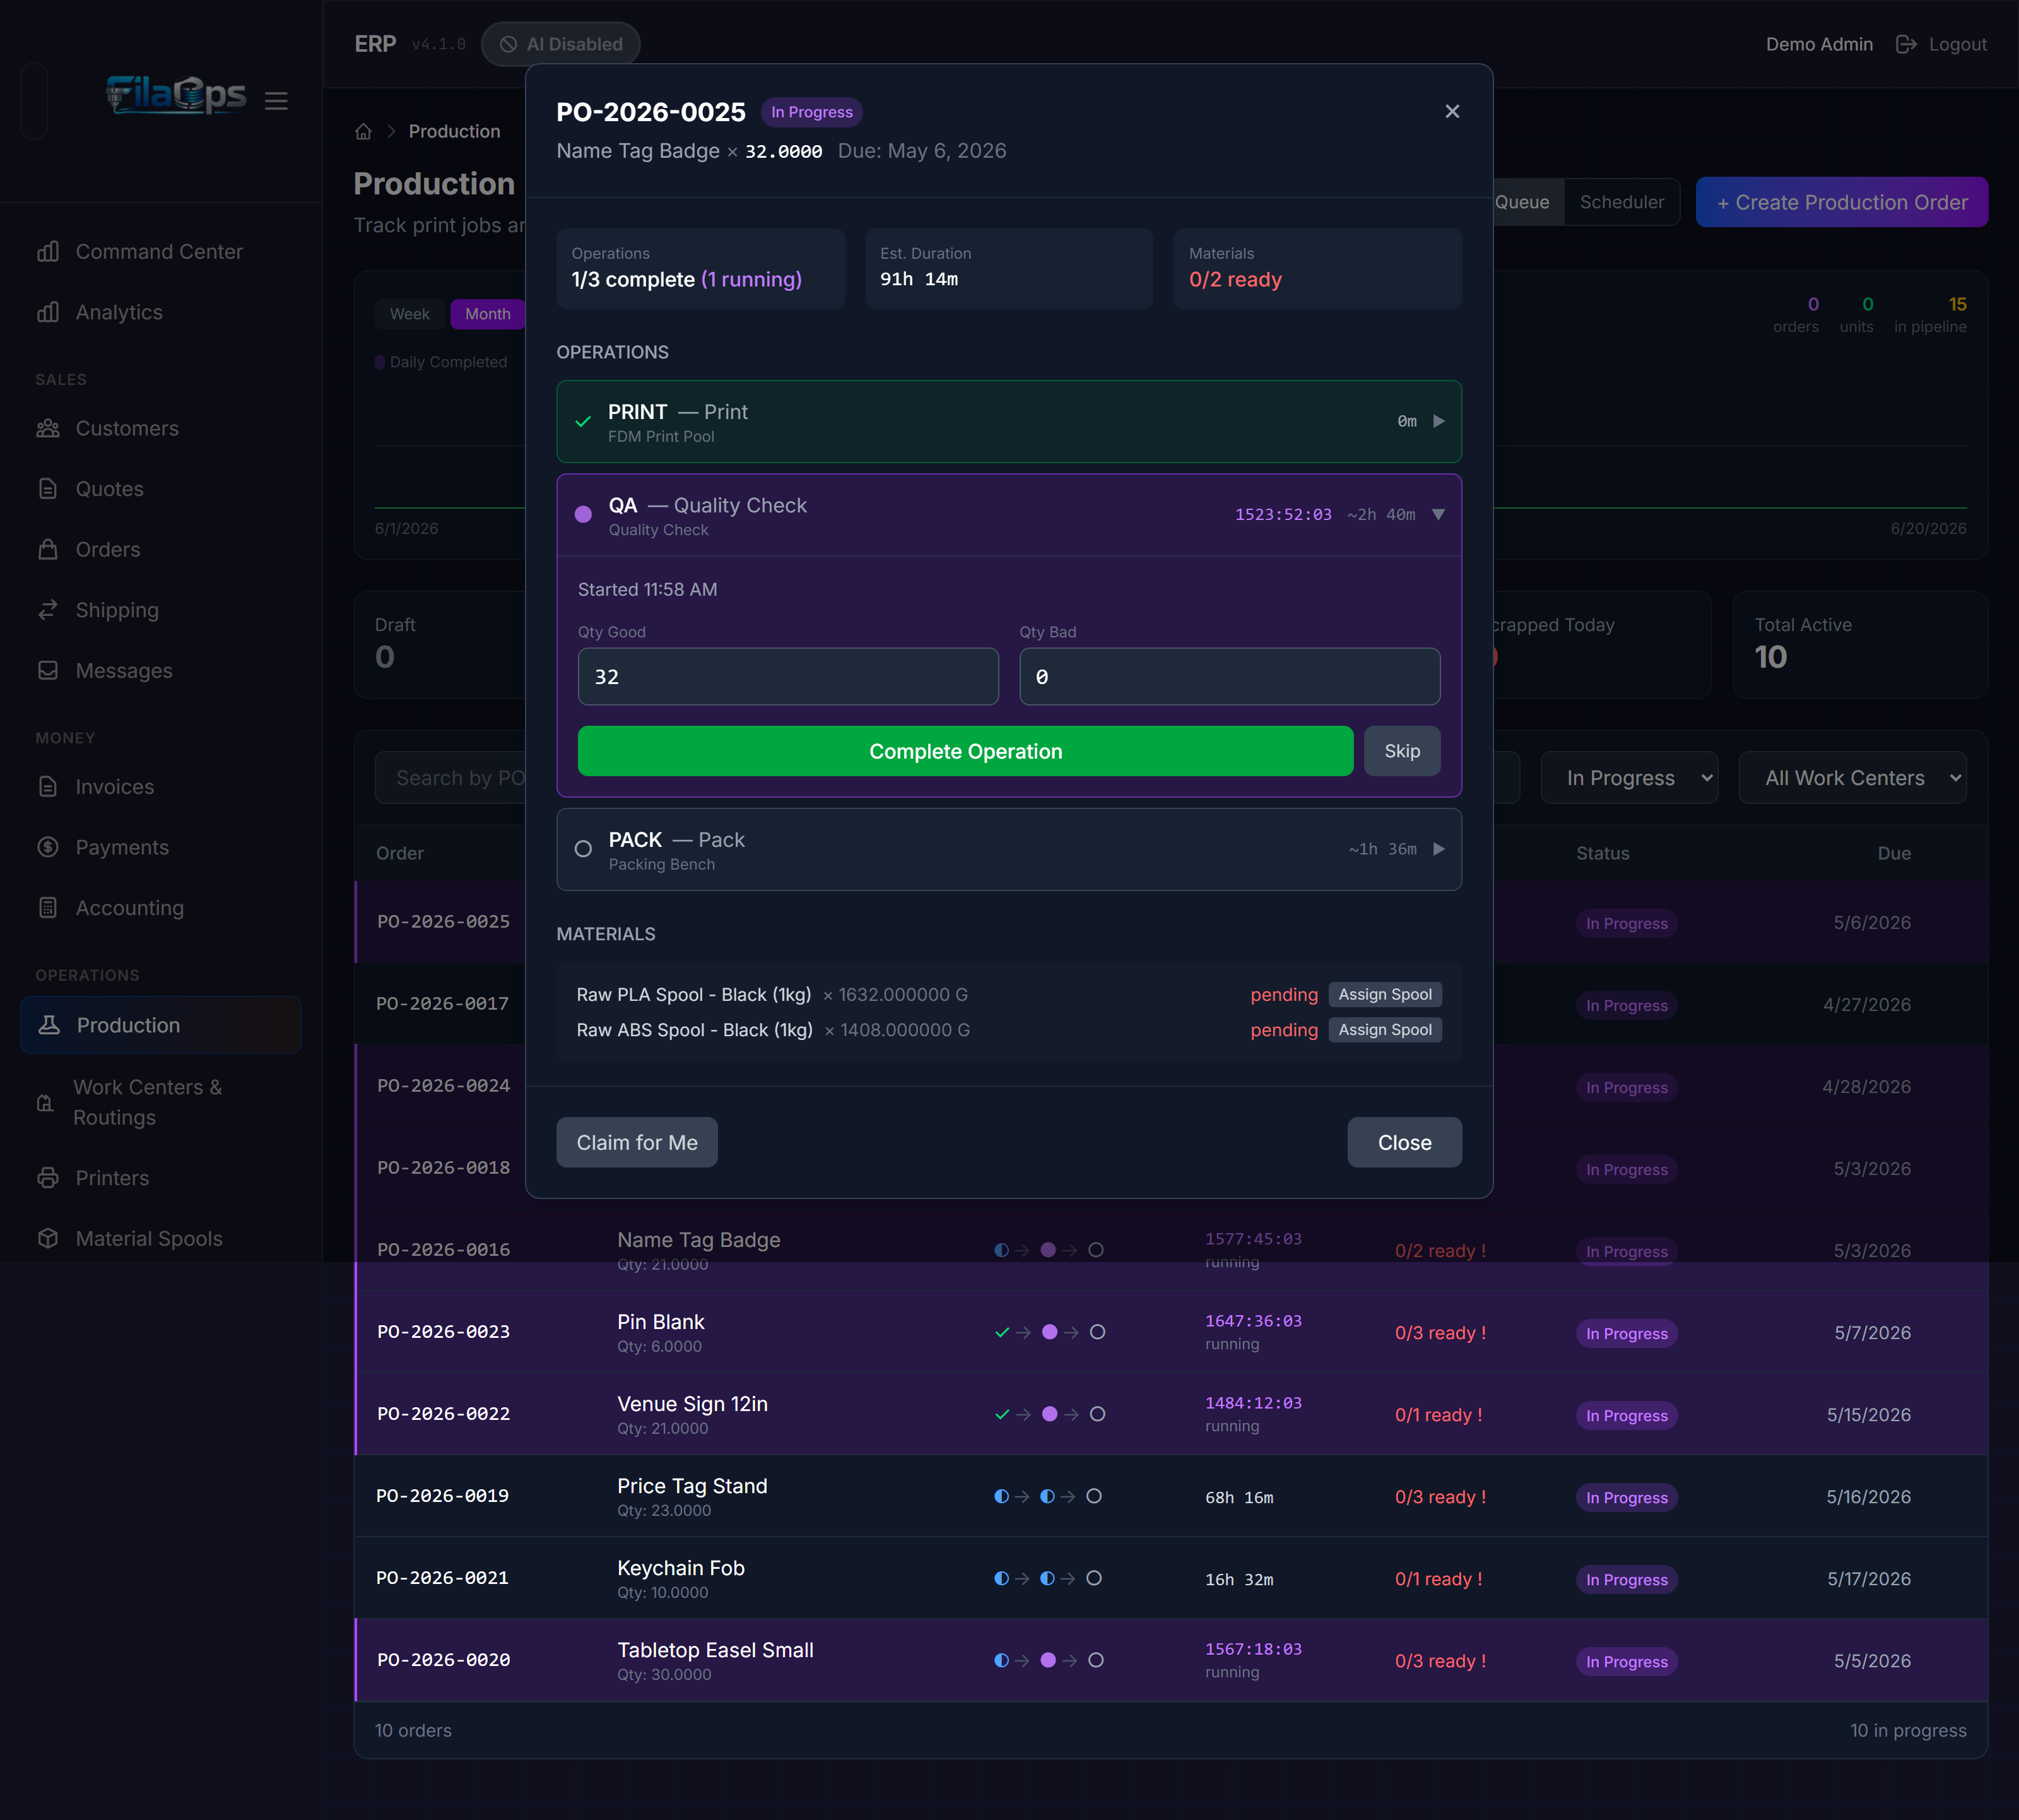
Releasing an Order
When a draft order is ready for the floor:
- Open the production order.
- Click Release.
FilaOps checks that materials are reserved and transitions the order to released. If materials are short, the response lists each shortage: component SKU, quantity needed, and quantity reserved. You can:
- Resolve the shortage (receive stock or transfer inventory), then release normally.
- Click Force Release to release despite shortages when you know stock is incoming.
Force Release does not conjure stock
Releasing with a shortage means operations may stall if physical material is absent. Use force release only when confirmed incoming supply covers the gap.
Scheduling Operations
Once released, operations need a time slot and resource before work starts.
- Switch to Scheduler view, or click Dispatch on the order's row in Queue view.
-
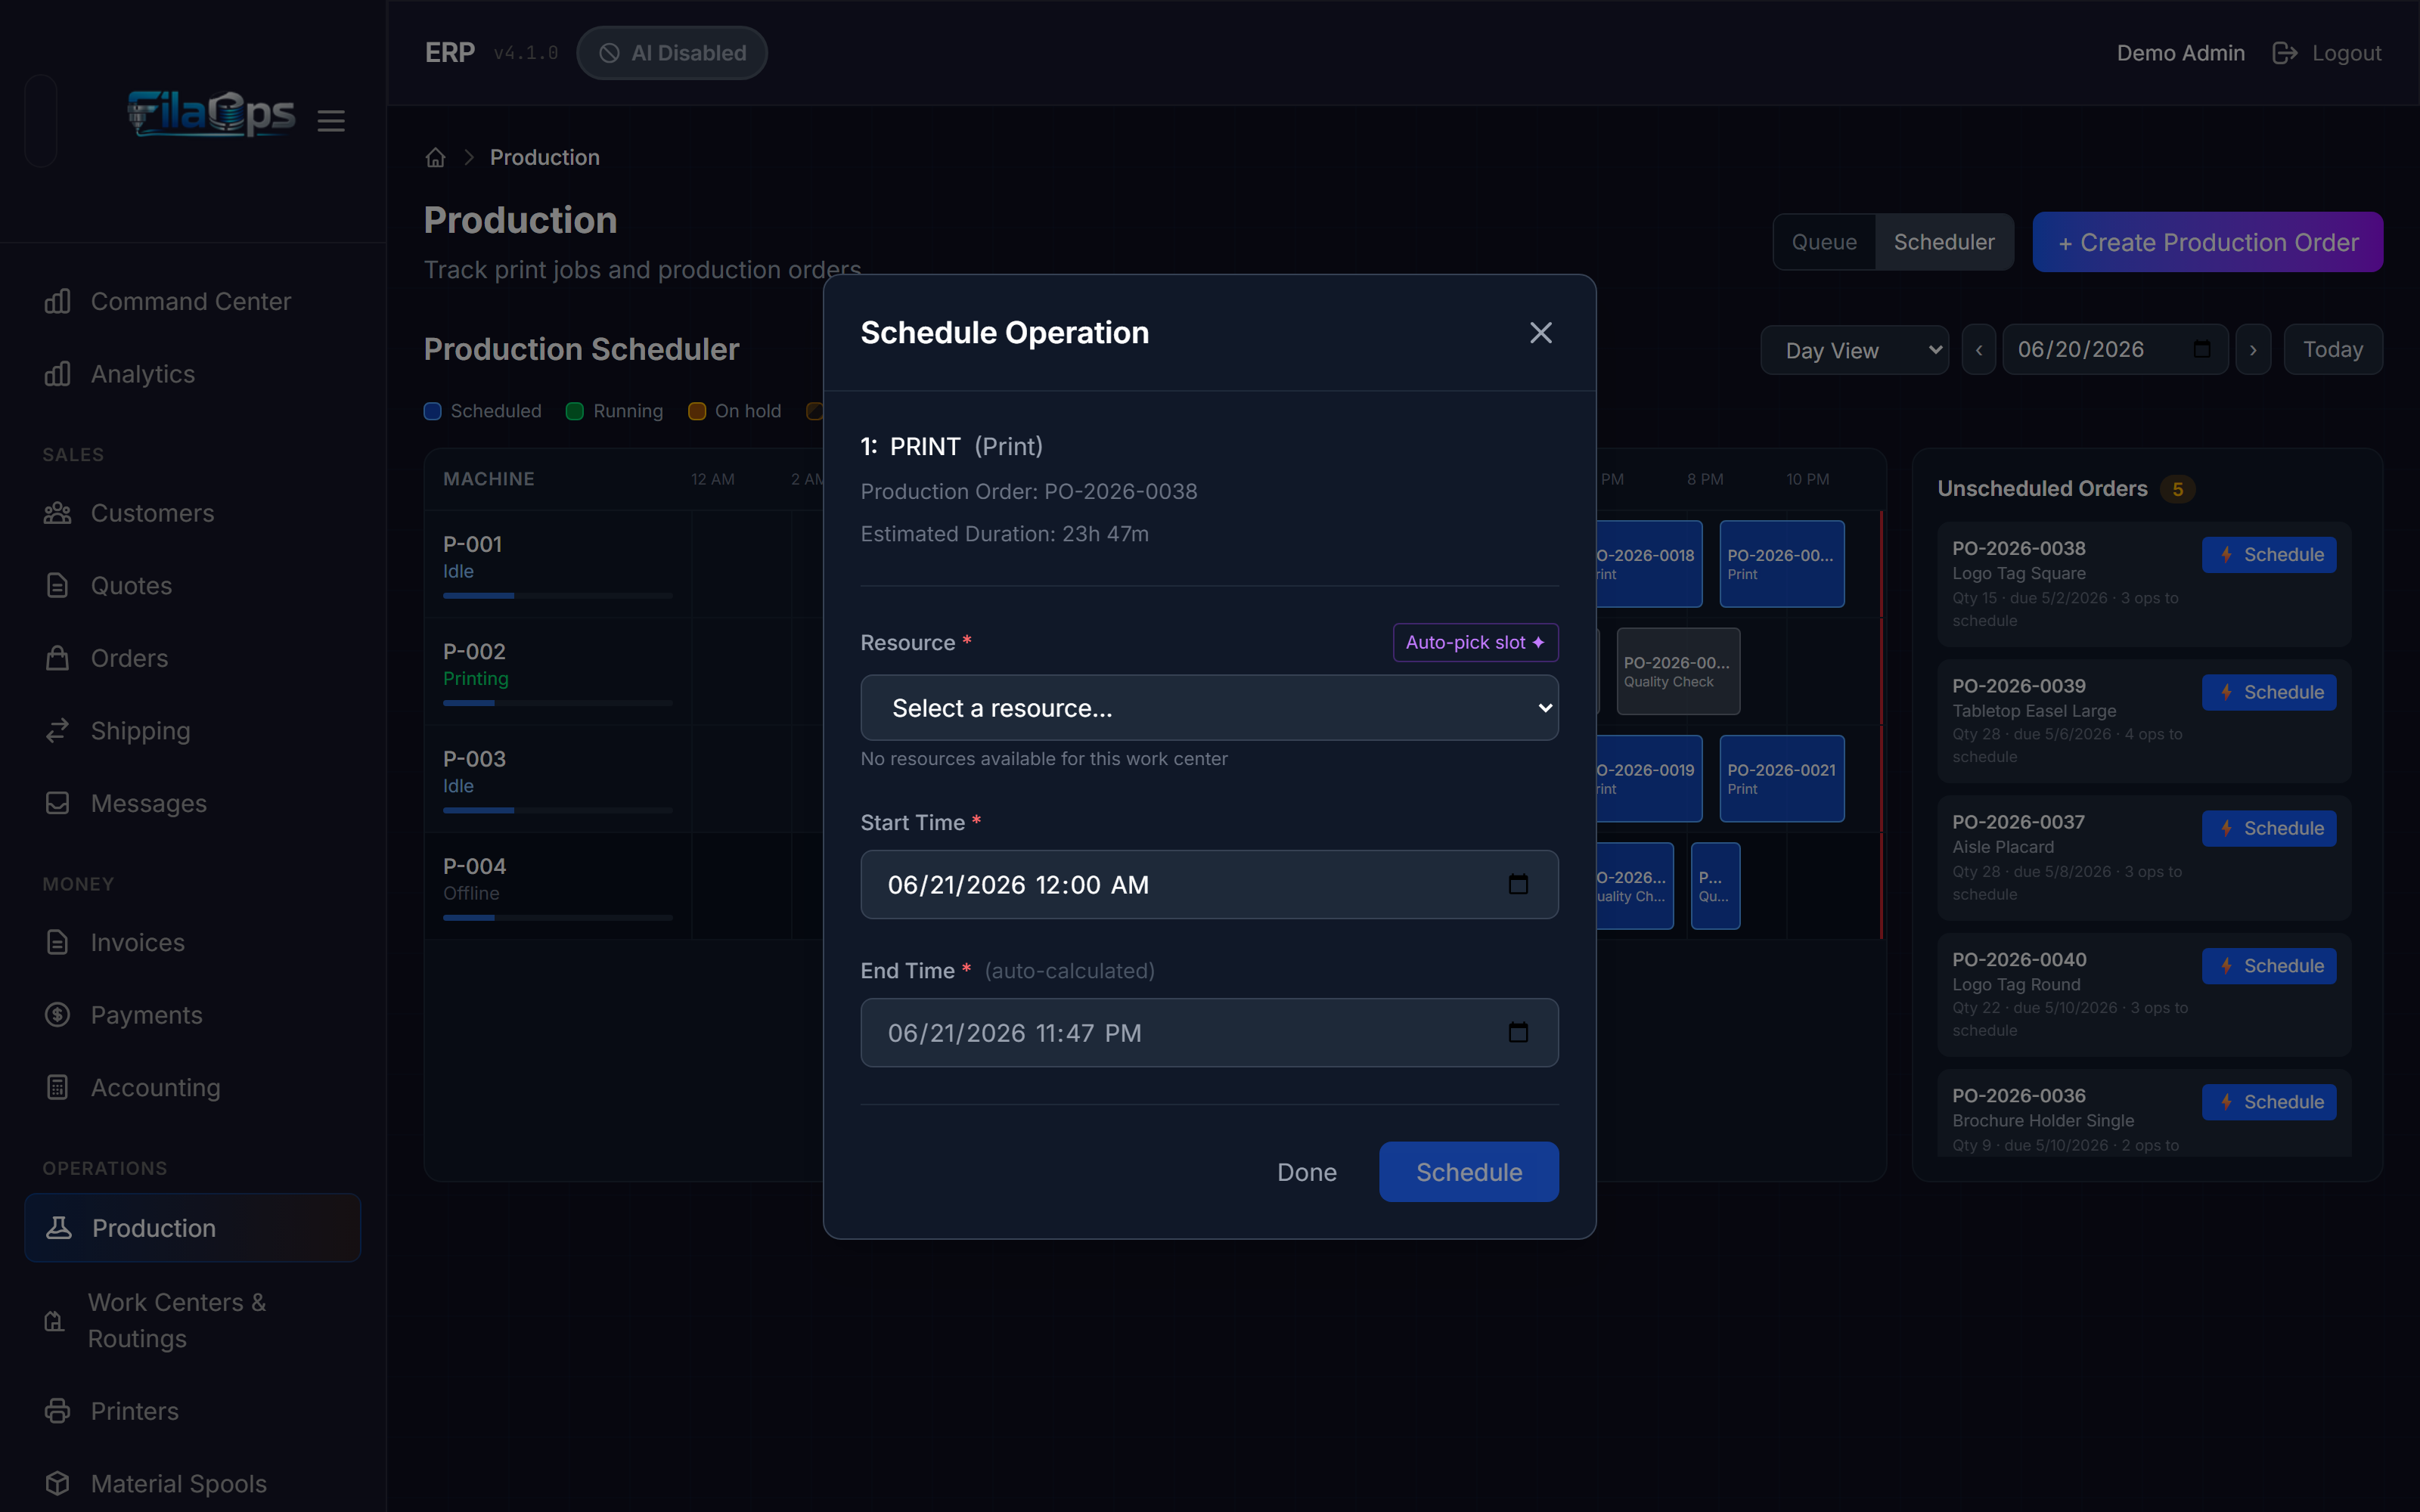
The Schedule Operation modal opens for the next pending operation.
-
Select a Resource from the dropdown. Resources are filtered to the operation's work center. The modal warns you if the selected resource is incompatible with the product's material requirements (e.g., an open-frame printer chosen for a part that requires an enclosed machine).
-
Set a Start Time. The End Time is auto-calculated from planned setup + run time. You may override it manually if the operation's routing has no duration set.
-
Click Schedule.
If the slot conflicts with another operation on the same resource, a red conflict alert appears with the name of the blocking operation and a suggestion for the next available slot. Click Use suggested slot to apply it instantly.
After scheduling one operation, the success banner offers a link to schedule the next operation in sequence — keeping you in the modal to chain operations without returning to the board.
To reschedule an already-queued operation: click its block on the Gantt board. The modal opens in Edit Schedule mode showing the current slot. Make changes and click Reschedule. To remove the slot entirely, click Unschedule.
Operation sequence enforcement
FilaOps enforces routing order. You cannot schedule step 2 to start before step 1 finishes (unless the routing operation has Can Overlap enabled). If you try, an amber predecessor conflict alert shows the earliest valid start time. For reschedules that would push into a successor's slot, an orange successor conflict alert lists the affected operations.
Starting Production
When work begins on a released or scheduled order:
- Open the production order.
- Click Start.
The order moves to in_progress and the first pending operation transitions to running automatically.
Completing a Production Order
When all units are finished:
- Open the production order.
- Click Complete.
- Enter Quantity Good (units that passed) and optionally Quantity Scrapped.
- Confirm.
Finished goods are added to inventory. Actual costs are recalculated from consumed material quantities and actual operation times.
Completing short at this step
If the quantity good is less than the quantity remaining, the system asks you to confirm a short close. This completes the order at the actual quantity.
Accepting Short (Partial Completion)
When all operations finish but quantity_completed is less than quantity_ordered, the order automatically enters short status. Inventory has not been updated yet at this point.
- Open the production order.
- Click Accept Short.
- Enter an optional note.
- Confirm.
FilaOps: - Releases all material reservations - Consumes materials proportional to the completed quantity (BOM-proportional) - Receipts the completed quantity as finished goods in inventory - Closes the order as complete
After accepting short on a production order linked to a sales order, use Close Short on the sales order to accept partial fulfillment.
Putting an Order on Hold
To pause work without cancelling:
- Open the production order (must be released or in_progress).
- Click Hold.
- Enter an optional reason.
The order moves to on_hold. Resume it by clicking Release.
Splitting a Production Order
If you need to run part of an order on a different machine or a different timeline:
- Open the production order (must be in draft, scheduled, or released status).
- Click Split Order.
- Enter the quantity to split into a new order.
- Confirm.
FilaOps: - Reduces the original order's quantity by the split amount - Creates a new draft order for the split quantity with a fresh PO-YYYY-NNNN code - Copies routing operations onto the new order (quantities scaled to the split amount) - Reserves materials for the new order - Appends a [SPLIT] note to both orders for traceability
Both orders retain any sales order link.
When to split
Split when a printer breaks mid-batch and you need to finish remaining units on a different machine, or when you want to expedite part of a large batch without holding up the rest.
Scrapping a Production Order
If a run fails and cannot be recovered:
- Open the production order.
- Click Scrap.
- Select a Scrap Reason from the list (configurable — common examples: Print failure, Layer shift, Material defect, Warping).
- Enter optional notes.
- Optionally check Create Remake Order to automatically generate a new draft order for the scrapped quantity at one priority level higher.
- Confirm.
Scrap records include the reason code, quantity, and cost at the time of scrapping. These accumulate into production stats so you can identify recurring failure patterns.
Cancelling an Order
To terminate an order entirely:
- Open the production order (must be draft or released — completed orders cannot be cancelled).
- Click Cancel.
- Enter an optional reason.
Material reservations are released automatically. Cancelled orders are excluded from active stat counts.
Running a QC Inspection
For products that require quality verification before inventory is updated:
- Open the production order.
- Click QC Inspection (available when
qc_statusispendingorin_progress). - Record:
- Inspector name
- QC Result —
passed,failed, orconditional - Quantity Passed and Quantity Failed
- Failure Reason and notes (if any units failed)
- Save.
If QC passes, the order can proceed to closed/complete and inventory is updated. If QC fails, the order enters qc_hold — you can then scrap the failed units, request rework, or waive the failure with a documented reason (waived status).
Refreshing Routing
If a routing was added or updated after a production order was created, the order does not pick up the new operations automatically. Use Refresh Routing to re-apply the current active routing.
- Open the production order (must be draft, released, or on_hold).
- Click Refresh Routing in the order footer.
- Confirm.
All pending operations and their materials are replaced with the current routing's operations. Refresh is blocked if any operation is already running or complete — you cannot rewrite history for work already in progress.
If the order has no operations at all (routing was missing when the order was created), an Apply Routing Now button appears in the operations section instead.
Swapping a Material Variant
If a routing operation specifies a parent/template product but available inventory is in a specific variant (e.g., the BOM calls for "PLA Black" but your stock is "Bambu PLA Black 1kg"):
- Open the production order detail.
- Find the pending material line on the relevant operation.
- Click Swap Variant.
- Select the active variant to consume.
- Confirm.
The swap is only allowed while the material is in pending status (before allocation or consumption). FilaOps validates that the selected product is an active variant of the original component (i.e., shares the same parent product).
Tips & Best Practices
- Configure work centers and resources before creating orders — operations can only be scheduled to resources that exist in the system
- Build routings for every repeatable product — they eliminate manual operation entry, drive consistent time estimates, and enable the Scheduler board
- Use routing templates for shared process patterns — define a "FDM Print → Support Removal → QC → Pack" template once and base individual product routings on it
- Generate production orders from sales orders — this maintains the MTO link so you always know which customer an order is for
- Check the Scheduler board at the start of each shift — the Unscheduled Orders panel shows what needs dispatching before printers can start
- Set priorities accurately — priority 1–2 for hard customer deadlines, 4–5 for stock replenishment, 3 for everything else. The order list and work center queues sort by priority then due date.
- Record scrap reasons consistently — the data accumulates over time and reveals which printers, materials, or products fail most
- Use On Hold rather than Cancel for temporary stoppages — on hold preserves the order and its material reservations; cancel releases them permanently
- Split rather than cancel when a printer fails mid-batch — the original order continues for remaining units while the split handles the diversion
What's Next?
- Tracking Inventory — monitor stock levels and record transactions
- Ordering Supplies — purchase materials before you run out
- Material Planning (MRP) — let FilaOps calculate what you need and when
- Managing Sales Orders — link production back to customer demand
Quick Reference
| Task | Where to Find It |
|---|---|
| Create a work center | Manufacturing > Setup > Work Centers tab > + Add Work Center |
| Quick-add a printer | Manufacturing > Setup > Printer Setup button |
| Add a resource to a work center | Work center card > Add Resource |
| Create a routing | Manufacturing > Setup > Routings tab > + New Routing |
| Create a production order | Manufacturing > Production > + Create Production Order |
| Generate PO from a sales order | Sales > Orders > order detail > Generate Production Order |
| Release an order | Production order detail > Release |
| Dispatch / schedule an operation | Queue view row > Dispatch, or Scheduler board > ⚡ Schedule in Unscheduled panel |
| Reschedule a scheduled operation | Scheduler board > click the operation block > Edit Schedule |
| Start production | Production order detail > Start |
| Complete an order | Production order detail > Complete |
| Accept short (partial completion) | Production order detail > Accept Short |
| Put an order on hold | Production order detail > Hold |
| Cancel an order | Production order detail > Cancel |
| Split a production order | Production order detail > Split Order |
| Scrap a production order | Production order detail > Scrap |
| Run a QC inspection | Production order detail > QC Inspection |
| Refresh routing on a PO | Production order detail footer > Refresh Routing |
| View the Gantt board | Manufacturing > Production > Scheduler toggle |
| View production trends | Manufacturing > Production > Queue toggle > chart at top |