Installation & Setup
Get FilaOps running on your server or local machine. The recommended path is Docker Compose — it handles the database, migrations, and both servers in one command. A manual (bare-metal) path is also documented for developers or environments where Docker is not available.
Prerequisites
Docker path (recommended)
| Software | Minimum version | Notes |
|---|---|---|
| Docker | 20.10 or newer | Desktop or Engine |
| Docker Compose | v2 (the docker compose plugin) | docker-compose v1 is not supported |
| Git | any | To clone the repository |
Manual path
| Software | Minimum version | Purpose |
|---|---|---|
| Python | 3.11 or newer | Backend runtime |
| Node.js | 24 LTS (24.x) or newer | Frontend build |
| PostgreSQL | 16 or newer | Database (16+ required) |
| Git | any | Clone the repository |
PostgreSQL 16 required
FilaOps uses PostgreSQL-specific features (JSONB, array types) and its migration history targets PostgreSQL 16+. SQLite and MySQL will not work. The .env.example and docker-compose.yml both default to postgres:16.
Download links:
- Docker Desktop: docker.com/products/docker-desktop
- Python: python.org/downloads
- Node.js: nodejs.org
- PostgreSQL: postgresql.org/download
Option A — Docker Compose (recommended)
This is the fastest path and the one used in production. Docker handles PostgreSQL, runs database migrations automatically before the backend starts, and serves the React frontend on port 80.
Step 1: Clone the repository
Step 2: Create your environment file
Then open .env and set two required secrets. The application refuses to start in production if either is left at a placeholder value:
# Generate a secure random SECRET_KEY:
openssl rand -hex 32

# Generate a secure DB_PASSWORD:
openssl rand -hex 24
Paste the output into your .env:
One-liner to append both secrets
On Windows without OpenSSL, use Python:The full list of supported environment variables is in backend/.env.example with inline comments. The most common ones to review before first boot:
| Variable | Default | When to change |
|---|---|---|
DB_NAME | filaops | If you want a different database name |
ALLOWED_ORIGINS | http://localhost,http://localhost:5173 | Add your server's hostname for remote access |
FRONTEND_URL | http://localhost | Set to your public URL |
ENVIRONMENT | development | Set to production for live deployments |
Step 3: Start FilaOps
Docker Compose starts four services in dependency order:
db— PostgreSQL 16, with a health check that gates the next step.migrate— runsalembic upgrade head(Core migrations) and exits cleanly. The backend does not start until this completes successfully.backend— FastAPI on port 8000, served via uvicorn with--proxy-headers.frontend— pre-built React SPA served on port 80.
First boot takes longer
Docker pulls images and builds the backend and frontend containers on first run. Subsequent starts are fast. Watch progress with:
Step 4: Verify
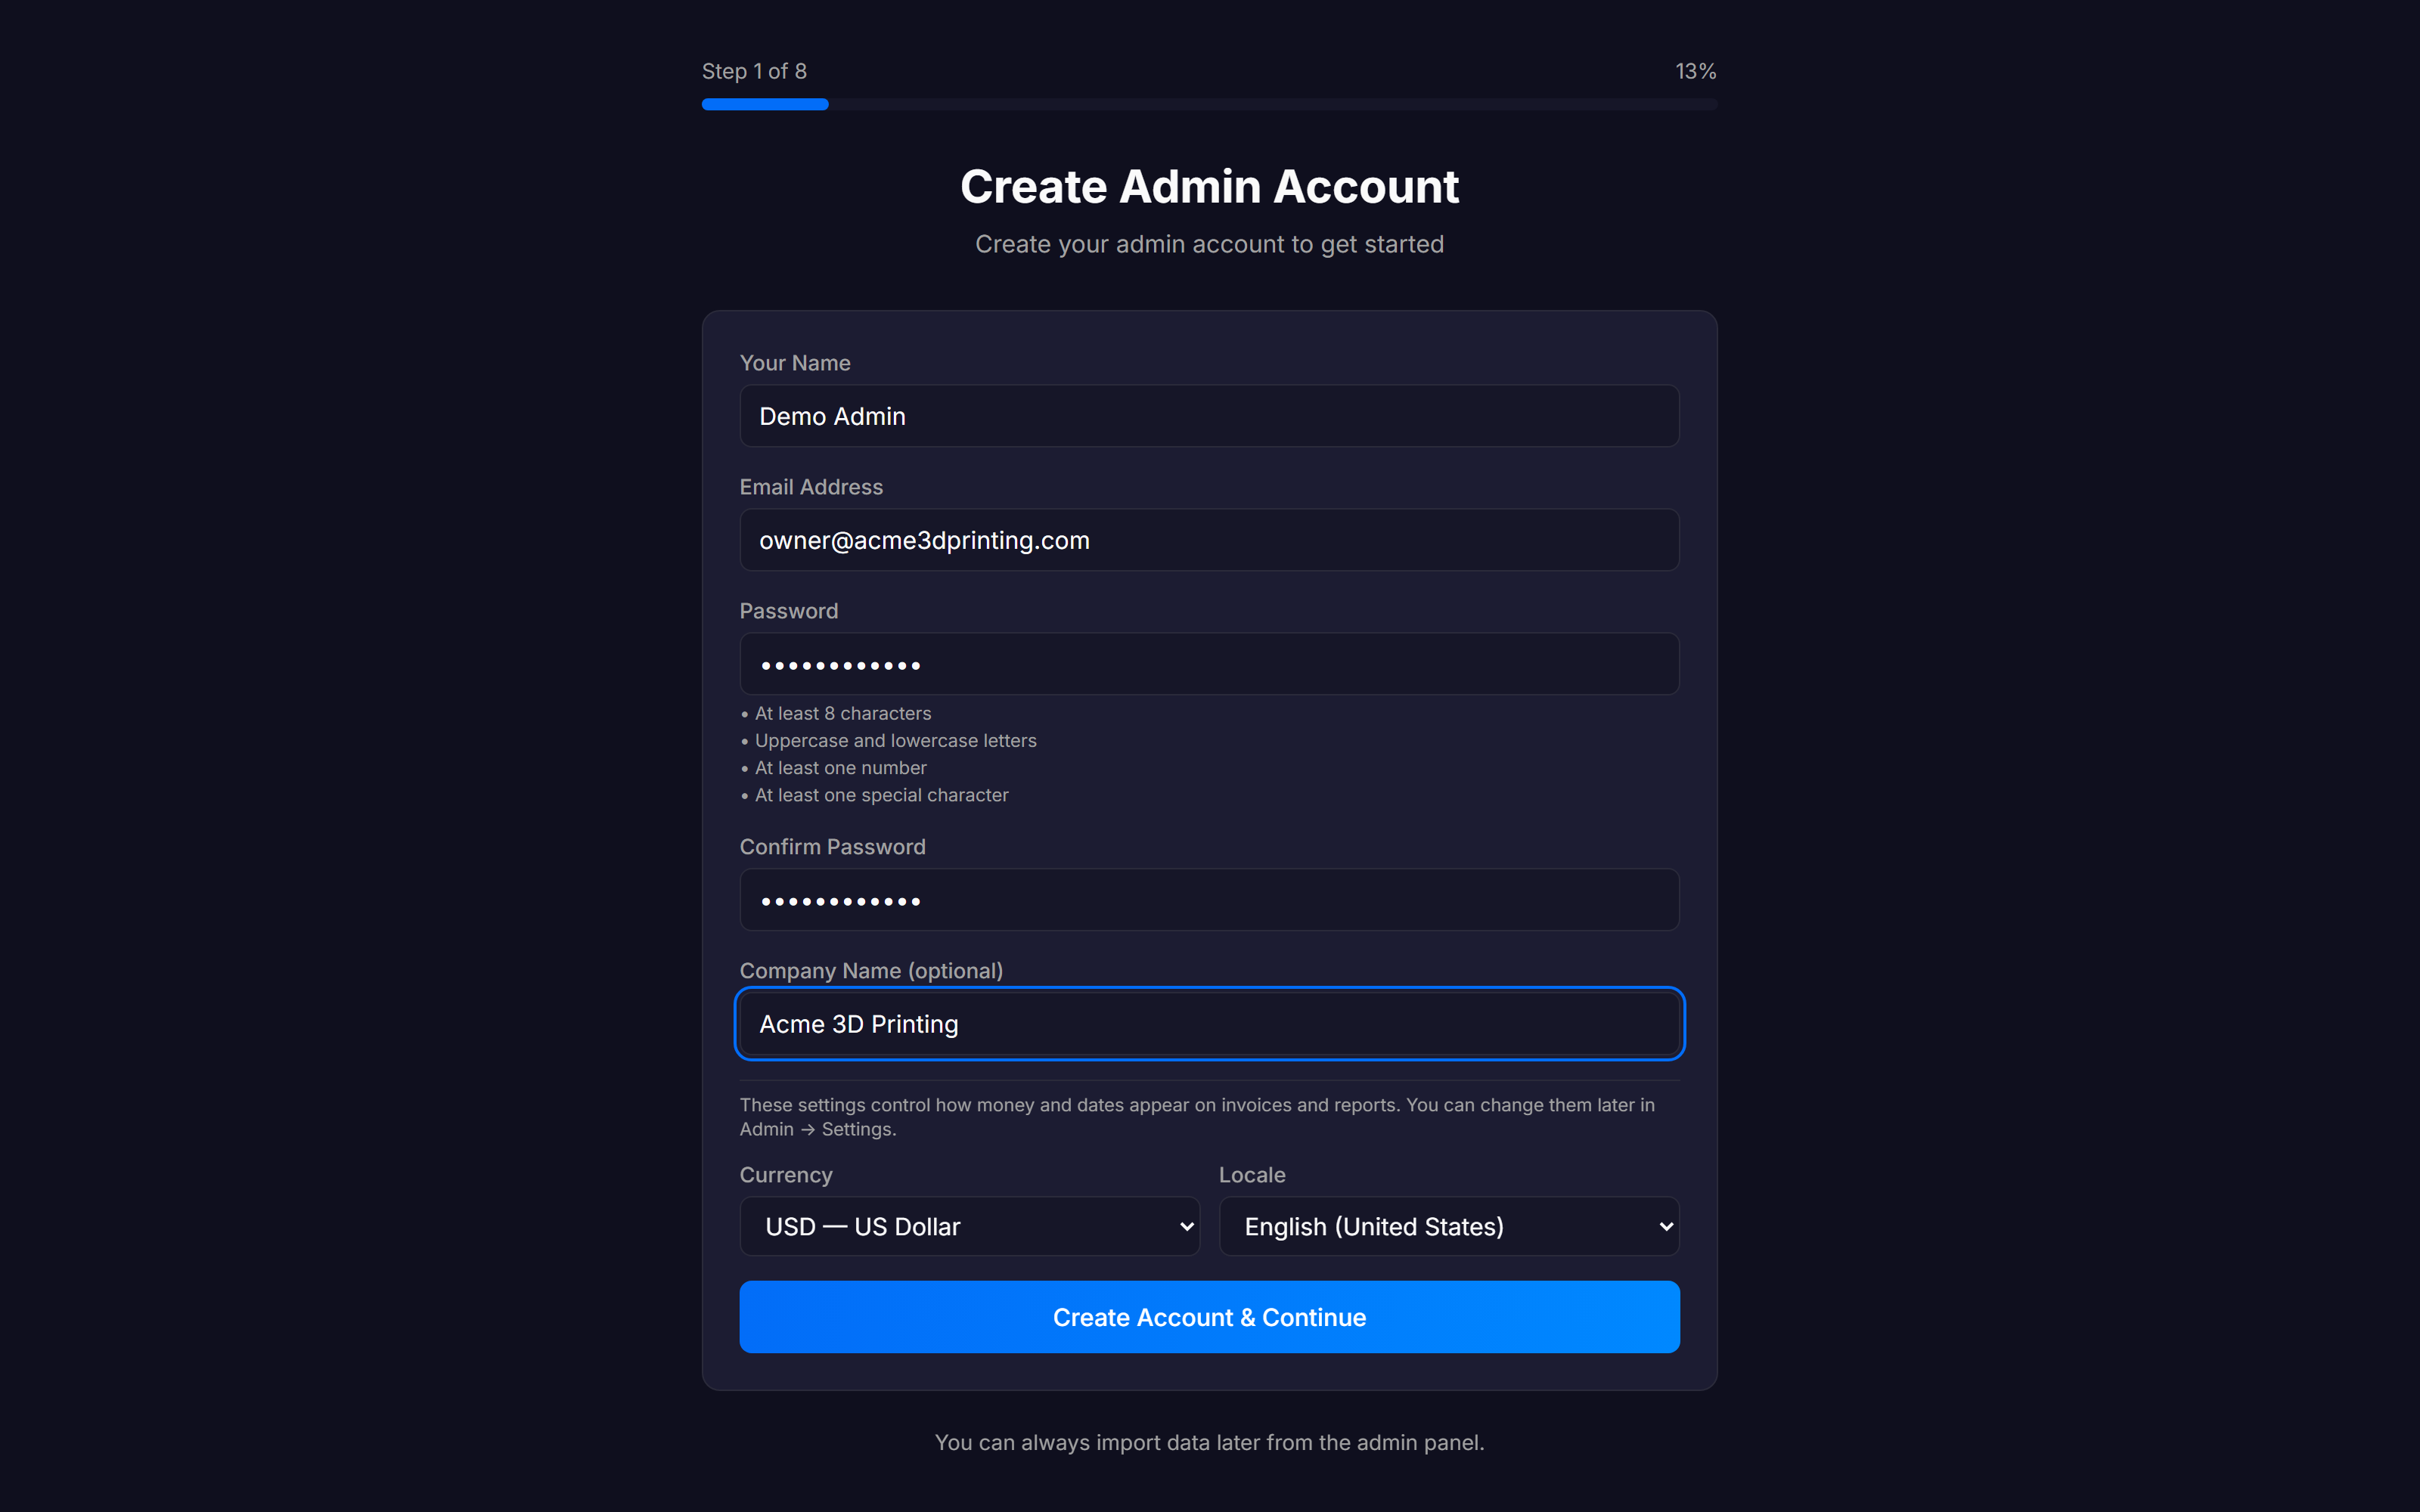
Open http://localhost in your browser. On a fresh database FilaOps redirects you to the Onboarding Wizard at /onboarding.
You can also check the backend health endpoint directly:
A healthy response looks like:
Option B — Manual (bare metal)
Use this path for local development or when you cannot run Docker.
Step 1: Clone the repository
Step 2: Create the database
Step 3: Configure the backend
Edit backend/.env. At minimum set your database credentials and a secret key:
# Use individual variables (recommended):
DB_HOST=localhost
DB_PORT=5432
DB_NAME=filaops
DB_USER=postgres
DB_PASSWORD=your_actual_password

# OR a full connection URL (overrides the individual variables above):
# DATABASE_URL=postgresql+psycopg://postgres:your_actual_password@localhost:5432/filaops

# Required — generate with: openssl rand -hex 32
SECRET_KEY=<your-generated-key>

# Token lifetime (default: 30 minutes)
ACCESS_TOKEN_EXPIRE_MINUTES=30

# Origins the browser is allowed to contact the API from
ALLOWED_ORIGINS=http://localhost:5173,http://localhost:3000
FRONTEND_URL=http://localhost:5173
Driver name in the connection URL
The connection URL must use the postgresql+psycopg:// scheme (psycopg3), not postgresql+psycopg2://. The old driver name will cause an import error at startup.
Step 4: Install backend dependencies
# From the backend/ directory:
python -m venv venv

# Activate the virtual environment
# Windows:
.\venv\Scripts\Activate
# Linux / macOS:
source venv/bin/activate

pip install -r requirements.txt
Step 5: Run database migrations
You should see a series of lines ending with the current head revision. The final line looks like:
If alembic reports a mismatch
Can't locate revision usually means a database from a different version of FilaOps is present. Drop and recreate the database, then re-run alembic upgrade head.
Step 6: Start the backend
Expected output:
INFO:     Uvicorn running on http://127.0.0.1:8000 (Press CTRL+C to quit)
INFO:     Application startup complete.
Step 7: Install frontend dependencies and start the dev server
Open a second terminal:
Expected output:
Step 8: Verify
Open http://localhost:5173 in your browser. On a fresh database FilaOps redirects to the Onboarding Wizard.
Checklist:
- [ ] Backend responds at
http://127.0.0.1:8000/healthwith"status": "healthy" - [ ] Frontend loads at
http://localhost:5173 - [ ] No database errors in the backend terminal
- [ ] The Onboarding Wizard appears at
/onboarding
The Onboarding Wizard
The first time FilaOps detects zero users in the database, every visit redirects to /onboarding. The wizard walks you through eight steps — all optional except Step 1:
| Step | Title | Required? |
|---|---|---|
| 1 | Create Admin Account | Yes |
| 2 | Load Example Data | Optional (recommended) |
| 3 | Import Products (CSV) | Optional |
| 4 | Import Customers (CSV) | Optional |
| 5 | Import Orders (CSV) | Optional |
| 6 | Import Inventory (CSV) | Optional |
| 7 | Connect Your First Printer | Optional |
| 8 | Complete | — |
Step 1 — Create Admin Account
Fill in the following fields:
- Your Name — first and last name; displayed in the UI
- Email Address — used to log in; must be a valid email format
- Password — must satisfy all four requirements shown on screen:
- At least 8 characters
- At least one uppercase letter
- At least one lowercase letter
- At least one number
- At least one special character (e.g.
!@#$%^&*)
- Confirm Password
- Company Name (optional) — saved to company settings immediately; editable later in Admin → Settings
- Currency — controls how amounts appear on invoices and reports (e.g. USD, EUR, GBP). Editable later in Admin → Settings
- Locale — controls date and number formatting (e.g.
en-US,en-GB,fr-FR). Editable later in Admin → Settings
Click Create Account & Continue. FilaOps creates the admin user, saves your currency and locale to company settings, and advances to Step 2. You are logged in automatically.
The wizard appears only once
Once the first admin account exists, /api/v1/setup/status returns needs_setup: false and the onboarding route redirects every visitor to /admin/login. There is no way to re-run the wizard without resetting the database.
Step 2 — Load Example Data (recommended)
FilaOps can seed your database with a starter dataset built around BambuLab materials:
- 18 material types — PLA Basic, PLA Matte, PLA Silk, PETG, ABS, ASA, TPU, PA-CF, PC, and more
- 15 colors — Black, White, Gray, Red, Blue, Green, Yellow, Orange, Purple, Pink, Brown, Gold, Silver, Clear
- 24 material + color SKUs — pre-linked combinations, all starting at 0 on-hand; update quantities to start using them
- Example catalog items — covering packaging, hardware, and finished goods categories
Check Yes, load example data (recommended) and click Load Example Data, or uncheck it and click Skip This Step to start with an empty catalog.
Skipping seed data
If you skip, you can still add materials manually. When creating a material, use the "+ Create new color for this material" link in the material form to add colors on demand.
Steps 3–6 — CSV Imports (optional)
Each step accepts a CSV file. If you have no file ready, click Skip This Step to continue. All of these imports are also available after setup from the relevant admin pages.
| Step | Admin page | Required CSV columns |
|---|---|---|
| Products | Admin → Items | SKU, Name, Description, Item Type, Unit, Standard Cost, Selling Price |
| Customers | Admin → Customers | Email, First Name, Last Name, Company, Phone, Address fields |
| Orders | Admin → Orders | Order ID, Customer Email, Product SKU, Quantity |
| Inventory | Admin → Inventory | SKU, Location, Quantity |
For the Orders step, select your Order Source from the dropdown before uploading: Manual / Generic, Squarespace, WooCommerce, Etsy, or TikTok Shop.
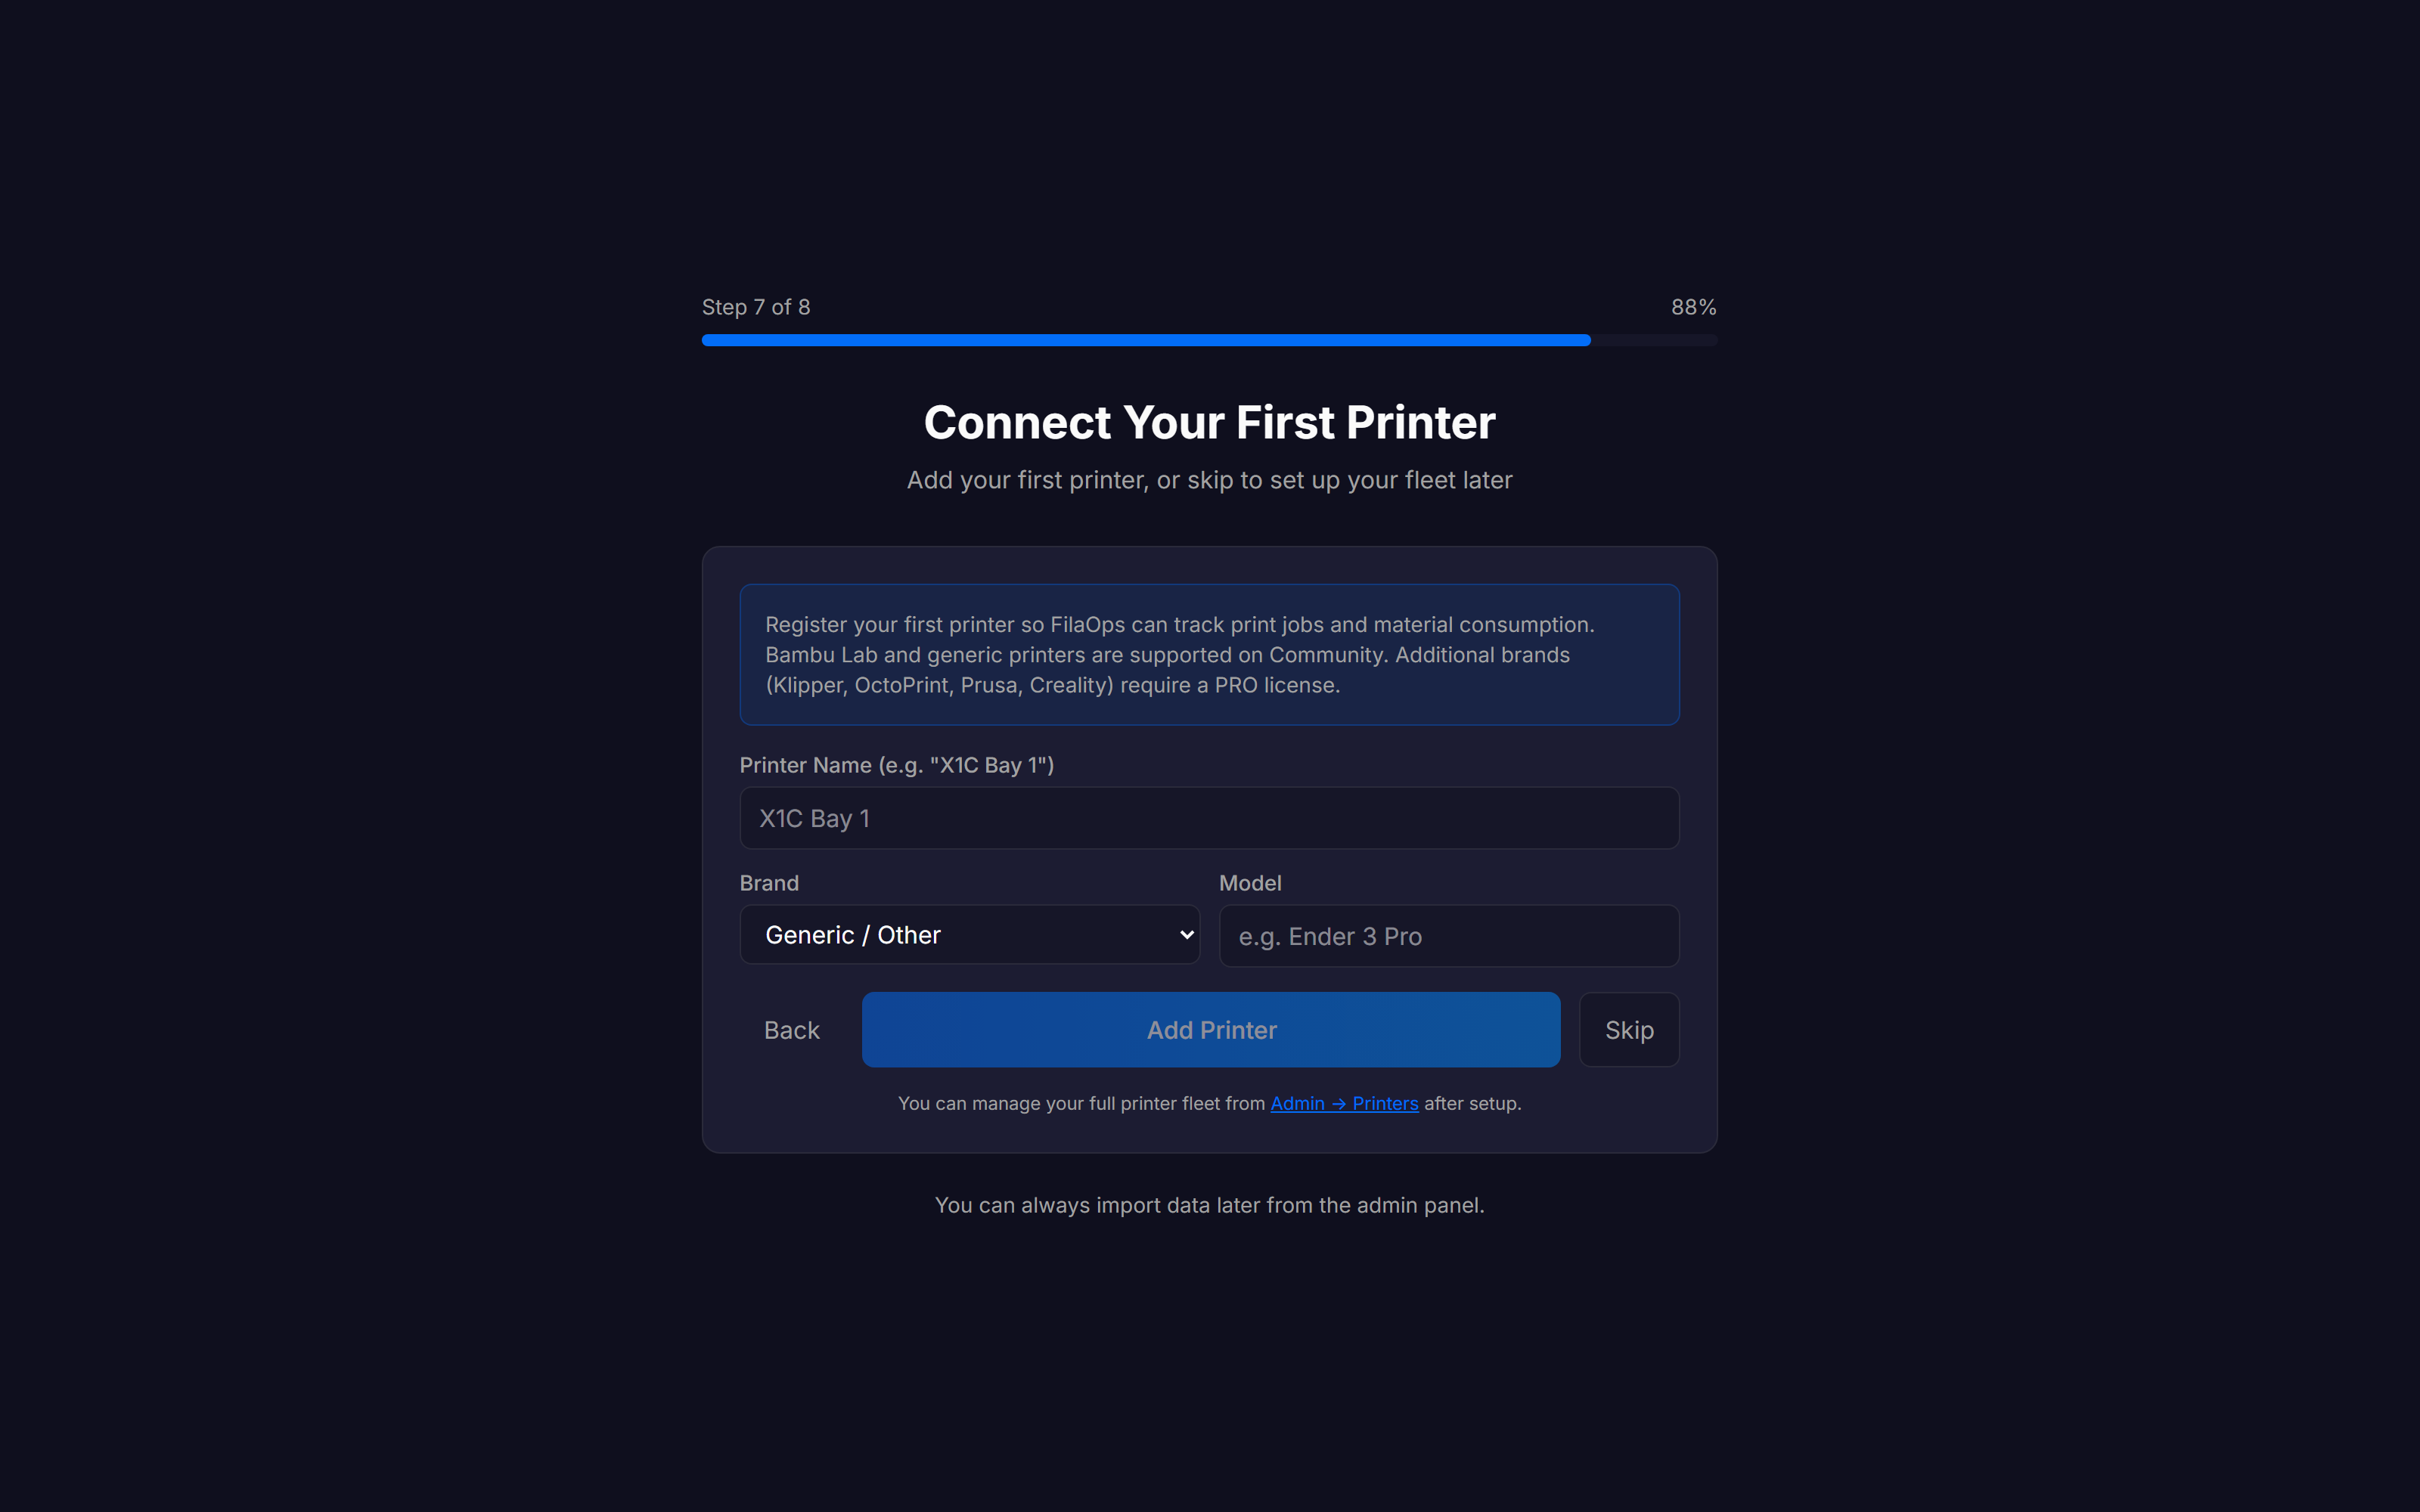
Step 7 — Connect Your First Printer (optional)
Register a printer so FilaOps can track print jobs and material consumption. On Community edition, Bambu Lab and Generic / Other brands are available. Additional brands (Klipper, OctoPrint, Prusa, Creality) require a PRO license and can be added later from Operations > Printers.
Fill in:
- Printer Name — a display label, e.g. "X1C Bay 1"
- Brand — Bambu Lab or Generic / Other
- Model — for Bambu Lab, choose from the dropdown (X1 Carbon, X1E, P1S, P1P, A1, A1 mini); for Generic, type the model name
Click Add Printer, or click Skip to add printers later.
Step 8 — Complete
Click Go to Dashboard to enter the Command Center. Setup is complete.
Development vs. Production
This guide covers getting FilaOps running. For a hardened deployment with HTTPS, a reverse proxy, and backups, see the Deployment Guide.
Key differences when setting ENVIRONMENT=production:
- The Swagger UI (
/docs,/redoc,/openapi.json) is disabled to prevent API schema exposure. Strict-Transport-Securityheaders are added to every response (HSTS).COOKIE_SECURE=truemust be set — auth cookies require HTTPS.- Startup refuses to boot if
SECRET_KEYorDB_PASSWORDare set to any known placeholder value (e.g.changeme,change-in-production).
Troubleshooting
"Cannot connect to server" in the wizard
The Onboarding Wizard displays this message if it cannot reach the backend at /api/v1/setup/status. Check:
- The backend container or uvicorn process is running.
ALLOWED_ORIGINSin.envincludes the origin your browser is using.- No firewall rules block port 8000 (manual) or port 80 (Docker).
Migration mismatch error on Docker
If the migrate container exits with a DATABASE MIGRATION MISMATCH DETECTED banner, your database volume was created by a different version of FilaOps:
This deletes all data
Removing filaops_pgdata permanently deletes your database. Export any data you need before running this command.
"Secret key is a placeholder" startup error
SECRET_KEY must be a randomly generated value. The application logs a clear error and refuses to start if a known placeholder is detected. Fix it:
echo "SECRET_KEY=$(openssl rand -hex 32)" >> .env
docker compose restart backend   # Docker
# or restart uvicorn for manual installs
Frontend cannot reach the backend
For manual installs, the frontend reads the API URL from VITE_API_URL at build time. The development server defaults to http://localhost:8000. If you access FilaOps from another machine, set VITE_API_URL before starting the dev server (or rebuilding for production):
Also ensure the frontend's origin is listed in ALLOWED_ORIGINS in backend/.env.
PostgreSQL port conflict (Docker)
If port 5432 is already used by a local PostgreSQL instance, either stop the local service before running docker compose up -d, or remap the host port in docker-compose.yml:
Quick Reference
| Task | Command / URL |
|---|---|
| Start (Docker) | docker compose up -d |
| Stop (Docker) | docker compose down |
| View logs (Docker) | docker compose logs -f backend |
| Start backend (manual) | cd backend && uvicorn app.main:app --reload |
| Start frontend (manual) | cd frontend && npm run dev |
| Run migrations (manual) | cd backend && alembic upgrade head |
| Health check | http://localhost:8000/health |
| Application (Docker) | http://localhost |
| Application (manual dev) | http://localhost:5173 |
| Onboarding wizard | /onboarding (auto-redirect on fresh install) |
| Sign in (after setup) | /admin/login |